-
#30 by 65imp on 14 May, 2010 17:58
-
While this is a bit boring I might as well throw it in. After all the main wiring I still needed my thick power and ground cables. I had mounted the battery, so I started with the power cable which I kept high and near the firewall until it got near the block. Then I dropped it down behind the starter to the positive terminal on the starter. I used that terminal for a junction post for the power line up to the alternator. I ran that line around the oil pan, to the front of the block, up under the main pulley, and around to the alternator. The alternator terminal was a junction post for the last power wire up to the fuse/relay box distribution center.
So the + routing goes:
Battery + terminal ----starter + terminal----alternator----fuse box power.
For the ground I wanted to have good continuity so I was pretty redundant. I ran all these behind the block near the firewall so they aren't too visible.
Battery ? terminal---- passenger frame rail---- passenger side head ----block----driver side head at ls1 harness grounding point ---- firewall.
All the contacts were cleaned down to bare metal. To protect the integrity of the connections I used this stuff the guys at the electronics place recommended. D5 was used first. It is a contact cleaner to improve the connections. Then the S5 was applied, which is a sealant/protectant to minimize corrosion.

-
#31 by 65imp on 14 May, 2010 17:58
-
Actually I did all this a while ago, but just remembered I had not listed it.
Fuel System:
After reading about how Hyperion had run a bit lean with his old fuel pump, and the really nice solution that Sabre002 had done, I decided better safe than sorry. I pulled my supra pump, and ordered the parts Sabre had come up with.
Here is my original nasty fuel setup done by the previous owner:
The braided steel line in the foreground feeds to the regulator feed side, and the return line is the braided nylon line hose clamped on. In the background you can see the aeromotive Fuel pressure regulator, and it feeds into the aeromotive fuel filter. I decided to keep what I had from the regulator on, but change the in-tank setup, the feed line, and the return line.
Old one out:
In this picture you can see how the filter boot had slowly dissolved over time. I had left a bunch of Toluene in the tank back from that test drive I took around the block years ago. Over time it thrashed the boot, though the pump is still functioning well in Danzan?s car.
Old one disassembled.
New Bosch 044 pump on right compared to Supra pump on left.
After a ton of work bending lines, flaring them, etc.
I had upgraded to the 95+ fuel tank and got the factory sump cover a while back, but Hyperion had come up with a much better setup which I wanted to take advantage of.
Here it is after assembly and trimming for the 044 pump:
And the final shot of my fuel system before install:
The real bummer is that all this nice stuff is invisible now that it is done. My hope is that the time and $ investment will pay of in reliability and functionality over time.
-
#32 by 65imp on 14 May, 2010 17:58
-
Quote from: mr_will;588248
This has been one of the better builds that I have seen/read on any board.
Will,
It takes a ton of work to write up alot of this info, especially after I have already spent all the time working on the car! Sometimes i wonder if anyone is reading it.
As a question to anyone reading this thread:
I am at the stage where I am filling the car with fluids in preparation to try and start her up. Some I have already decided on; Evans coolant since that is what Darton recommends for their sleeved blocks. DPI recommends the royal purple diff fluid plus their additive, so I got that covered as well.
Any suggestions on break-in engine oil? A friend's dad works for Torco, and swears by the stuff, especially for break-in.
Also I am looking into tranny fluids. I know Joel had insane heat with the GM Synchromesh. I have read some info about a lot of transmission shops recommending motor oil. Any thoughts?
-
#33 by 65imp on 14 May, 2010 17:59
-
Quote from: Brismo7;589518
a couple pics from tontie


and a couple less serious pics:
Mike and Joel(Frijolee)


And incase you were wondering about proctection. Mike has the house covered with Lion hunting dogs:

hahaha. I've had nightmares of this dog. LITERALLY!!
haha, love ya mike! -
#34 by 65imp on 14 May, 2010 18:00
-
In response to a question about the gauge cluster carbon fiber look
It is wrapped in 3M Dinoc. The rest of my interior is wrapped in it as well. I also have several yards of neffywrap material that would work. I has a guy do the wrapping who had done his interior first, so he had some experience with it. He preferred working with the 3m product, as it has adhesive on it. The neffywrap requires spray adhesive. IIRC I paid $500 for it to be done. I considered doing it myself, but justified the cost since I can avoid the learninng curve by having it done and it frees up my time for other tasks. It turned out very killer, I'll post more pix after I finish the last little wiring bits, and install everything. -
#35 by 65imp on 14 May, 2010 18:00
-
Quote from: smileyman345;589632
please post pictures of how you integrated the aftermarket gauges into your stock cluster while still retaining the fuel level gauge. pleeeeeeaaaaassssseeeeeee, lol.
I will write all that info up with pix, but it was a real ordeal. I basically had to hog out the entire innards of the cluster behind the defi gauges, then I also had to shave the front of the cluster for the faces and needles to fit. I still have not installed it to see if it all works, but I am crossing my fingers.Quote from: digitalsolo;589654Thanks for the info on the DiNoc; I've been eyeing that for a couple weeks to wrap my cluster in (just the flat back actually, so it should be easy). Glad to hear it works and looks good from someone, first hand.
Steve and I were looking at it, and I think it would be much more straightforward to use it on the FC interior rather than the FD stuff. Far fewer compound curves with the FC stuff.
-
#36 by 65imp on 14 May, 2010 18:01
-
Quote from: justin samberg;590642
Hey Mike, I see the hand made wide body flares in one of your pictures. Do you have any more? You showed me them in person. They looked really nice. It would be cool if you showed us some pictures of the installation. I looked through your thread and couldn't find any.
Here are a couple notes on the fender install Justin:
Fenders:
I have posted my intention to run custom Pettit-style fenders hand formed in metal. I wanted to do metal because my research led me to believe that it was the only way to ensure no cracking in the fenders over time if I smoothed them to the body.
(what I started with)
After a year or so :rant2: a fabricator pal I know got around to making them for me. I picked them up and did some test fitting, then returned them for some adjustment around the time of seven(not)stock 2009. I then picked up my original pettit fiberglass fenders to give to another forum member at sevenstock since shipping them was a PIA. This fact is only of interest since my fabricator had to then make my gas-lid cutout from measurements and pictures only, rather than the original pettit fenders. When I got the completed fenders home, they had a good fit overall, but the gas lid cutout overlapped the fill hole by about an inch on the forward side. At this point I had a couple options:
1. Take the fenders back to my guy, have him re-do the hole.
2. Use a different fuel door that is not as massive as the FD's 6" monster.
3. Say "F-it" and smooth the whole thing over, relocating the fuel fill elsewhere.
I figured if I wanted to go with plan 1 I would just do it myself to save time. While researching options 2 & 3 I decided that I should get started on the darn things, and weld the fenders up to the body. But first I had to begin the carnage by chopping out the wheel-well. This was one of those moments where I paused and said, "Self, you have a great looking, nicely painted car right here, and you are about to thrash the crap out of it. Are you sure you want to do this?" Well this post would be really short if I had backed out at that point.
I started by making a smooth arch above the top of the wheelwell where a wider tire would contact.
Then I carefully cut the exterior sheetmetal, and the fender lip.

This left an exposed gap between the two. (You can also see the closed cell foam in there where it spilled out of the chassis when i was blindly filling the frame rails)This gap needed to be sealed to keep water from getting up in there and causing rust problems down the road. So out came the tool I have wanted to use on this car for a while now: THE BFH!
My thought was to pound upward on the fender lining metal to bring it up flush to the arch I had cut away. At first it did not seem like it would work, but with more pounding in multiple upward directions on the metal it formed up pretty nicely. It is neat how elastic metal sheet actually is. Here you can see the beginning of felding up the gap, and how much smaller it got with the hammering:
Now I had to seal it up, and I got my first practice welding a notably large stretch of sheetmetal.
Not pretty, but it won't be seen and it sealed up for the most part. Also i got my welder dialed in a bit better, and got much needed practice with welding thin sheet.
Now I was ready to mount the fenders. But first more carnage, as I had to remove the swath of paint around where the fenders would mount. First I mounted and measured the fenders so as to maintain symmetry on the driver and passenger side fenders. First I measured the same height from the ground to the wheel arch, and then the distance to fore and aft landmarks on the body. Then I scored the outline of the fender on the body with a knife, and brought out the sander for ~3" swath in the paint along the fit line. All this sanding was great at making a huge mess of the garage in the process. Then I returned the fenders to their previous locations. I clamped them in place, and braced them in the correct position to match the scribe line I had made previously.

I got out the welder and put a couple spot welds on them to hold them in place. After double and triple checking the measurements I ran a series of spot welds along the entire mounting surface.
Now it was starting to look really cool, and I was improving with my sheet metal welding, so I started with some ~1" sections of weld in one area, then jumping to a different area on the fender for another 1" section. I did this to keep down the heat that I had read will warp the body panels. Those sections grew to ~1.5-2 inches as I went since the starting and stopping is tougher than just running the bead. I got practice welding up, down, sideways, and upside down (under the bottom of the body) It looked like everything was going well, and the only thing I had to worry about was the fires internally that would break out when the foam lit up from the welding heat. It would generally burn itself out, but I had a spray bottle and a fire extinguisher ready at all times. I could only imagine torching the thing after all the work I have done till this point! :eek3:
Eventually I got it all sealed up, but as the metal cooled it warped the flat portion of the sheetmetal at the top and wrinkled it a bit. I was a little pissed, but I later spoke with my fabricator buddy, and he said that it is often impossible to not warp flat sections of sheetmetal when welding. So I don't feel too bad about it.

After I did the passenger side I went over to the driver side, and did the same. This time I stuck to 1" max on a single bead, in an effort to not wrinkle the sheetmetal. I still got a bit in the same relative area, but not as bad as on the passenger side.

In the end the welds on the driver side looked a lot better, as I got more practice. The final result was pretty sweet!
Now I really had to decide on a solution to the gas cap thing. I had come to the conclusion that wayyy too much of my custom fenders had to be cut away to use the stock fill location and lid as is. So I focused on option 2 and 3. For option 2 it seems a couple FD guys had replaced the stock fill lid with the original audi tt fuel fill lid a couple years back. It apparently had identical curves to the FD in the fuel fill area, and was a relatively simple matter to install. Also the fill lid was reduced to only about 4.5" so I could keep my fenders looking as they were. While I did not like the look of the lid, i figured I could just smooth over the visible bolt holes in the audi lid surround, and just have the look of the smaller fuel door. So I found one on eBay. When I went to fit it I found that it is made of aluminum, and not stainless like I thought. That made welding it a no-go. Also it retains the hinge location for the fill door (fore side) which means the door has to swing into the fender, so more clearance would be needed. Also I would need to do some custom cabling, etc in order to get it to work. If I wanted to stick with option #2 it would be a bunch of time. But I had found another option...
I remembered a pretty wicked option I had seen, and went back to the rx7 club to look it up. It was our very own czwalga00gt's thread about his Pettit fender install and the custom fill relocation he did. It too would be a ton of work, but in the end it was pretty damn slick. I sent him a PM to see how he liked it, but never got any feedback. After about a week I decided I would go for it, the final verdict was Option #3. By saying F-it I went from a big mess, into an even bigger mess.
BTW Anyone want an Audi TT fuel fill door?
First I cut the access hole into the cabin for the fuel fill hose with a hole saw.
Then I made a plate to keep water from the fender area from spraying up into the old fill location, and welded it on.
(I later had to enlarge it for a different grommet)
First I cut out my patch panel for the fill door, tried to replicate the curve of the body, and welded it into place. Then I made the small piece to complete the fender, and welded it up:


Now I was pretty much done with the welding. But the grinding needed to be done. I wanted to grind down my welds so the guys that do the body work need only a minimal amount of filler, and don't charge me for the grinding. It was a major PIA. My forearms hurt just thinking about it! I must have spent 2 days with ~6 hours a day grinding those welds down. Eventually it was done, and my garage looked like a real fab shop with metal shavings in piles on the floor. (BTW that is how I got my avatar pic, I call it finger tracing in metal shavings )
)

Now I could get them primed, and protected. My initial plan was to use the POR-15 I had and spray it with a refillable spray can I got at Harbor Freight. The spray can turned out to be a POS, and I had to toss it and the POR-15. I just went with Duplicolor primer, and sealer instead.

All that was left was to seal up the underside with some liner panels I had made up of sheet metal previously. They were riveted into place, and then sealed with body seam sealer:

Back on the fuel fill front there was work to be done. I had found and ordered the special fill caps that czwalga00gt used on his build, so I could take measurements and plan how I would make this work. I wanted the cap to sit flush under the plastic trim panel, so I measured everything several times, then cut a 3" spacer pipe to offset the fuel fill below the metal surface. Then I used a 3" hole saw to cut the hole under the trim where I would re-locate the fill.

The spacer piece was then slid inside the hole until flush with the mounting surface.
Then I welded the ridge around the top.
I wanted the fill neck to be a separate bolt in piece in case I needed to service it in the future. So I made the necessary trimming to the original mounting flange, and torched on 3 flange nuts for mounting:
Then I drilled 3 holes for the stainless mounting hardware.
For better routing and clearance I got a 90 degree elbow welded on in a clocked position to allow better routing of the fill hose.
Then I painted it and cleaned it up and tried the install. After a lot of problems with sealing grommets, and fuel safe hoses I got a reasonable result.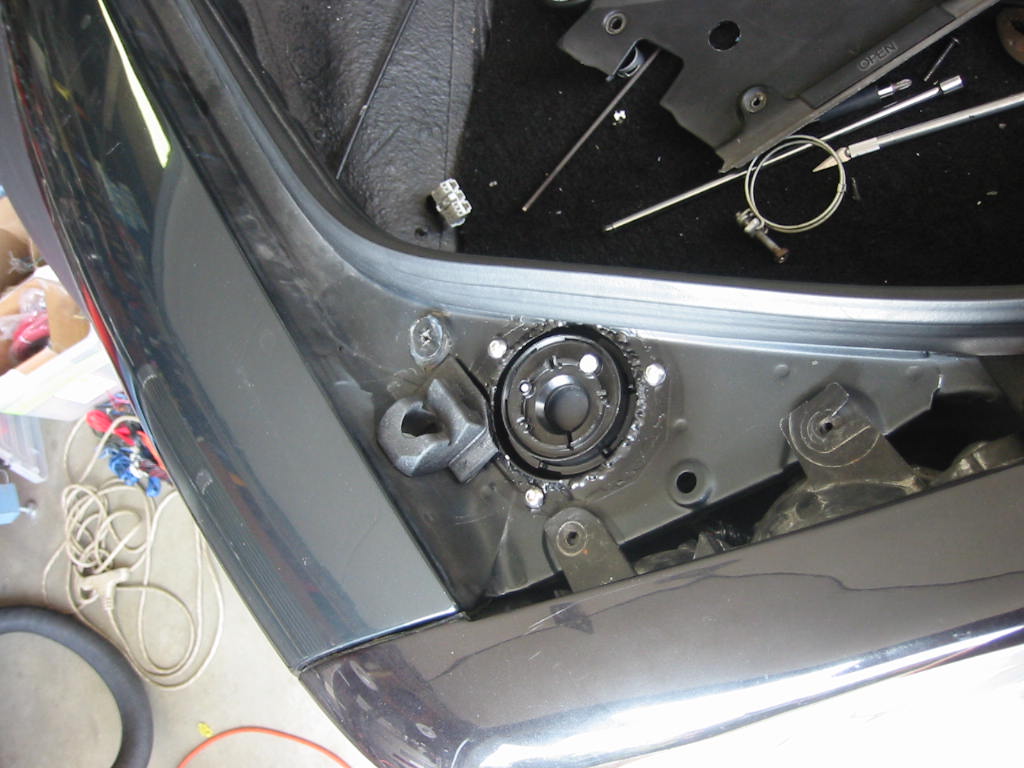
I still have to test the fuel fill, and see the fit of the wheels and tires, but the hard work is done.
Here endith the fender saga.
-
#37 by 65imp on 14 May, 2010 18:01
-
Quote from: smileyman345;589632
please post pictures of how you integrated the aftermarket gauges into your stock cluster while still retaining the fuel level gauge. pleeeeeeaaaaassssseeeeeee, lol.
Don't worry, I have not forgotten your request. I'll get it out shortly.
Quote from: ruth'lessdet;590617This is a sick thread nice work.....how much did that oven run you if you don't mind??
Thanks man, I have a ways to go. This thread is good encouragement, as is seeing actua, visible progress lately. Pretty sure the oven ran me about $300, but picking it up was a real chore. Also making the support legs to place it where it was ran a decent chunk of $ too!
-
#38 by 65imp on 14 May, 2010 18:02
-
I had wanted to place high quality gauges in my cluster, and always planned on it being a "someday" project. I liked the look of the Defi Black face gauges, but the lighting doesn't usually match the rest of the FD gauge lighting. Changing FD gauge lighting is a bitch of a job, and I would rather not have to do it. But when I saw Dixon parting out his Defi gauges that matched the stock FD lighting I jumped on them. Defi only made them in matching amber colors a wile back, and they are no longer available. In the end I was pretty lucky to be able to pick them up. But the fact that I could not get replacements was a real source of stress while I performed the gauge swap. This pressure became more palpable as this project became more and more involved, as my projects with this car are wont to do.
I definitely used maxcoopers write-up for this project, as well as Danzan's and Danwrx. Originally I was going to do something similar to Danwrx, as it is much, MUCH easier. In the end I went with the Defi's because they were too nice not to use.
I started by pulling the cluster and disassembling it.
Then I measured for the gauges. It was readily apparent that much plastic surgery was needed:

Then I repeated the measuring and trimming until I realized I really needed to remove the Defi Gauge shrouds to get some much needed clearance. This requires the bending up of the sealing flange in order to disassemble the gauge. Then I could get the dimensions of what I really needed to keep if I wanted the gauges to fit.
On the right is what the gauges look like removed from the housing. On the left is after I wrapped one in the high temp silicone self adhesive tape I had leftover from my wiring harness. I did this to keep light from the gauges from bleeding into the surrounding cluster, and vice versa. This was followed by more measuring:
This sort of measuring was really time consuming and stressful because all three axis had to be considered, and the gauges are round, so the reference points are difficult to nail down. That coupled with the fit being so tight that millimeters mattered.
All the plastic that supported the factory gauges had to be removed. Then the surface in the back of the housing had to be relatively smooth. This was because I decided I wanted to keep the Defi mounting bosses and secure them through the back of the plastic Mazda housing. You can see in the picture above the tiny screws and washers that I used to affix them. So I had to drill holes for them, and the multi-pin Defi wiring connectors.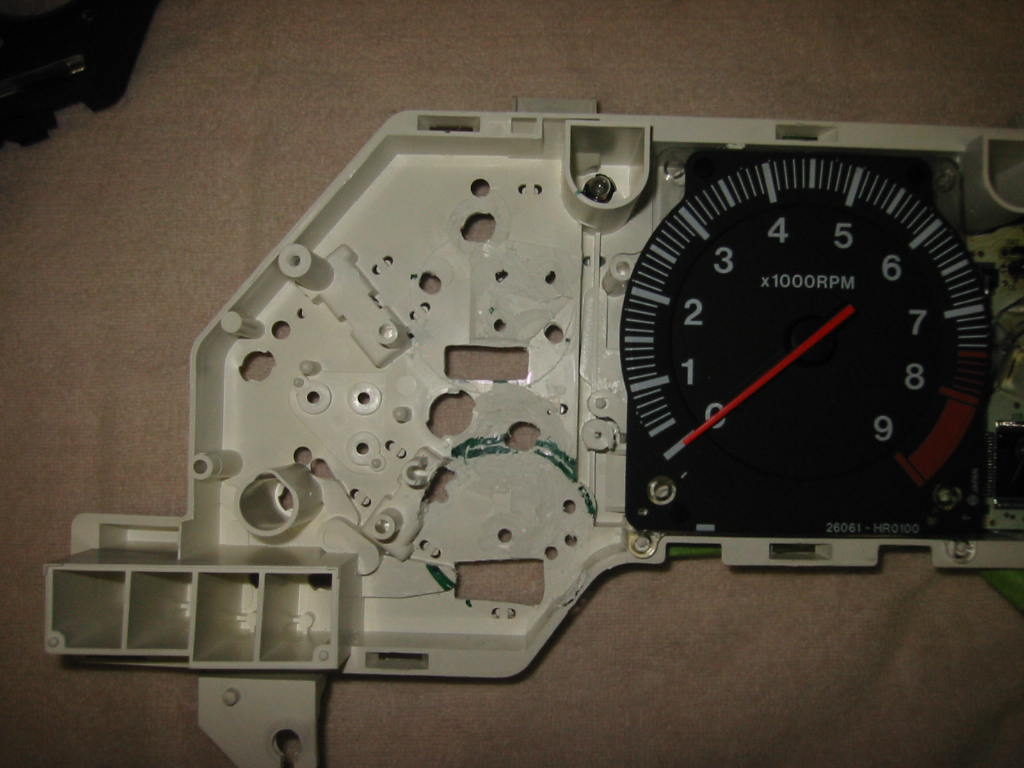
If you look at the 10 oclock position of the lower gauge in the picture above you can see that there is a cutaway into the large plastic hump. This was because I found that in order to center the gauge face to the black mazda gauge face opening the gauge body impinged on a corner of that plastic hump. That hump is there as a relief for one of the factory cluster wiring connectors. I needed to chop into that connector and relocate 2 wires. Not something I wanted to do, but it was a necessity.
Also I realized once these metal fasteners were holding the gauges in that I ran the risk of them shorting or wearing on the flex circuit that hovered right over them. Once I determined the gauges were how I wanted them when finally mounted I smeared silicone over the heads to insulate them.
The overall depth of the gauges was going to be difficult to fit. Even with the plastic removed and smooth, the gauges were still a bit too deep. I really did not want to cut through the back of the housing, so that meant I needed to make clearance in the direction of the gauge face.
About this time I realized that the Defi gauge display face was larger by several millimeters than the black shroud on the Mazda cluster that lies between the gauge face and the clear plastic front cover. This meant that the Mazda gauge faces were ~5mm smaller IIRC. In order to allow my new gauges to fit I needed to enlarge the holes in the black plastic that allowed viewing the gauges. These holes are actually cones that are offset into a sloped surface. By moving it fractions of a mm up to add clearance for the gauge body it also enlarged the opening. To complicate matters I realized that the Defi gauge needle would only have ~1 mm of space before contacting the clear front cover that is mounted at an angle after I made this adjustment. Damn! :eek3:
Here is a picture showing the differences in offset that the gauges have when mounted, all this had to be accounted for when calculating what I was going to remove:
So I devised a plan which involved a Dremel router base, and some heavy breathing. In the end it worked out, but there was an extended ball sweating interval going on during this process for sure. I could have sworn I took pictures of the setup I devised, but I can?t seem to find them anywhere, Sorry bout that guys.
Here is a picture comparing a stock cluster (I picked up used as a backup) to the modified cluster. You can see the difference in the size of the gaugefaces quite well, and maybe get a better image of what was involved:
So eventually I got the gauges mechanically mounted, but the wiring needed addressing. I realized it would be damn near impossible to fish the Defi connectors up past the flex circuit, through the tiny holes I drilled, and into the gauges without bending any of the dainty little pins. I decided to chop off the Defi gauge ends, and create a jumper harness to add to the 4 that already go into the back of the cluster for ease when installing. I also ran jumper wires through this plug for my Accusump warning light (in the old ABS warning light hole) and some of my s2000 Starter button wiring.
When I was all done I installed the setup in the gauge cluster hood I had recovered in order to get to the point where Brismo7 took that picture. I just installed the cluster this week, and will add a picture here later. I have yet to see if the functionality is 100% but will know once I fire her up in the next month.
-
#39 by 65imp on 14 May, 2010 18:02
-
Quote from: Eat-Pez;591509
wait, wait, wait..... sheet metal fenders. hawtness... i've got pettit rears, and am planninng on making sheet front flares. think your buddy would make another set of rears?
Actually I mentioned that other guys may be interested, but he explicitly said he was not interested in doing another set of these. Sorry bout that Greg. On the other hand PM me before you go through all the effort on the front ones. I have a solution in progress.....
-
#40 by 65imp on 14 May, 2010 18:04
-
Quote from: Brismo7
Some Stuff got done today. I took some pictures of Mikes car. I'm labeling it "Car Art'


dan had a peice of food stuck to his tooth. I tried to tell him, but he didnt car. lol
andrewdruiz


-
#41 by FadedFD on 14 May, 2010 19:30
-
Such a great build! Would you be willing to do a gauge set up like that for forum memebers if they supplied the parts and paid?
-
#42 by 65imp on 14 May, 2010 20:04
-
Such a great build! Would you be willing to do a gauge set up like that for forum memebers if they supplied the parts and paid?
If you mean install the gauges into the cluster then the short answer is:
"no F*c%!n Way!"
I hate to be an ass, and I would bend over backwards for most anyone, you can ask the so cal guys. But that job was totally F'ed fo the following reasons:
- I think it is because the size of that generation of Defi Gauges leaves literally 1 mm or 2 max clearance to the front clear shield of the cluster.
- pretty much every item installed needs to go beyond the point of no return in order to do the install; meaning neither the cluster nor the gauges could be returned to their original useful state.
-Also there are several ways that the cluster could be damaged with a slight slip. I realized that and purchased an extra cluster just in case. The same is true for the gauges, and they can no longer be purchased in that color!
-Finally there was about a week of work in that cluster. No one in their right mind wants to pay enough for a job like that to make it worth doing.
As time goes on I have realized that the gauge cluster on any project vehicle is a notable undertaking. There is a bunch of $ involved, and a lot to think about in order to have the cluster meet your needs. -
#43 by FadedFD on 18 May, 2010 22:28
-
It never hurts to ask. I just figured sometimes when people do these things they become confident in the job and can replicate it pretty easily.
-
#44 by 65imp on 24 May, 2010 19:59
-
Been a long time since an update I know. Partially it has been a busy time at work, but mostly the progress has been pretty boring from a write up perspective. We have spent a lot of time, mostly troubleshooting and getting things to fit that look good on paper, but have issues in reality. These problems always take a bunch of time, and the final result of all your work is that things work like they were supposed to in the first place!
Here are a couple examples and my notes about them:
Catch Can mount
So I make the jump and get the hot ticket for catch-can setups. The Saikou Michi dual can setup. It shows up and I think ?finally something that will just bolt up!? Well that is what I get for thinking. It comes with a mounting bracket designed for the ls1 style heads, and the ls7 stuff is at a different angle, therefore it will mount crooked on my ls7 heads. So after some playing around I realize I can chop it up, flip it 180 degrees in the center, and then weld it back together.
That will put the can in the exact right spot?.
Well exactly the right spot, but rubbing against the head. So I welded on 2 thicker washers as spacers to get me about 1/8? away from the head. Then the whole thing needs to be powder coated. It is now mounted and looks great, but I need to get a picture.
Coolant hoses
A couple months back I started filling the fluids in the car in preparations for firing it. Since I have a Darton sleeved block I am required to use Evans coolant. I am confident I would likely be fine with a standard coolant, but Darton recommends Evans. So for that reason I pay a bunch more for coolant which theoretically runs at no pressure, and lasts forever. We shall see how accurate the claims are.
But back to filling up the car?. I fill it up about halfway, and things look good, but the next morning I have a stream of Evans running down my floor. Turns out my fancy AN-20 lines are leaking at the crimp. Crap!
So I take the hoses off, and run them down to my hydraulics shop where the guys tighten the crimp, and state that it should be better now. I don?t want another stream of maple syrup running under my car, so I devise a way of testing the darn lines:
What you see is a couple AN-20 bungs, one of which I tapped for an air line. I put a tee in that line so I could see what pressure I was able to build and hold in the line. Then I let it sit in a bucket of water for about an hour. No bubbles=good times. So I was able to final assemble the hoses once more.
Since each hose has several layers I thought I would post a picture of how I am doing them:
What you see is the AN-20 end with the proprietary connector for the I-core hose. Then on top of that is the crimped end. The pearly white hose is the I-core hose, followed by the standard heat shielding. Then on top of everything I went with black heat shrink so that my engine bay does not scream racecar to every LEO who takes a peek.
Exhaust
To mount my exhaust I ran into a couple issues. One of the first ones was that my exhaust heat shield was pretty borked. Since I removed the spare tire wheel well in the back of my car it affected the mounting for the heat shield. The other major mount in the front of the heatshield was torn almost in two. In my efforts to weld it up it only got worse, so I re-made the thing from some sheet I had laying around:
then I re-coated the heat shield since it was looking pretty dingy. Here it is after some chrome powdercoat:
Now I can finally mount my pretty titanium catback exhaust I posted about wayyyy back in the thread!
Wait, nope it won?t fit. Seems I lost one of the exhaust mounts when swapping to the cobra diff. So I found an old exhaust mount and re-made the hanger, then powdercoated it. (sorry no pix of that one). The problem I am now running into is that the Ti exhaust touches the crossmember for the Samberg subframe.
If I lower the exhaust any more it will sit way low in the front. But in order to have some clearance I either bash the exhaust pipe, or cut and clearance the diff crossmember. Neither of those options I am very fond of. Additionally I could sell the ti exhaust, and have something custom made up, but I want to keep the weight down as much as possible? I am open to your suggestions fellas.
oil adapter
When I went to hook up all my oil lines for the accusump/external filter/etc. I had wanted to maximize the clearance up near the pan since the headers are right near there. What I did was take a couple fittings I had laying around and create a custom fitting which spaces the rear oil inlet back into the block down enough to allow both the inlet and outlet to use 90 degree fittings right above one another. Here are a couple pictures of that little guy:

steering shaft
When I went to hook the rack up to the column I found I was about a ? inch from the coupler shaft fitting. In the past I had already cleaned and coated the shaft I was going to use, but I did have another one sitting around. Here is my solution:
Careful measuring, don?t want to mess this up. You can see I added more length than was necessary, as I wanted to have more range of adjustment with the final product. Now the linkage lines up in the middle of the adjustment range in case I need future adjustment.
Here I have marked the lines where I want to cut, and which side I plan to remove. I find that making it blatantly obvious is a good policy before all the fun with the angle grinder starts. This prevents the ?wait, hold on, which side was I supposed to?.. F*(%! Now WTF am I supposed to do!? moments.
After I cut the shafts I cleaned them up really nce, and put a bevel on the end. I added the bevel to increase the penetration of my little 120v welder. Even on it?s max setting I wanted to make this puppy strong. Also to maintain the shaft being true at the junction I tack welded it at 4 points before turning up the juice and final welding.
Sorry for the crappy picture, but it shows what the shaft looks like now that I welded, and smoothed it. I did powder coat it again, and it would be hard to tell that it was ever changed at all.
throttle cable mount
After installing my intake and 100mm throttle body I needed to get something made so I could use the cable on the ls7 intake manifold. One of those little issues with a amalgamation motor like mine. I knew I would be staring at it every time I opened the hood, so I didn?t want it to look half assed. It looks like there are a couple products made for this purpose, but there is no guarantee they fit every application. Considering my current track record for ?bolt-on? parts, I decided to skip the middleman and do it myself.
I had a nice piece of aluminum that I never used for my impala ls1 (automatic) swap. After looking at it funny for quite a while I decided to sacrifice it for this project.
chopping and marking the old?
finished cutting out.
After smoothing the round head of the bracket that will house the tb cable I wanted to bevel the cut edge to match the bevel that was manufactured into the rest of the aluminum piece. Out came the dremel router fixture, and a small carbide cutter.
I do have this piece finished and installed, and I am actually quite pleased with how it turned out. I?ll try to add a picture when I get the chance.
Dome light
Kinda a simple, stupid job here, but thought it worked out pretty nicely. I replaced all the stock lighting externally with LED?s. Inside the car I wanted the dome lights replaced as well. I had read that some of the later FD?s came with reflecting material behind the bulbs for the dome light. Light and vision is my business, so I thought that in order to get the most benefit from the LED lights I was upgrading to, I should make add some reflecting paint to the dome light housing.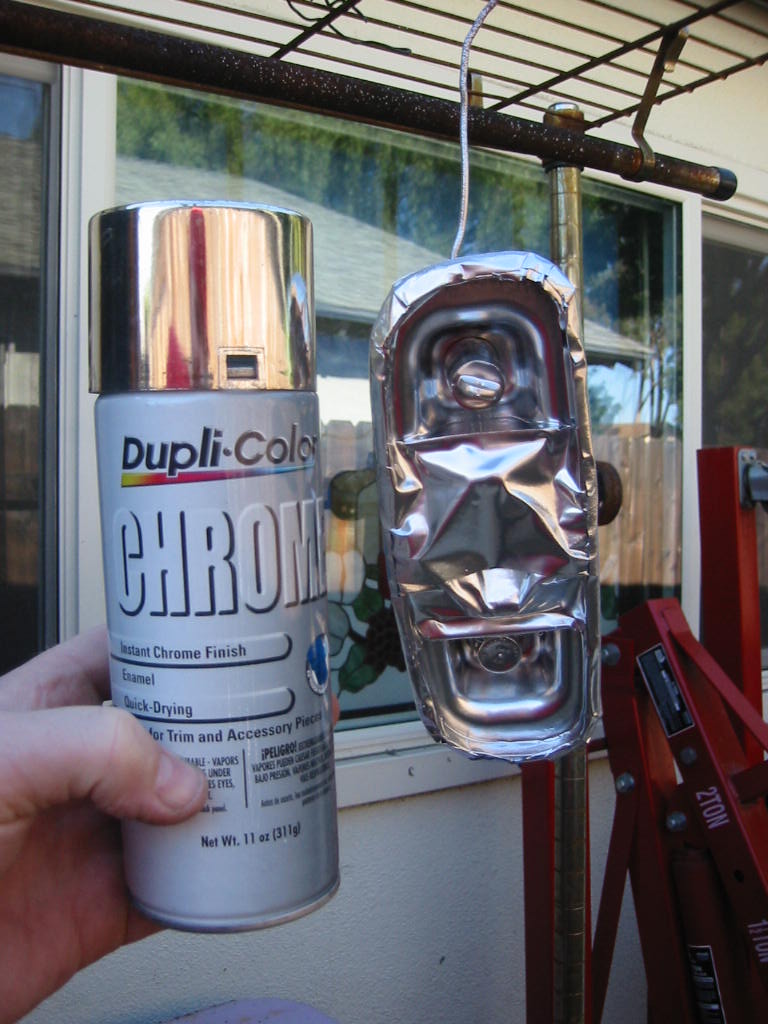
(finally a legit use for chrome spray paint)
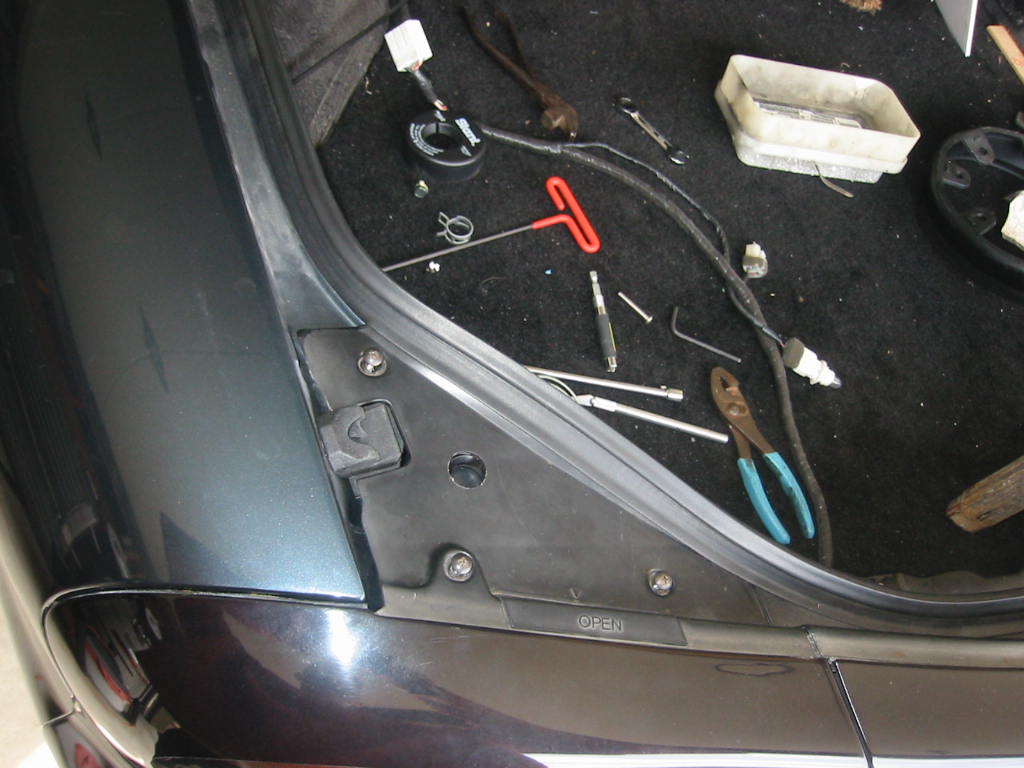
restoration
On the lighting note, check out this lens for the factory reverse lights:
That is not dirt, it is overspray, right over both light covers. So much for even having the darn things. I can?t begin to estimate how many hours I have in removing overspray, or replacing the rubber parts and trim that got coated in a matter of seconds?.
It is easy to plan to upgrade these cars but at this point they are close to 20 years old. Restoration is often in order before you can move up the food chain.