April 26, 2024, 01:25:02 PM

Author Topic: Cryptic's forged 427 LS3 Burnout FD  (Read 136634 times)

Offline clocker

Re: Cryptic's forged 427 LS3 Burnout FD
« Reply #75 on: August 22, 2010, 05:15:41 PM »
Quote from: Cryptic
I think that lip is there to make water drip over the seam.
^Hmm, that makes sense about the drip path. When you mentioned 3 pieces of metal meeting, I was thinking it was a critical part of how the pieces of the car were held together.
I seriously doubt it's a "drip rail" ( a lot of extra work for a dubious result) and would bet it's there for structural reasons.
The 90? bend on the two vertical pieces would add quite a bit of stiffness to the piece as a whole.
Whether you've seriously compromised the firewall is debatable, time will tell, I guess.

Offline Troux

Re: Cryptic's forged 427 LS3 Burnout FD
« Reply #76 on: August 22, 2010, 08:27:53 PM »
^Tom Servo avatar. Awesome.

I know a lot of people have tackled this lip modification before. Cryptic's approach seems to be the cleanest, but I never really questioned what it was there for until now.

Offline hardbodeez

Re: Cryptic's forged 427 LS3 Burnout FD
« Reply #77 on: August 22, 2010, 08:58:41 PM »

Whether you've seriously compromised the firewall is debatable, time will tell, I guess.

Lol.  No, you didn't "seriously compromise" the firewall.

Offline RTRx7

Re: Cryptic's forged 427 LS3 Burnout FD
« Reply #78 on: August 23, 2010, 12:39:51 AM »
Looks good!

Offline Cryptic

Re: Cryptic's forged 427 LS3 Burnout FD
« Reply #79 on: January 19, 2011, 03:24:26 PM »
reviving my near dead thread...

Enduring the cold winter months in WI with the help of a lot of propane and a 125,000 BTU heater, I'm finally getting some progress on my car.
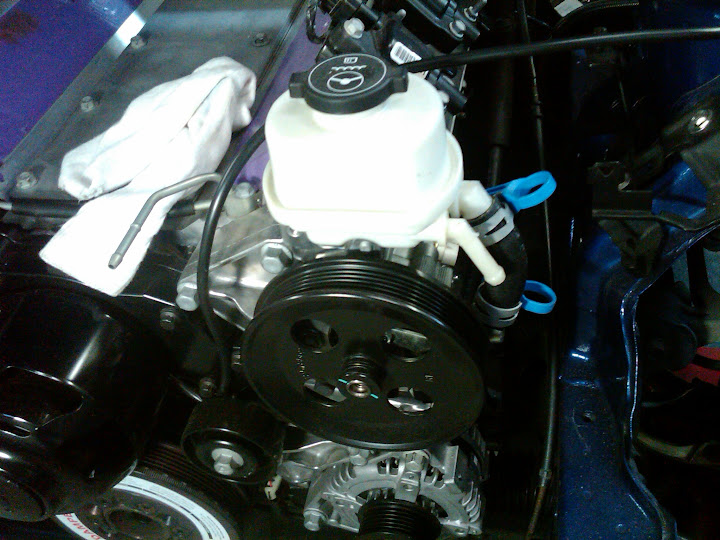
Power Steering

As mentioned before, the Power Steering pump from the Cadillac CTS-V kit (Part#: 19155066), there is a clearance issue with the hood and the reservoir. If you remove the cap, you have enough room. It's that close. I haven't quite figure out what I am going to do here yet. I've looked for alternative reservoirs, but still not sure what will work out. Concidering cutting the bracket and re-welding lower. There's not a whole lot of room to be gained here though.


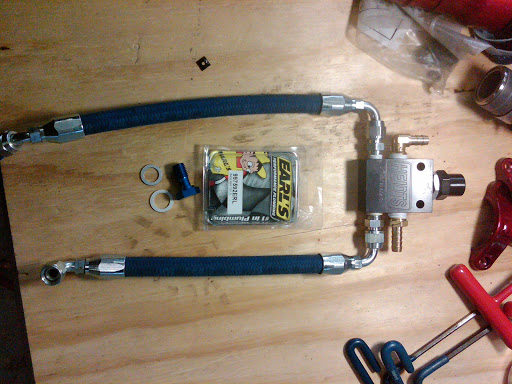
Also mentioned before this pump puts out 1.9-2.1 GPM 1640/1740 psi which is too much for the stock steering rack. I asked Pez for mock up a modification for me using a Heidt's variable valve. I couldn't be happier with how well the fitment worked out! Nice job on this one Pez!

I'll share some pics on this mod:
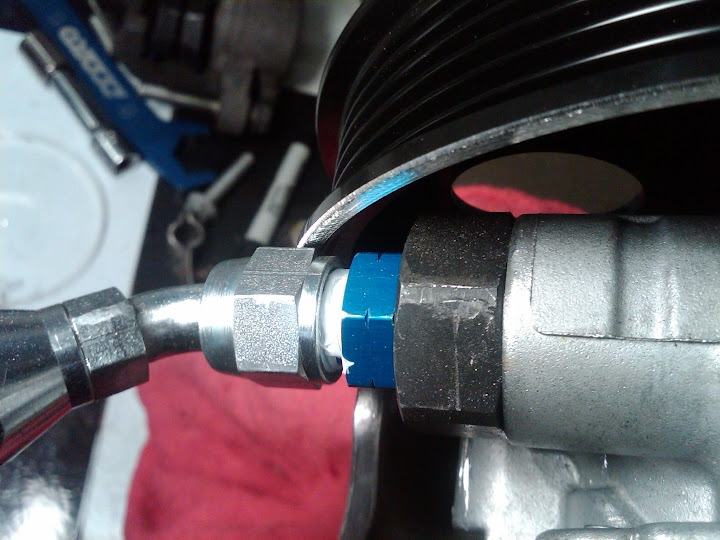
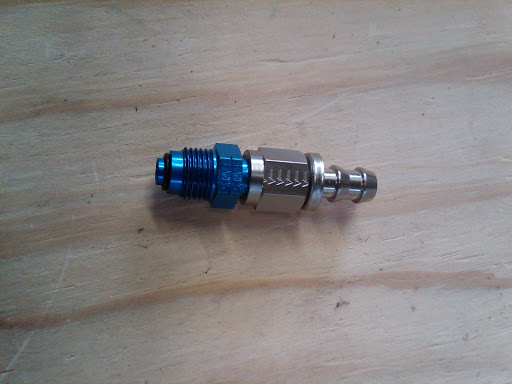
Underside of power steering pump. The silver fitting needs to be screwed out so a standard -6AN fitting will go in its place.


Heidt's power steering variable valve, with the high pressure lines by Pez.


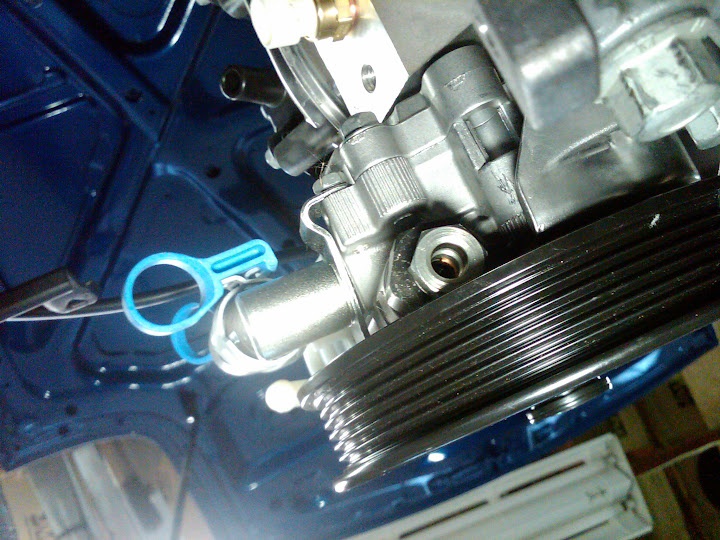
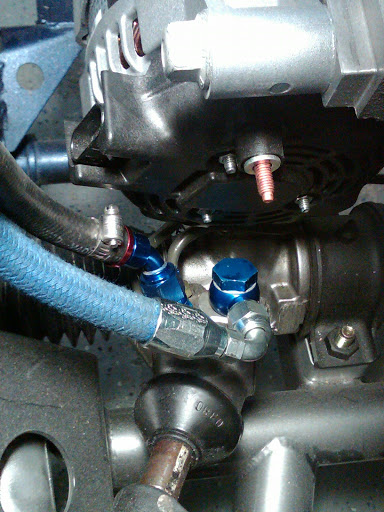
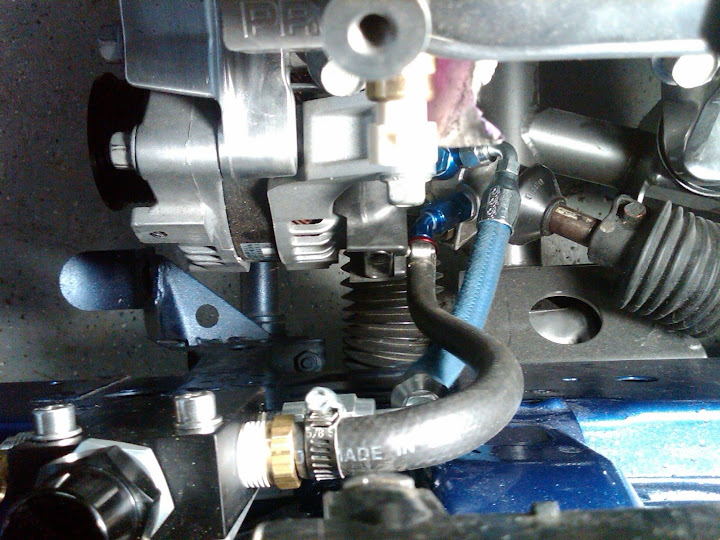
Pez sent me a straight barb fitting which goes to the return side of the steering rack, This turned out to be to close for comfort as it was right next to the back of the alternator (which again is part of the Cadillac CTS-V kit (Part#: 19155066). Simple solution to replace with a 45 degree hose barb fitting.


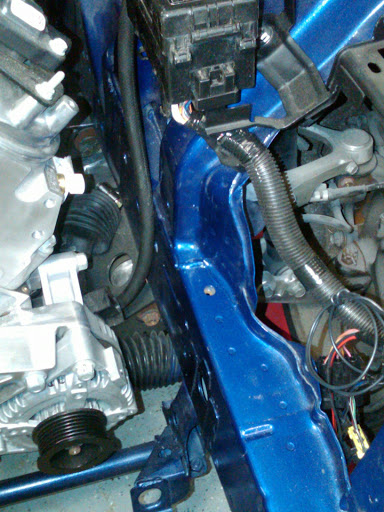
Use this M6 hole for the mounting bracket. This turns out to be a perfect open spot for the Heidts valve. Conveniently the hole is already there and tapped  :drive:


The stock banjo bolt and power steering line (high pressure) is removed. As I said above the return side fitting (bottom) gets too close to alternator (CTS-V accessory kit) so I swapped out for a 45 degree hose barb fitting which works out nice.


Close up of the clearance of the power steering lines to the rack.


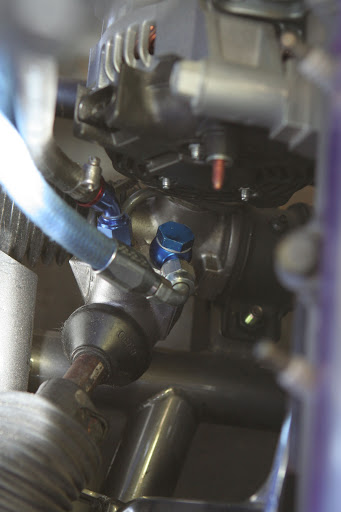
High pressure (blue) to steering rack and return (black) back to Heidt's valve. Valve mounted on driver side frame rail. M6 hole was already in this position.


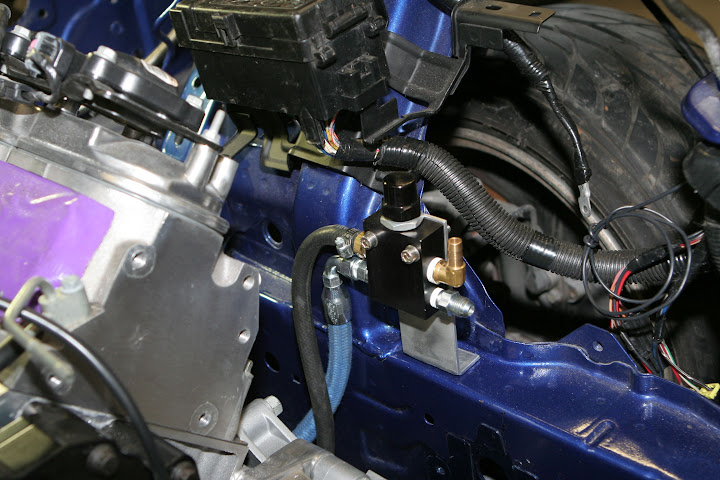
Top view of high pressure (blue) to steering rack and return (black) back to Heidt's valve.


...another shot


On the pump side a modification is needed to the power steering pump pulley. 1-2mm needs to be shaved off the backside of the pulley to make clearance for the AN fittings. I put the power steering pump (still attach to bracket) in a vise and used an air dremel with a grinding disc. I held the grinder steady as a third hand slowly spun the pulley. The results were perfect.
1995 427 LS3 Burnout Widebody FD
My build thread
2011 Ford F250 CCSB 6.7L

Offline ablake211

Re: Cryptic's forged 427 LS3 Burnout FD
« Reply #80 on: January 19, 2011, 06:21:21 PM »
Nice writeup. I ran one of these last year and it worked great.

Offline Cryptic

Re: Cryptic's forged 427 LS3 Burnout FD
« Reply #81 on: August 06, 2011, 11:12:31 PM »
ugg having hood fitment issues with the FAST 102mm intake. I already cut the brace and the hood is still touching.


EDIT...
OK, I think I may have panicked a little early.  I tightened down the 102mm LSXr intake (10 long bolts) and it squished down quite a bit.

The hood is still touching on the LSXr lettering, but is damn near flush with the fender lines. Perhaps I can cheat it a bit with some washers to raise the rear of the hood. 2nd option is to dremel off the lettering on top the intake. Maybe both to get it to fit without any touching of the hood.

I also want to note that the Fast 102mm throttle body fits under the hood fine. However, I did have to trim the lower left corner to make it clear my Meziere electric water pump.

« Last Edit: August 07, 2011, 12:26:32 AM by Cryptic »
1995 427 LS3 Burnout Widebody FD
My build thread
2011 Ford F250 CCSB 6.7L

Offline Cryptic

Re: Cryptic's forged 427 LS3 Burnout FD
« Reply #82 on: August 07, 2011, 02:43:03 PM »
(hopefully I don't get yelled at for double posting, but I'm trying to share information in a relevant thread.)

Throttle cable, MAF/intake, and air filter on. Now I have an issue with the hood touching where the blue tape is on the rubber intake hose.
1995 427 LS3 Burnout Widebody FD
My build thread
2011 Ford F250 CCSB 6.7L

Offline Covert5150

Re: Cryptic's forged 427 LS3 Burnout FD
« Reply #83 on: August 07, 2011, 08:15:00 PM »
I can't wait to be at that point, it's looks very nice.

Is your front left tire backwards?

Offline Cryptic

Re: Cryptic's forged 427 LS3 Burnout FD
« Reply #84 on: August 07, 2011, 08:16:52 PM »
That just keeps it off the ground and rollable. Those tires are stretched beyond anything I would run on the road. Not going to mount new tires till car is painted.
1995 427 LS3 Burnout Widebody FD
My build thread
2011 Ford F250 CCSB 6.7L

Offline LNF_AJ

Re: Cryptic's forged 427 LS3 Burnout FD
« Reply #85 on: August 07, 2011, 10:28:01 PM »
WOW very impressive build, I'm very impressed with how well your body work turned out and any plans to dyno the motor when you're finished?  I would love to see what you put out because I've wanted to run a similar build. Also keep us updated on how your fitment of the 102 is going I've wanted to run the same intake.

Offline Demon

Re: Cryptic's forged 427 LS3 Burnout FD
« Reply #86 on: August 08, 2011, 12:55:45 PM »
For a reference pic to the PM you sent me about the 102mm clearance, here is how much I had to do to my hood and firewall:


'93 RX7 (co-project with macnewma)
'95 Supra Turbo Billet GT42-76

Offline Sabre002

Re: Cryptic's forged 427 LS3 Burnout FD
« Reply #87 on: August 09, 2011, 11:31:51 AM »
What did you use an air hammer?   
Josh
Manager Business Development, Mazda Motorsports
For info on how to join the Mazda Motorsports Team Support Program Email me.
Jsmit295@mazdausa.com

Offline Troux

Re: Cryptic's forged 427 LS3 Burnout FD
« Reply #88 on: August 10, 2011, 08:24:27 PM »
^Looked like a grenade to me.

Offline Tictakman

Re: Cryptic's forged 427 LS3 Burnout FD
« Reply #89 on: August 10, 2011, 08:34:42 PM »
Cryptic, be careful when you actually run the engine...its gonna torque and rub on the hood.  I had a similar rubbing issue and it ended up putting a nice nickle size dent in my stock hood.

Z