April 18, 2024, 08:27:46 AM

Author Topic: Cryptic's forged 427 LS3 Burnout FD  (Read 136350 times)

Offline Cryptic

Cryptic's forged 427 LS3 Burnout FD
« on: June 23, 2010, 12:19:49 PM »
I've been lurking the old site and this one for a while now. I figured it's about time I post up my build which is now been dragging on for about 3 years. I started out with a 93 VR base FD which got me addicted to the RX7. I did full exhaust, PowerFC, new clutch, and some paint to it.


A little down the road, money got tight and I sold the car to my brother with the promise he wouldn't sell it. He had it for about 2 years till there was an accident in front of him which forced him into a wall on the freeway. The car was a loss. He then gave the car back to me, I had plans to use it as a parts car since the frame got pretty bent.

Here is after the motor was pulled (which survived the crash actually and I still have it). I'm scavenging the interior, wiring harness, brake master, ABS and whatever else I need from the car.

Rotary pulled


After much searching and patience I managed to locate a 95 roller chassis, which I drove down to pick-up from FL and bring back to WI. The car was completely stripped, but it was rust free, clean and straight. (not pictured, but the car did have fenders and front bumper)


At this point in the game I really didn't have any intentions on converting to a V8. I actually started to buy replacement items like a radiator and a cold air intake which was destroyed in the red FD (which I am still sitting on).  I decided since the car was so stripped down anyway that this would be a good time to POR-15 the underside, engine bay, fender wells, and even the interior floors.  I doubt this car will ever see rust now   :D

This was about Spring of 2008:
Before Por-15 (pics previously posted on the club)


Front right fender


Rear Fender


Underbody


Dad spraying


Me


Finished


« Last Edit: February 15, 2014, 11:24:31 PM by Cryptic »
1995 427 LS3 Burnout Widebody FD
My build thread
2011 Ford F250 CCSB 6.7L

Offline BAD-LSX-7

  • Supporting Member
  • Top Fuel
  • Posts: 2437
  • Back in Action for 2012
  • View Gallery
    • View Profile
Re: Cryptic's forged 427 LS3 Burnout FD
« Reply #1 on: June 23, 2010, 12:25:01 PM »
keep it coming! i love white FD's just dont like other people having them!!!!!  :secret:
>:( >:(2012>:( >:(

Offline Cryptic

Re: Cryptic's forged 427 LS3 Burnout FD
« Reply #2 on: June 23, 2010, 12:32:17 PM »
ShineAutoProject - KS-AUTO Burnout body kit

My Dad has been painting cars in his garage as far as I can remember. I pitched the idea of doing a "widebody" kit to him to see if he thought it was something doable by the two of us. This was actually one of the funnest summers I ever had with my Dad. 1 Sunday at a time we got this body kit put on. It was something my Dad never really did before, but nothing we couldn't figure out. He had plenty of body repair experience and for him he was glad to finally working on a car that wasn't a ton of rust repair.

Putting on the rear fenders flares with some 3M 8115 panel bond. Good stuff. 90 mins of work time. Just goop on the inside anywhere there's contact and I did some extra around the outside edges since I'll be molding/blending this all in. You can run your finger over it to smooth it out. Wipes off your hands pretty easily.


Other than a some sanding of some small items and a little bit of priming... that's it for today!  I have to wait 24 hours for that panel bond to setup.

I used DuPont ChromaSurfacer? 7704S which can have flex agent added for the shine kit I'm putting on. It's a urethane based primer (opposed to epoxy based). It can be used over POR-15 and the 3M 8115 panel bond without any reactions/bubbling.

7-17-08
Blending in the rear flares of the Burnout kit.


7-27-08
Hand sanding

First coat primer/filler


Burnout Front Bumber from ShineAutoProject


This sh!t pisses me off, brand new and there's a crack right where the bumper goes under the fender. It's going have to be completely re-glassed.
There where plenty of other pits that have to be filled to on this bumper. There's going to be a lot of prep time here.
The crack, essentially its an air pocket during the manufacturing process. Just bad luck I guess.


1st round of hand sanding... I was black head to toe when I finished. It still needs more work, but this was enough for the day.


The hood's 1st coat of primer


Front Bumper 4th coat primer... might sill have some spot putting to do. Surface prep on FRP is FTL.


Sun roof 1st coat of primer


We lost count how man coats of bondo and primer to get the rear fender flares this far. I think its good to go now :thumbsup
1995 427 LS3 Burnout Widebody FD
My build thread
2011 Ford F250 CCSB 6.7L

Offline Cryptic

Re: Cryptic's forged 427 LS3 Burnout FD
« Reply #3 on: June 23, 2010, 12:36:18 PM »
PAINT!!!
I know I am going to get some flack for getting rid of the white

8-16-08

We decided to use the OEM fenders for testing paint color. This is the Lotus' Magnetic Blue (B100) using a single stage paint for testing only. We'l' be spraying a base coat/clear cost for final.


I didnt get a chance to spray the other fender, but tomorrow we will spray the other fender down with the Lexus' Ultrasonic Blue (8U1)

We shut it it down for the day... ***Garage Porn***


8-16-08
Preping the rear hatch, I had a blast taking it off the car by myself.


Other test fender in Ultrasonic Blue Mica (8U1)

This one might look a little flat... we ran didn't quite have enough paint to cover an entire fender


Left: Magnetic Blue (B100) - Right: Ultrasonic Blue Mica (8U1)
Look for a slight purplish pearl in the Ultrasonic Blue Mica


Bottom: Magnetic Blue (B100) - Top: Ultrasonic Blue Mica (8U1)


Left: Ultrasonic Blue Mica (8U1) - Right: Magnetic Blue (B100)


Almost like splitting hairs between these two.
The Magnetic blue is much more metallic. Lots of silver'ish flake.
1995 427 LS3 Burnout Widebody FD
My build thread
2011 Ford F250 CCSB 6.7L

Offline Cryptic

Re: Cryptic's forged 427 LS3 Burnout FD
« Reply #4 on: June 23, 2010, 12:37:49 PM »
PAINT DAY! Door jams / engine bay / undersides 09-08-08

Slideshow of all pics from today

2005 Lotus Elise Magnetic Blue Metallic (B100). Martin-Senour Tec/BASE


We lightly scuffed down the POR15 and color/cleared the entire engine bay.


Just base coat (no clear yet)


We were just doing door jams and what not, but I couldn't resist putting down a light coat over the fender to see how it looked.


Engine bay base and clear coated


It's got some shine to it.


Done for the day
1995 427 LS3 Burnout Widebody FD
My build thread
2011 Ford F250 CCSB 6.7L

Offline Cryptic

Re: Cryptic's forged 427 LS3 Burnout FD
« Reply #5 on: June 23, 2010, 12:42:40 PM »
Burnout Skirts - more bodywork
9-29-08

The fenders and hood are on and aligned. Sanded off the "overspray" from the doing the door jams, sunroof area, trunk, etc. Quick hit of primer again and some sanding...

The next big headache is getting these fiberglass skirts on in a way that doesn't look glued or bolted on and more OEM and part of the car. The first issue we ran into is that the skirts come with a lip that sits in the door jam. This is just a recipe for the doors grinding between the bottom of the door and the top of the skirt. Paint would be scrapping off in no time.

We cut the entire lip off and we'll be blending it in to the door's edge with fiberglass/bondo


Lip gone here:
Please disregard the overspray

Panel bond was applied the the flat area that touches car body. We did some extra grinding to smooth out some areas


We marked off where the skirt goes before applying the 3M panel bond (same stuff I used on the fender flares) to the backside of the skirt


Could only do one side... ran out of clamps


Last shot.... I like how the white looks against the blue... The car kinda begs for some white stripes or something. We'll see what happens when I get that far.


Driver Side Skirt
3M 8115 panel bond on the driver side skirt. Door jam lip is completely cut off. It would rub on the door and maintain the gaps.


Lots of clamps to secure it while it dries.


Passenger side skirt blended in. A coat of primer to finish it off.


So a little bit of blending on the driver side and the body work is done!
« Last Edit: June 23, 2010, 12:44:41 PM by Cryptic »
1995 427 LS3 Burnout Widebody FD
My build thread
2011 Ford F250 CCSB 6.7L

Offline BAD-LSX-7

  • Supporting Member
  • Top Fuel
  • Posts: 2437
  • Back in Action for 2012
  • View Gallery
    • View Profile
Re: Cryptic's forged 427 LS3 Burnout FD
« Reply #6 on: June 23, 2010, 12:48:12 PM »
WOW I LIKE!!!!!!! i like the wide body. and the color
>:( >:(2012>:( >:(

Offline Cryptic

Re: Cryptic's forged 427 LS3 Burnout FD
« Reply #7 on: June 23, 2010, 12:50:04 PM »
Body work done for now...


Gotta love this blue...


1995 427 LS3 Burnout Widebody FD
My build thread
2011 Ford F250 CCSB 6.7L

Offline Cryptic

Re: Cryptic's forged 427 LS3 Burnout FD
« Reply #8 on: June 23, 2010, 01:04:34 PM »
Almost a year went by as I started to read up on V8 conversions. I found a new long block for sale not to far from me that was pretty much what I was looking for. I was looking at doing a 418 LS3 from Texas Speed, but the price was right on this long block. Long block was assembled by Don Hardy Race Cars.

The long block build sheet:
New GM LS3 aluminum block, 4.125 Scat Crank, Mahle 4.065 bore flat top pistons, Oliver 6.067 Rods, Clevite bearings, PRC ported oil pump, Roll Master timing chain, Comp cam, rear, top, and front cover, knock sensors,
Newest PRC LS3/L92 heads decked .020" cnc'd and then hand polished, TSP dual springs, Standard new LS3 valves, hardened push rods, intake and exhaust rockers,LS7 lifters and trays, head gaskets, head bolts and valve covers

Comp Cam specs = 243/259 .624/.624 114 LSA

PRC LS3 CNC'd and Hand polished Heads - should be close if not better than:
Lift Intake Exhaust
.200 154 115
.300 223 170
.400 282 198
.500 324 211
.600 351 228
.650 358 232


Front drive accessories (CTS-V kit) / starter / brand new valve covers with coil packs (vette take-offs for cheap)


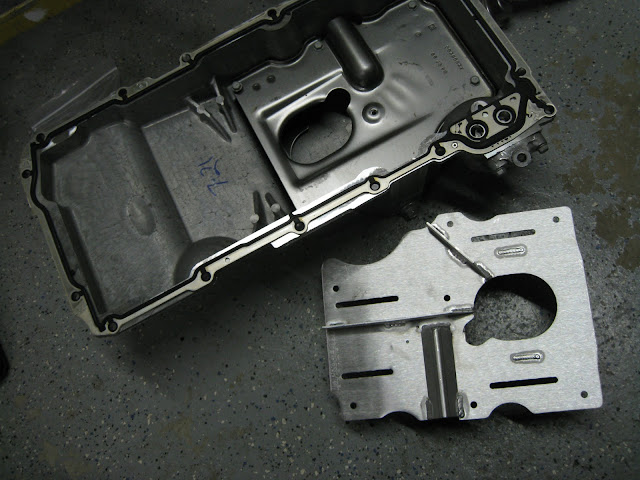
F-body Oil Pan, Windage tray, pickup tube, dipstick and  Improved Racing Trap-Door Race Baffle on the way to replace the stock one.


2/17/2010 I bought all this used on LS1tech.
2002 Fbody T-56 (40k) / Bell housing / Throwout bearing


Pro 5.0 Shifter


Spec Stage 3 Clutch / Pressure plate / Billet Flywheel  (800 miles)


and to my delight , a complete 2002 wiring harness and PCM. I didn't really realize I was getting this for the same money.

------------------------


Edit 2/18/2010
JTR 1-7/8 long tube headers (ceramic coated)


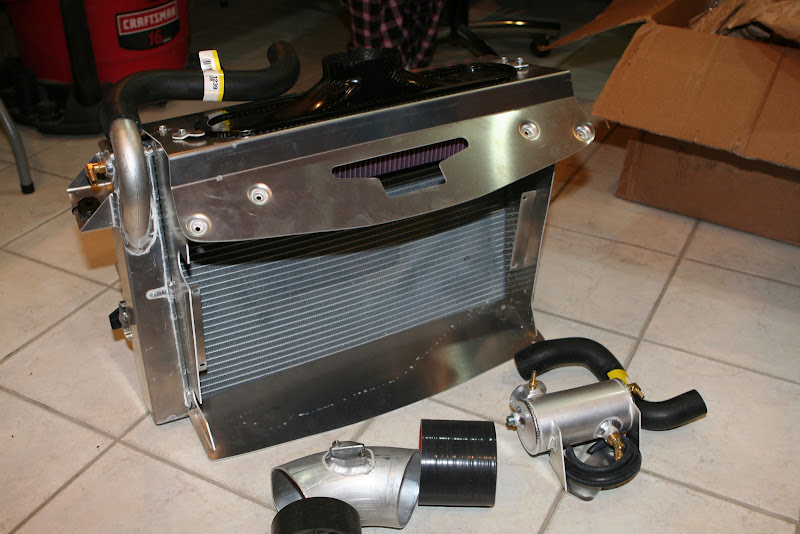
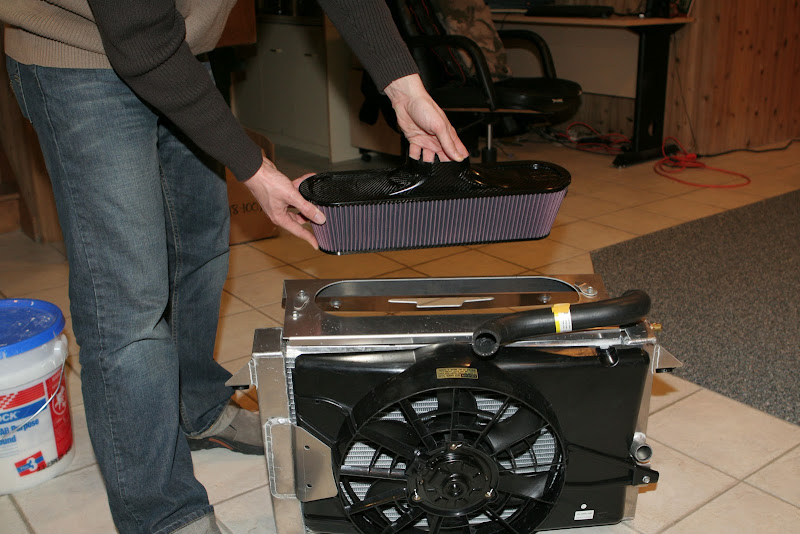
Samburg CAI/Radiator **note the prevision for the A/C condenser**


Edit - 2/23/10
Polished motor mount pedestals and Biscuits (required for Samburg subframe)


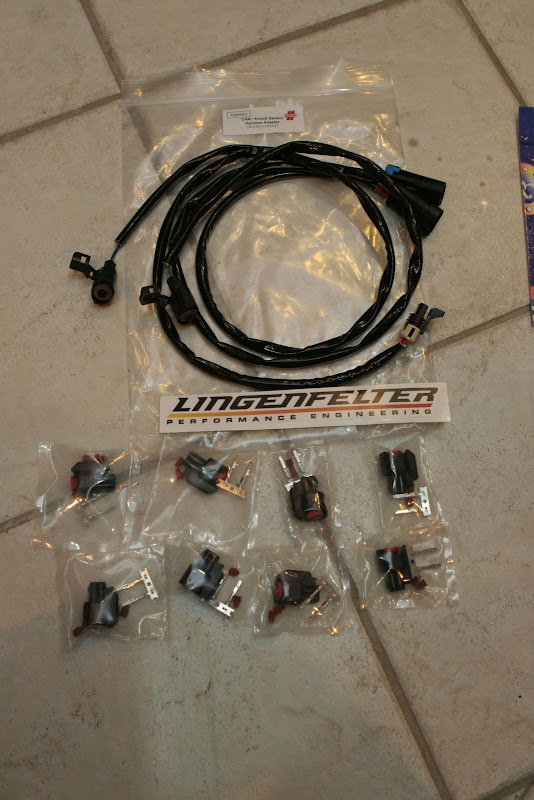
CAM and Knock sensor extension harness and USCar type fuel injector connectors (swap from LS1 harness connectors to LS3/L92/L76 style)


Edit - 2/25/10
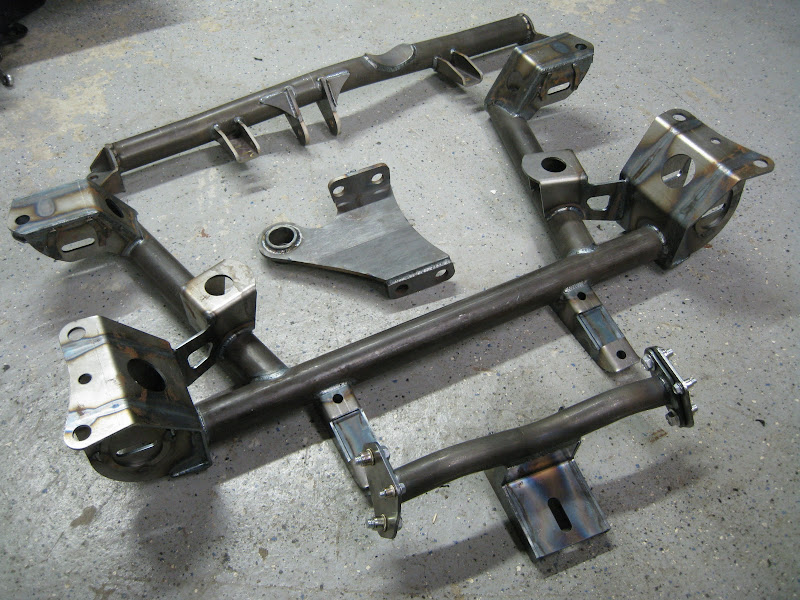
Samburg Rod and Custom LSX Subframe, transmission mount, and differential mount (1 3/4 .095 DOM tube) (before powder coating)


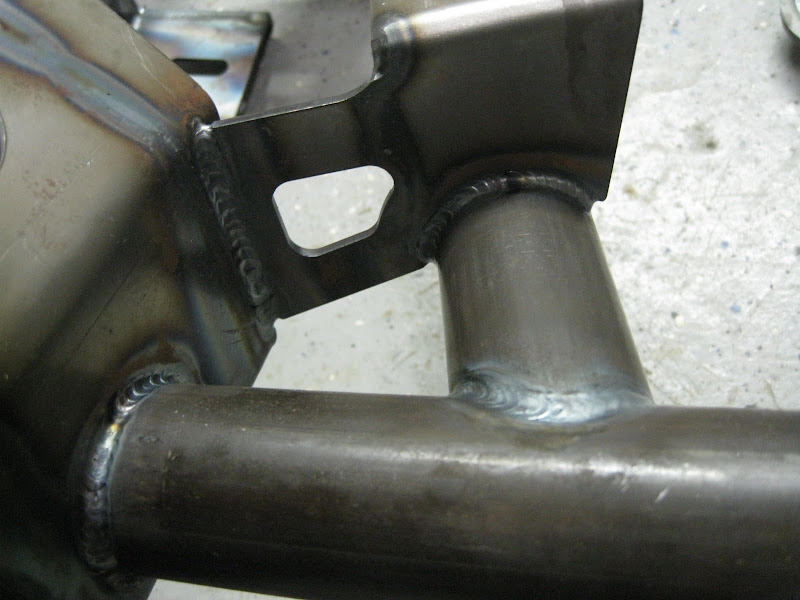
Close up of some welds


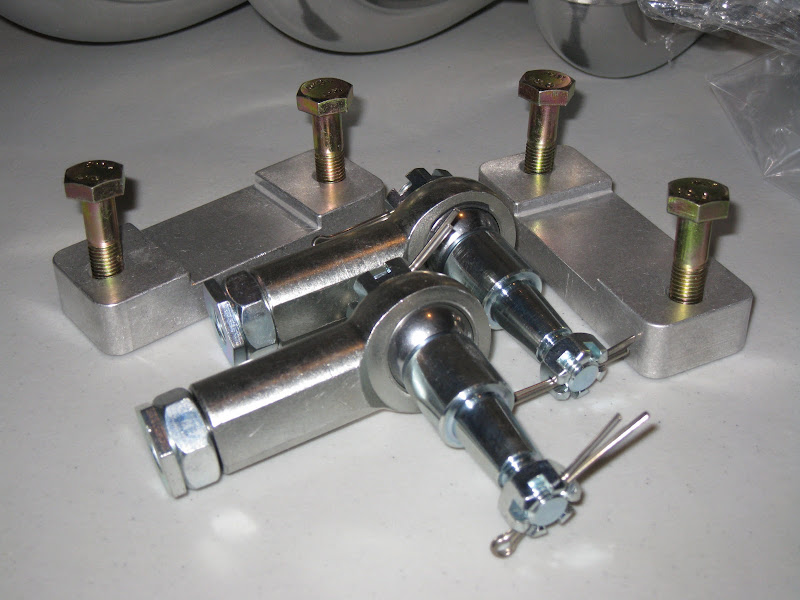
Bump steer correction w/spacers


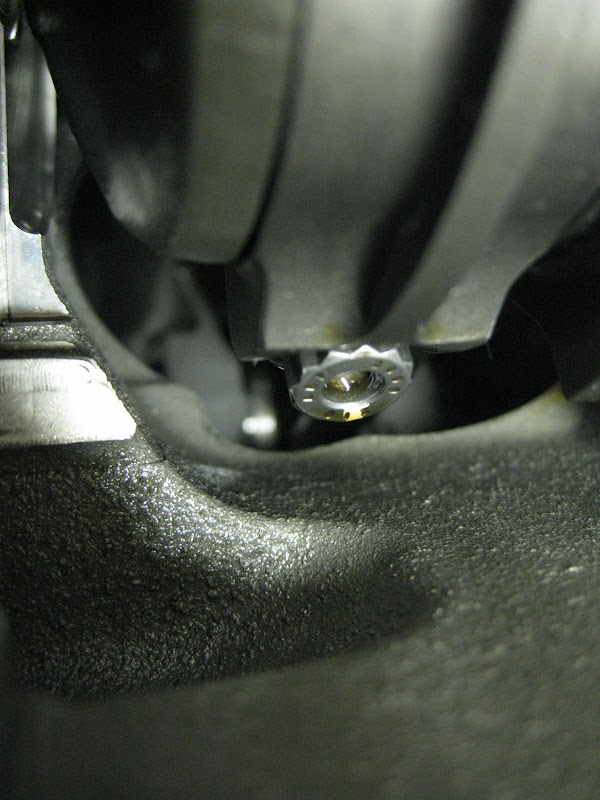
I took some shots inside the motor.
This shows the LS3 block modification to allow a 4.125" stroke, so the connecting rod clears the block.


This is the best I could do showing how close the connecting rod gets to the block. I can't turn the motor right now to get a better angle.


Edit 2/27/2010

My girlfriend's Dad works for Southwest Metal Finishing in New Berlin. He polished some aluminum pieces for me. You can compare before polishing from a few of the pics above.


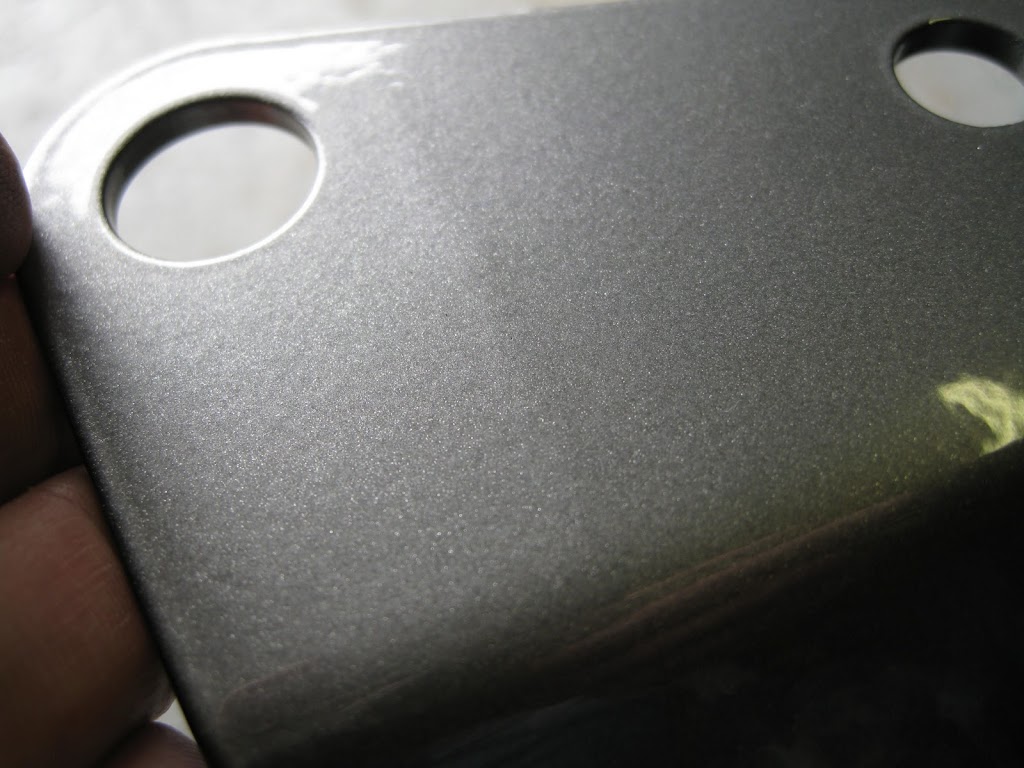
Subframe is back from the Hy-Tec Powder Coating. The color is called "Anthracite w/clear"


This is what is it replacing


Edit Sunday 2/28/2010
Subframe is in.


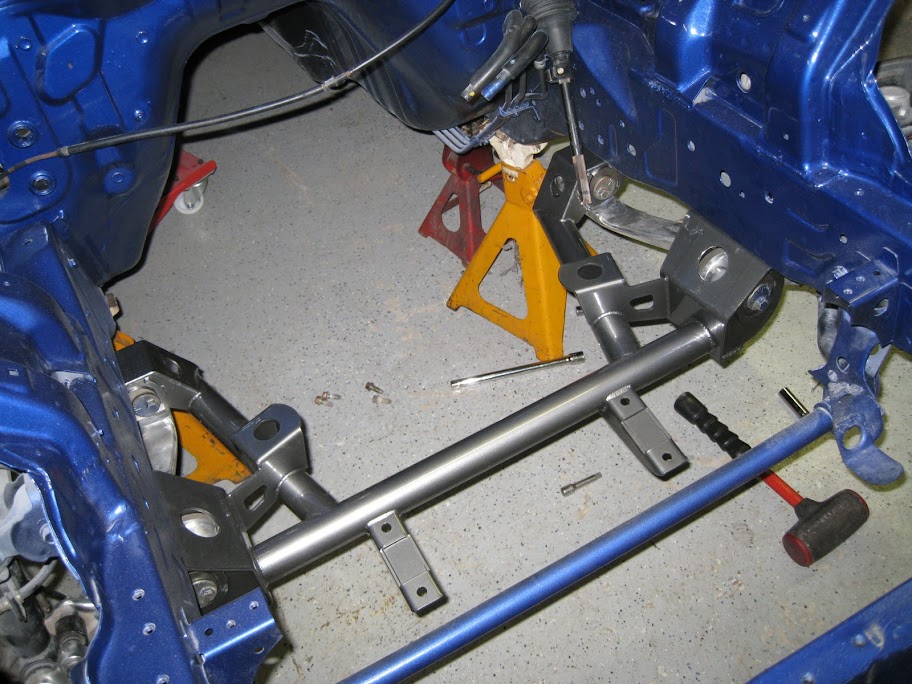
As well as the steering rack and bump steer correction.


Edit 3/12/2010
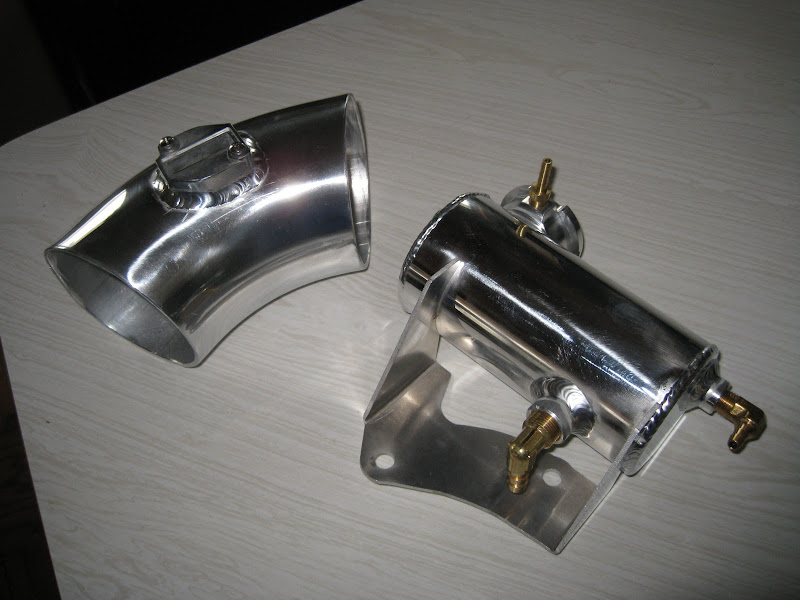
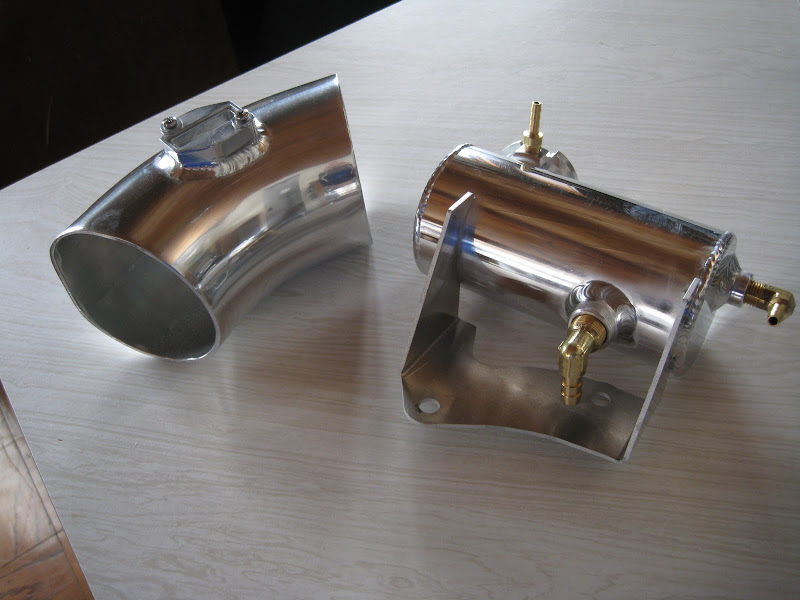
Meziere Electric Water pump


ATI Super Damper / Harmonic Balancer / SFI approved (no underdrive with A/C)


-6AN fuel line stuff, Aeromotive Fuel Pressure regulator and gauge, Wilwood Clutch Master cylinder, ARP flywheel and harmonic balancer bolts


Edit 3/24/2010
OK... so I took a little hiatus from the car. A week in Aspen and waiting for more parts to get here. Parts from Hinson Supercars.

Optima Yellow Top battery, Custom aluminum drive shaft, Batter relocation kit, transmission tunnel cover (for T-56), stainless clutch line


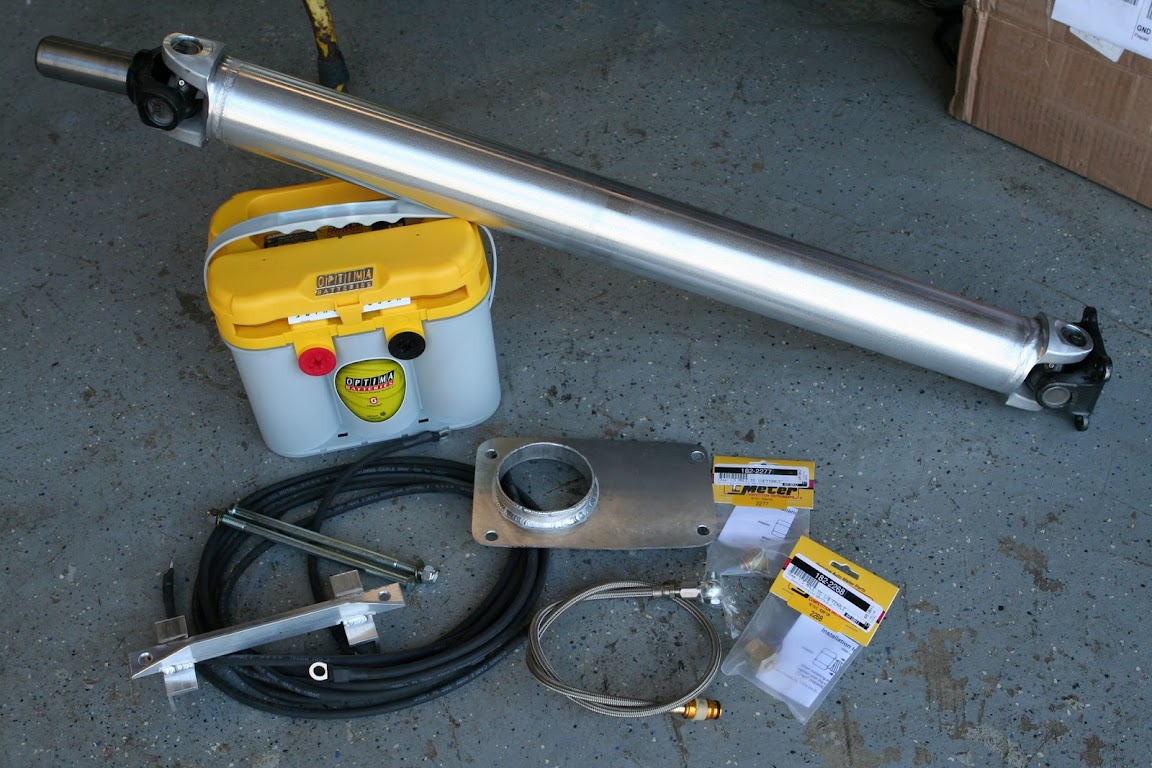
FAST 102mm Throttle Body, Billet fuel rails, 65lb injectors (these things look micro sized compared to Jim's Buick stuff)


Saw AHHHHHHHHHHHH!
« Last Edit: June 23, 2010, 02:27:50 PM by Cryptic »
1995 427 LS3 Burnout Widebody FD
My build thread
2011 Ford F250 CCSB 6.7L

Offline kukri

Re: Cryptic's forged 427 LS3 Burnout FD
« Reply #9 on: June 23, 2010, 02:00:14 PM »
Can't wait to see more, sir.

'08 C6 Z06
'00 S2000
'01 Golf VR5
'93 Base LSX 485 whp - sold
'93 Touring LS1 - sold
'90 TII 383ci SBC - sold
'88 GTU 302ci SBF - sold

Offline Cryptic

Re: Cryptic's forged 427 LS3 Burnout FD
« Reply #10 on: June 23, 2010, 03:31:26 PM »
Mar 31, 2010

FAST 102mm Intake and Throttle Body (Yes I am converting the LS3 to cable throttle, using a 2002 LS1 PCM & Harness)


Valve covers off, TSP Dual Springs


I gave the valve covers a hit with a wire brush with the air dremmel and some Flitz, just to take the dull aluminum finish off of it. Yeah I was a little bored.


More stuff from Jegs for my fuel system.


Grinding off the radiator supports with a 4" cut off wheel


Grinding off the firewall lip
I did the entire length of the firewall budge. I'm glad I did because it provides more room for your hands later and a little more ease putting the motor in. I used some duct tape to mark my cut line and hopefully provide a little insurance if the cutting wheel got away from me. Later I learned all this carefulness was for nothing as I had to bash the firewall in to make room for the FAST 102mm intake.


1995 427 LS3 Burnout Widebody FD
My build thread
2011 Ford F250 CCSB 6.7L

Offline JimmyTNT

Re: Cryptic's forged 427 LS3 Burnout FD
« Reply #11 on: June 23, 2010, 03:44:41 PM »
nice work, but SERIOUSLY use a goddamn legit 3m respirator not a DUST MASK!!!! Youre killing yourselves with a dust mask, might as well have nothing on honestly...
93 Ls1 RX7 w/ PT88  (for sound effects)
98 Acura Integra (grocery getter/tow vehicle)
03 Grudge Hayabusa (for sale)

Enjoy yourselves...

Offline Cryptic

Re: Cryptic's forged 427 LS3 Burnout FD
« Reply #12 on: June 23, 2010, 03:54:39 PM »
Bosch 044 Fuel Pump
Inspired by 93silverbullet and Sabre002

stealing the pump from my original (wrecked) RX7


Ohh goody... Rust. Half of those tiny screws had no intention of coming off. They stripped despite my best attempt to take them off carefully. I had to drop the tank and grind off the top of the screws.


I ground off the remaining screws. They were just stripping out.


Grind off the top smaller hard line nipples. We will be replacing them with -6AN bulkhead fittings. (3/8th line)


Using a drill bit first to carefully make a pilot whole just short of a half inch. The final hole is .55 if an inch. I had some air dremel bits that work out dead nuts.


The final hole is .55 of an inch. I had some air dremel bits that work out dead nuts. This will allow the bulkhead fitting to just thread in, minimizing the hole size.


Grind away a piece of the bracket to make room for the stat-o-seal. This will seal and fumes from leaking out the tank. (Earl's #361-178009 )


On the underside, grind a bit of the bracket to make room for the bulkhead fitting nut. (Jeg's -  Earl's #361-992416)


Cut a 9.5 inch piece of 3/8" brake/fuel line. (this is for the return line)


Bend the tube to match the profile of the original return. The 45 degree slant needs to be a tad long to get around the larger Bosch pump. This doesn't have to be perfect.


Slide on your Tube nut (581806) and Tube Sleeve (581906) BEFORE you flare the tube.


Use a 37 degree flare tool (not a 45 degree double flare). Note I forgot to put on my Tube Sleeve and have to do this all over. I couldn't slide it on from the bottom over the bends like the nut could.


-6AN fitting and a 37 degree flare.


Stat-o-Seal (178009) and a -6AN 90 degree Bulkhead fitting (983306).


Stat-o-Seal (178009) and a -6AN 90 degree Bulkhead fitting (983306) assembled.


Stat-o-Seal (178009) and a -6AN 90 degree Bulkhead fitting (983306) on fuel tank cover.


This is starting to look good. (Note I wire brushed (air dremel) the entire top of the cover and hit it with a couple coats of paint, so the top isn't rusty anymore.


-6AN Bulkhead nut (592406). I added a touch of red thread lock.


My final length turned out to be 8.5". (I had to redo this whole piece because I forgot the tube sleeve). This part will need to be trimmed to make the difference of the bulkhead fitting (next picture).


Bulkhead fitting is 1". Trim that from the bottom of the hard line so the the final lengths match up. Your final milage may vary. Do your own measuring.


Close enough for return line. Note the bend is wide out. The Bosch 044 fuel pump is bigger and your return should clear it.


I opted for the high flow check valve that has -6AN fittings at the top. Remove the Bosch provided check valve.


Bosch vs JaysRacing.com High Flow Check Valve (Model: BFP-CV6)


Bosch 044 (left) vs Stock Denso (right).
Bosch has a Fuel sock from JaysRacing.com, Model: BFP-PF1. It does not come with a Bosch pump.


Stock pump sits 11-11.25" to the bottom of the sock. The tank seems to be 12" from the lip of the tank to where the sock sits in the tank.


I cut a 1.25" piece of 3/8" hard line and flared one end. Put the Tube sleeve & nut on the flared end. Once you slide on the other tube sleeve & nut for the opposite end you are left with just a bit more than 1/4" if tube to flare. No way you are going to get that in the flare tool. I don't condone it but I used another flared piece to support bottom while I used a punch, hammered needle nose pliers tip, and finagled the flare tool to give be something that resembled a flared tube. This seemed to get me a descent end result. But I have not tested. Sorry for lack of pictures. But this had me scratching my head for awhile. There maybe a better way to go about this, but I couldn't think of it.


Final result:


« Last Edit: June 23, 2010, 04:15:48 PM by Cryptic »
1995 427 LS3 Burnout Widebody FD
My build thread
2011 Ford F250 CCSB 6.7L

Offline Cryptic

Re: Cryptic's forged 427 LS3 Burnout FD
« Reply #13 on: June 23, 2010, 04:40:01 PM »
Wilwood Clutch Master Cylinder
April 28th, 2010

Clutch pedal removed


Clutch pedal needs to be tapped with a 5/16" 24NF tap for the Wilwood to thread into the stock clutch pedal.


Enlarging the firewall whole. I used a air dremel and a carbide bit. It doesn't need to be perfect as the Hinson adapter covers and reinforces the hole.


The Hinson adapter positions the master cylinder vertically, unlike the stock RX7 which is turned to 2 o'clock and uses are remote reservoir.


-6AN stainless feed and return fuel lines ran all the way to the tank.


Wilwood clutch master cylinder, Aeromotive Fuel Pressure regulator, home made stainless steel polished mounting bracket
1995 427 LS3 Burnout Widebody FD
My build thread
2011 Ford F250 CCSB 6.7L

Offline hardbodeez

Re: Cryptic's forged 427 LS3 Burnout FD
« Reply #14 on: June 23, 2010, 04:54:18 PM »
Everything looks great.

However, if you use that puck style clutch disc, you'll hate driving the car.  Like an on and off switch.