The Borg Warner T5 Transmission is a cost effective alternative to the much more expensive (but much better) T56. While not as strong, the little T5 can hold its own if not abused by a power shifting retard
or mounted behind a high horse/torque engine
or mounted in a very heavy vehicle. Which makes it perfect for my project .
But how the hell do you mate a T5 out of a V8 3rd gen f-body behind an LS based V8?
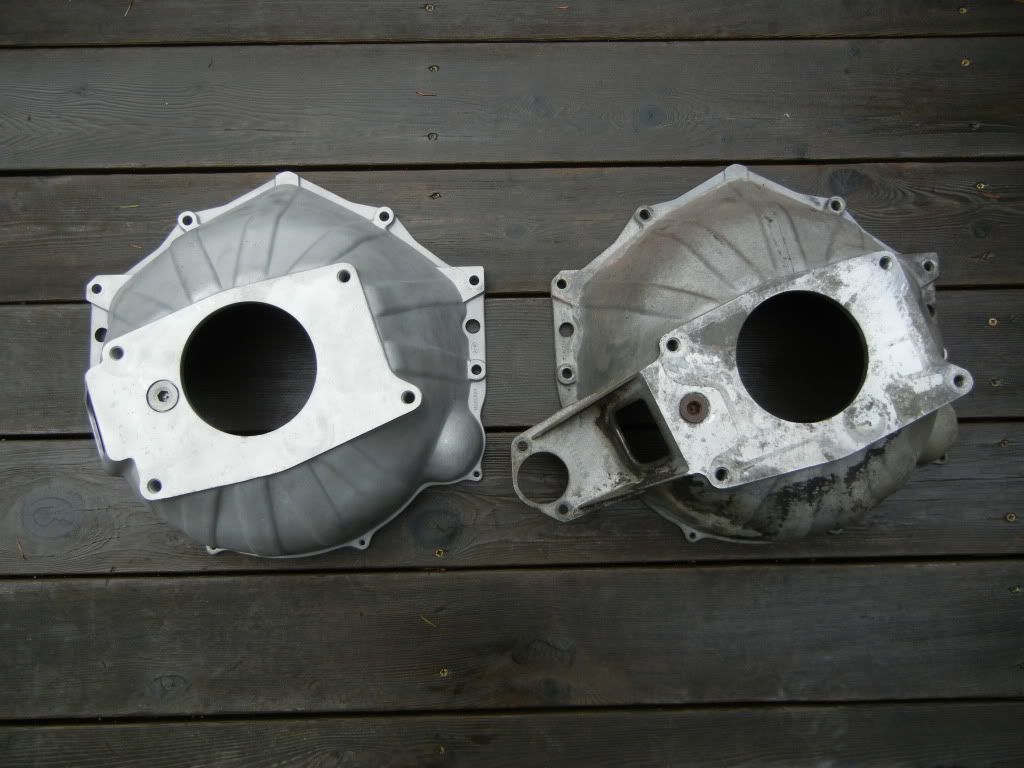
While the bolt patterns at the back of the block are all relatively the same for genI/II/III GM small block V8 engines, the factory T5 bell housing cannot be used with an LSx based engine due to the diameter of the flywheels (168 tooth VS 153 tooth). There are no OEM or aftermarket solution available to allow them to work together either. While a custom made high dollar flywheel is an option, there is a much cheaper and easier way. Just get a 621 bell housing. This is an older bell housing that came on 60s and 70s cars and trucks, there are many other bell housings that can fit the bill as long as they are the larger style but this is the most commonly referred to bell. After that youll need the right flywheel clutch, if yours is a WC unit like mine was youll have the same dia/spline input shaft as a T56! So its as easy and grabbing a flywheel and matching clutch setup for any LS1/LS6/LS2 and T56 combo. While the LS1 style pilot bearing cant be used due to the difference in length of the input shaft and bell housings, a cheap and easy switch to the larger LS7 style sealed pilot bearing will fit your needs. Only thing left to do is grab the right throw out bearing and clutch fork. While these can vary based on the type of system you want to use and the vehicle this Frankenstein build is going into. Im sticking with cheap and basic, just an OEM style clutch fork and a LONG STYLE (1 7/8 height) throw out bearing. The LS based clutches have a slightly lower profile compared to the T5 and older Muncie style clutches. So to get the proper clutch fork and throw out bearing geometry you need to grab the longer style GM t.o.b. VS the standard and more common short GM t.o.b. BUT before you stab everything together there is one final step, the four bolts that hold the trans to the bell. The bell housing uses a ½-13 bolt and the holes in the tranny arent big enough, drill them out to at least ½ (maybe a hair more for wiggle room) and then youll be ready to go.
Parts list recap!
Bell Housing: GM 621 or equivalent
Pilot bearing: LS7 style, GM part # 12557583
Flywheel and Clutch: LS1/LS2/LS6/LS7/etc.
Clutch fork: OEM style, Pioneer CF-100 or GM 340278 or GM14066235, etc.
Throw Out Bearing: OEM GM long style, BCA 614037, etc.
Now that you have the T5 mated to the LSx, you might notice a problem with the shifter and tranny mount. The OEM T5 bell was cast with the mounting holes clocked at 18* (see next pic below). Dont ask me why they did this (most likely for fitment issues) but now that you mounted the tranny upright, the tranny mount is sitting at that funny 18* angle (see 2nd pic below). And even though the mating surface for the shifter is now sitting flat like it should be, the OEM shifter doesnt work all that great with the lever now pointing to the passenger. While I could fab up a custom tranny mount and mod an OEM shifter, find an S10 shifter or the rare aftermarket S10 shifters
I think I have a better idea.

This brings me to the second half of this write up, how to swap the f-body tail housing for a fox body mustang tail housing. This will solve our tranny mounting issue by providing a normal flat mount and also allow us to run the much better and more readily available aftermarket mustang shifters. This really isnt all that hard and the only parts required other than a donor 5.0 fox tranny is a new tail shaft yoke bushing and seal kit from Timken (part # 5200) so we can use the right GM yoke with the ford tail housing. These are the parts youll need from the ford mustang based T5: Tail housing and top plate WITH the matching shifter block, shifter rail, forks, and other bits that are mounted in the top plate. NOTE: this swap can only be done between WC/WC trannys and NWC/NWC trannys, you cant do this swap with World Class and Non World Class parts.
This page here (
http://www.pomoforacing.com/tech/T5Rebuild2002.pdf) is a great source for T5 Rebuild info and Im going to borrow some info to help with my write up. NOTE: the page is written for a ford 5.0 based T5.
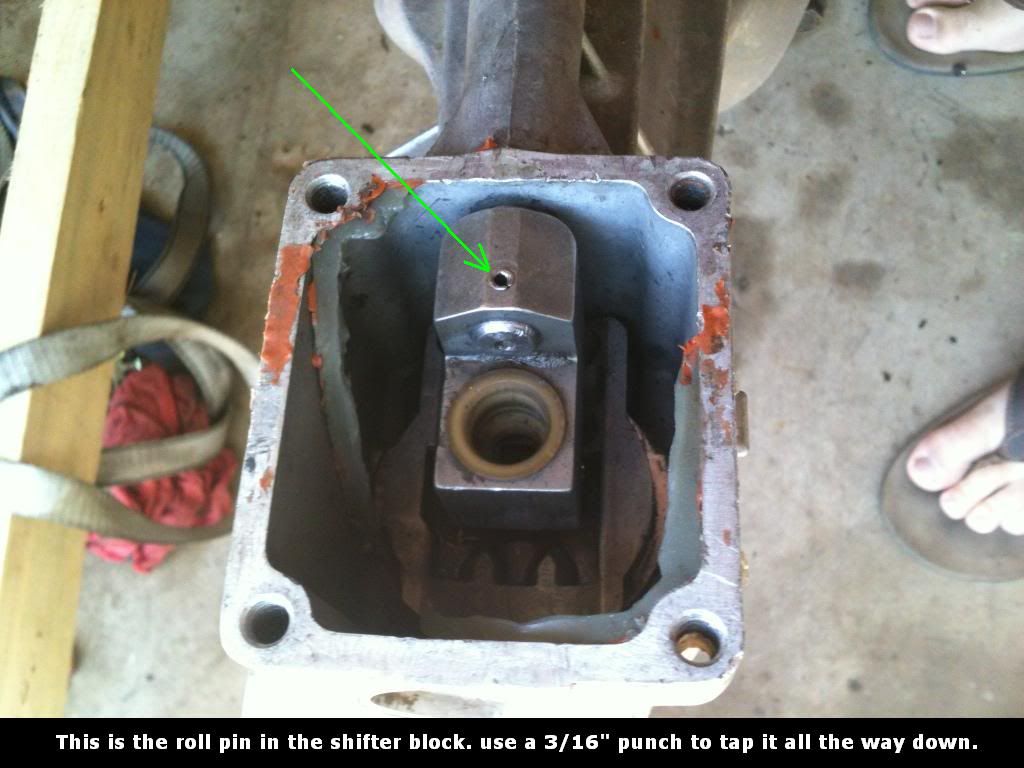
Completely drain the transmission fluid. Then remove the eight tail housing to main case bolts with a 15mm wrench or socket. With the shifter removed, drive the roll pin through shift block with 3/16 punch (see above pic). The pin may not fall all the way through but as long as it clears the shift shaft youre fine. Break the sealant bond between the tail housing and main case by tapping the end of the housing with a rubber mallet; dont try to remove housing yet, just break it free of the case. Apply slight downward pressure on the shift block and simultaneously slide block off the shift shaft while removing the tail housing from the tranny. Once the block is free, continue to pull all the parts off and place on the bench. The cover, which also contains the shift forks and shift shaft, is attached with ten bolts. Remove the neutral indicator switch (drivers side of trans) using a 7/8 open-end wrench; be careful not to damage it. Youll also find an activation pin below the switch; retrieve and secure it. Using a 10mm socket, remove all the bolts. Two of the bolts are shoulder bolts; they fit in one place (well, two actually
) only, and align the cover to the main case like a dowel pin. Use a screwdriver between the cover and the main case to break the seal (intentional pry points provided!). Slide the loose cover towards the passenger side, to clear the reverse mechanism, and lift up. Now you need to remove the old ford seal and bushing out of the end of the tail housing. While there are many different ways of doing this, my suggestion is to take your $10 bushing/seal kit to your local transmission shop and let them do it for a few bucks. Once all that is done and you repeat the same for the GM T5, just clean all the mating surfaces up and apply a fresh bead of silicone and assemble everything back together. It may take some time and a bit of a wiggle together the tail housing to go all the way on due to everything trying to line up, but just be patient and DONT force anything! once everything is back together, torque the top cover and tail housing bolts and enjoy. Other than losing the speedo hookups since the ford and GM setups are a little different everything should be good to go. there are some measurements that have changed with this swap: the mount now sits 1.5" closer to the engine, the shifter now sits 1.7" further forward than it did before, and the overall length of the trans (with exception to the actual output shaft, because we didn't change that) has been shortened 0.5". but not to worry, the stock yoke will work just fine as it did before.
FINISHED PRODUCT!

