April 20, 2024, 12:08:57 AM

Author Topic: Mississippi FD - 383CI Forged LS1 Stroker Build  (Read 344910 times)


Offline wickedrx7

Re: Mississippi FD - 383CI Forged LS1 Stroker Build
« Reply #496 on: July 11, 2014, 03:37:36 PM »
I loved "Mike Mulligan and His Steam Shovel"
according to my mom

1993 Touring, 2012 L99, T-56, Ronnin 8.8, Ohlins, Speedhut, Samberg and lots of custom parts
Build Thread - http://www.norotors.com/index.php?topic=19354.0
Pictures - www.flikr.com/wickedrx7

Offline halfspec

Re: Mississippi FD - 383CI Forged LS1 Stroker Build
« Reply #497 on: July 11, 2014, 03:56:41 PM »
Some post baby updates that are car related :D

First off, I've lined up a truck and trailer to get my currently disassembled rx7 to my painter 2 hours away. This will be happening this Monday July 14th. After that it'll be up to him to make it pretty.

Secondly I had a member PM me earlier today asking for a status update on my master cylinder replacement. This work was completed a couple of weeks ago but I haven't had a chance to document it. Rather than reply to his PM individually I decided to get off my ass and do it properly.
For reference, this idea came from this thread:

http://www.norotors.com/index.php?topic=19151.0

My reasoning for the thread above is that I really don't like the Wilwood MC option for LSX swaps. I don't like that there are countless stories of failure, I don't like that it's not clocked right for RX7's and it requires a crazy stupid adapter from hinson to get it right, I don't like that it's huge (in a place where space is an expensive commodity), I don't like that you have to adapt the rod to the FD's clevis (or tap the FD's clevis), and I don't like that it's expensive.

Before I get to it I just wanted to be clear that this is NOT a drop in replacement. I don't think that was expressed very well in the thread above so I wanted that to by crystal clear so no-one walked away from this with illusions of a plug and play part.

Finally, I went about this conversion without welding ANYTHING. Greg/Pez suggested welding the stock FD clevis to the M8x1.0 coupling nut. In retrospect that's the way to do it. Doing it my way required 3 painful adjustments to get my clutch pedal throw in its sweet spot.

With that being said, here's the part list:

$30.00 - Beck Arnley 072-8657 Clutch Master Cylinder - Amazon.com
$6.00   - Earl's 997517ERL Banjo Bolt with crush washers - Amazon.com
$10.00 - Earl's 997641 Steel -4 AN Banjo Adapter (some folks may need -3 AN adapter based on what you used for your clutch line) - Amazon.com
$3.54  - Metric Class 5.8 Zinc-Plated Steel Coupling Nut, M8 Screw Size, 1.25 mm Pitch, 38MM Length, 16MM Width - 93355A105 - Mcmastercarr
$9.60  - 18-8 Stainless Steel Male-Male Thread Adapter, M8 X 1.25, 12.7 mm L, M8 X 1.0, 12.7MM L, 13MM Hex - 95316A880 - Mcmastercarr (only needed if you're not welding)
$13.78 - High-Strength Zinc Yellow-Chromate Plated Cap Screw, Class 10.9 Steel, M8 Full Thread, Pitch: 1.25, 50MM LG (25 pack) - 90854A178 - Mcmastercarr
$8.45 - Class 8 Steel Nylon-Insert Hex Flange Locknut, Zinc-plated, M8 Size, 1.25mm Pitch, 13mm W, 11.1mm H (100 pack) - 92461A400 - Mcmastercarr

Total = $81.37 and if you've got boxes full of hardware you can probably get the cost down to $60 and not have to order 121 extra nuts & bolts from mcmaster carr

So what makes the Land Cruiser MC so great? Well, for starters, it's only going to cost $30 to replace if you ever have it die on you. That's $30 with a brand new reservoir and cap. It's small, it's clocked right, it's an OEM grade part with the reliability of a factory MC.

Here's what's challenging about swapping one of these in.

1. Even though the mounting ears are clocked right, the mounting holes are not spaced for a RX7. It requires that you get out your dremel and elongate the holes (pics below).
2. I had to modify my clutch pedal sheet metal with a dremel so that the inner section of the MC's body could slide through (pics below)
Additionally, if you don't weld the coupling nut to the FD's clevis you'll face the following challenges as well:
3. The coupling nut has to be shortened
4. The M8x1.0 leg of the male-to-male thread adapter has to be shortened
5. The MC rod has to be shortened

Here's what we're dealing with:


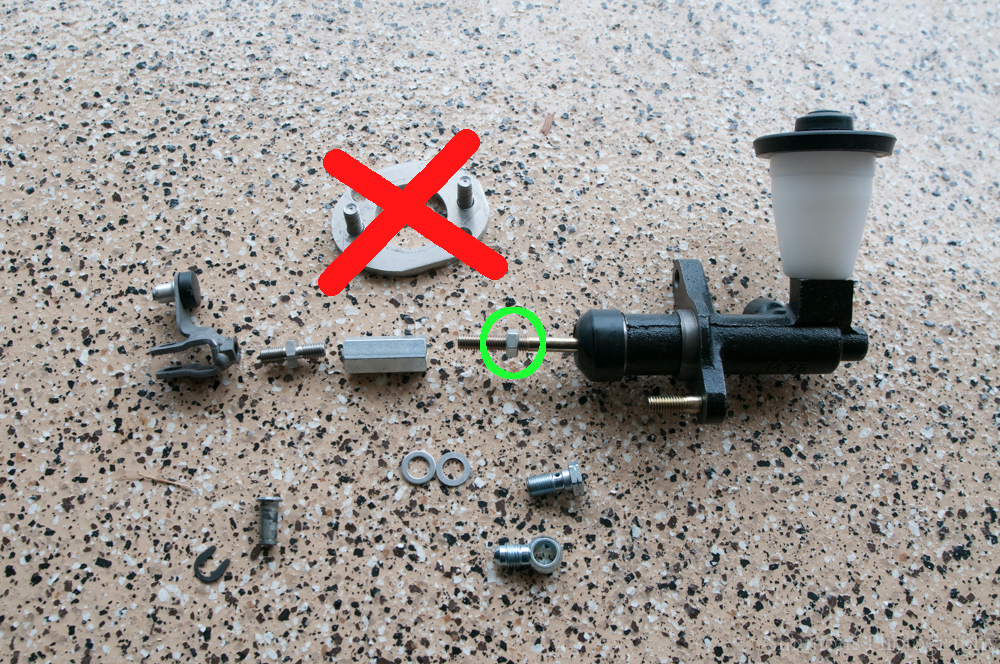
Just ignore the Hinson adapter crossed out in red. It somehow jumped into the picture even though it's not required. Also, in the pic above, the nut circled in green came with the MC and I simply screwed it all the way up on the rod (closest point of the rod to the MC) and red loc tite'd it so I'd have a nut to turn the rod for clutch adjustments (this is something else Greg/Pez recommended welding, but I think red loc-tite is fine for this purpose).
One thing that is not shown in the pic above is that if you are not welding the female coupler directly to the FD's clutch pedal clevis, you'll have to chop ~1/4" off of the end of the MC's rod.


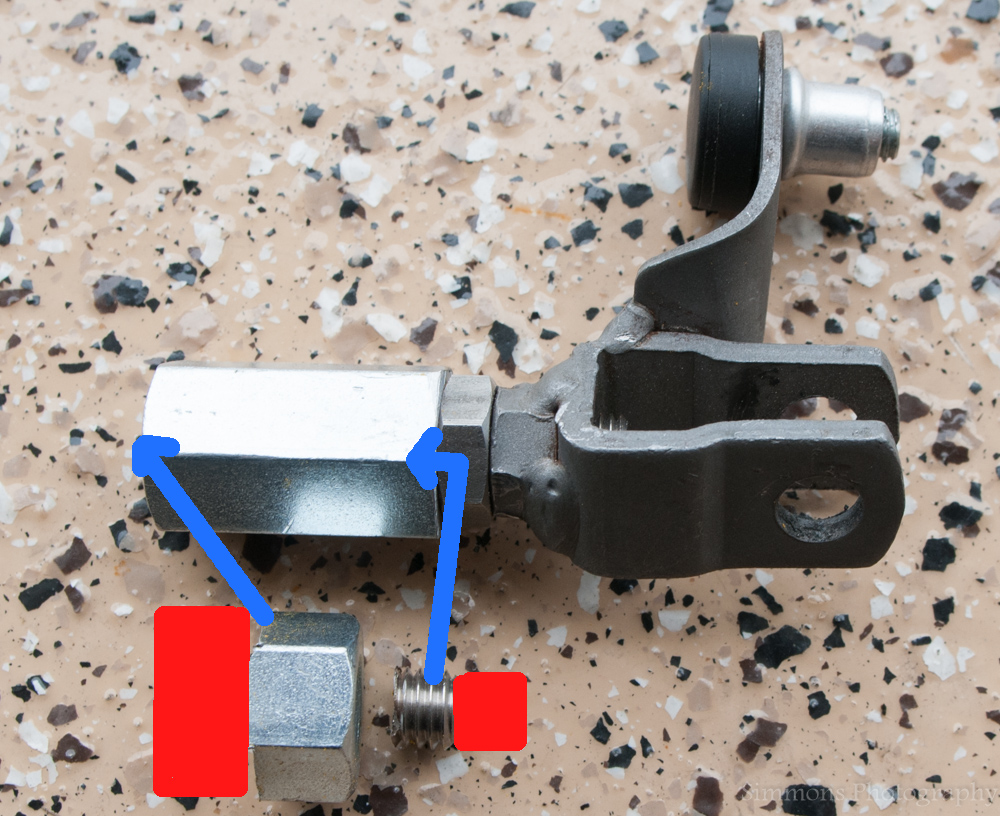
Here's one of the tricker parts for the way I did it (no welding). The pic above shows how I adapted the LandCruiser's M8x1.25 rod to the FD's M8x1.0 clevis. I used a M8x1.25 female coupler and a M8x1.25-to-M8x1.0 male-to-male adapter. This will go together exactly how it shows in the pic above and it'll thread right onto the LandCruiser MC rod. The problem is that it will end up too long for the FD's pedal throw. That's where the little cut pieces below the adapted piece come into place. This pic was taken 1/2 way though the adjustment process. The blocks of red indicate that I SHOULD have cut more off the respective female coupler and the male-to-male adapter (M8x1.25 side). The red blocks show that I should have doubled what I originally trimmed.


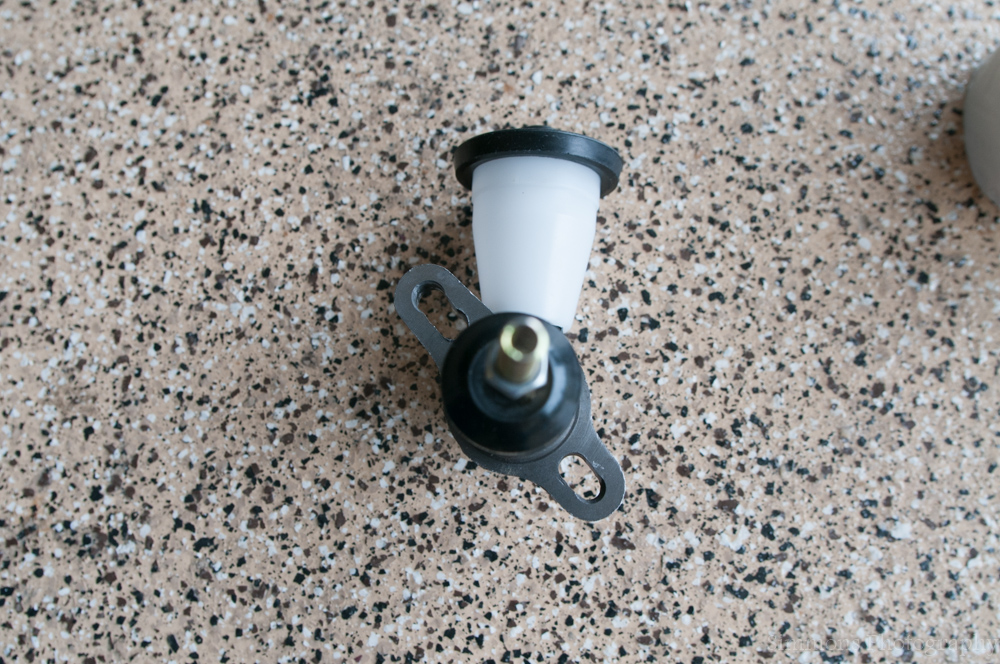
This pic shows how I elongated the MC's mounting holes with a dremel. You can get away with less trimming than I did.


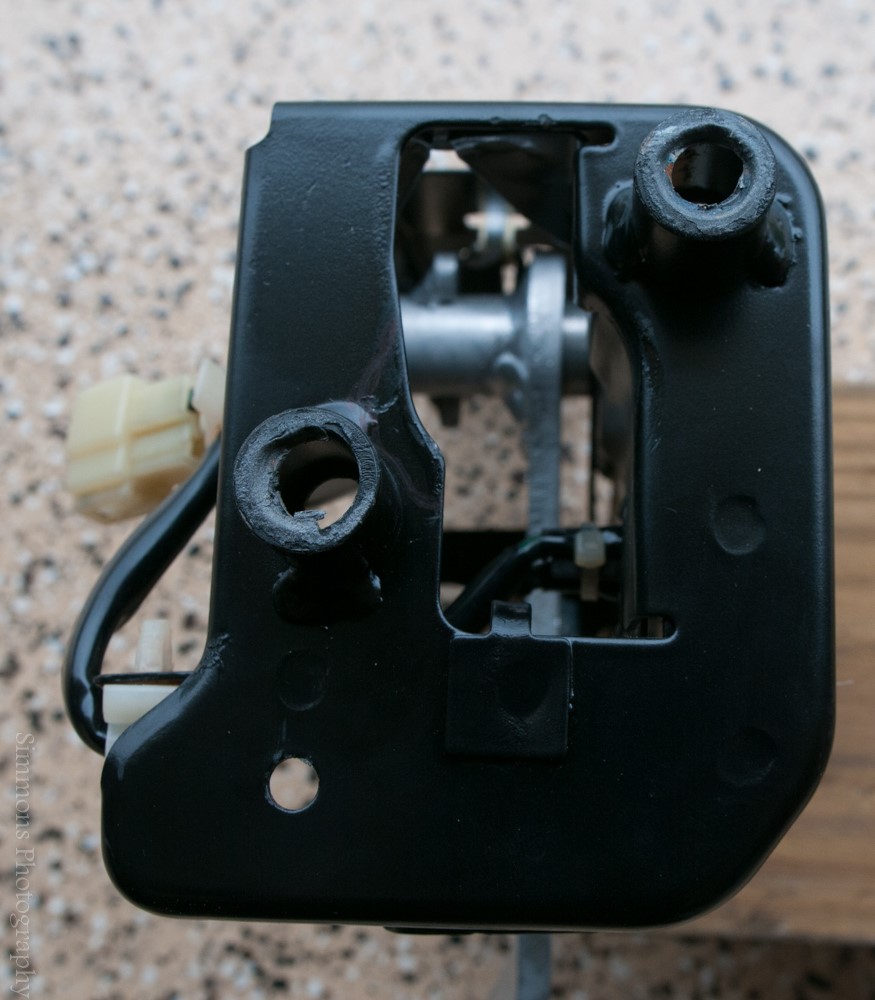
The three pics above show the last modification I had to make. It shows the clutch pedal assembly before and after a quick dremel trim. The third picture shows how the trim created additional clearance so that the LandCruiser MC can fit through and into the pedal assembly.


That's pretty much it. For me it was a 2 weekend ordeal because I chose to try and do this without welding.
It's been working like a champ. After adjusting the clutch pedal throw it feels perfect and works like it was put on at the factory.

Lane

Offline gnictry

Re: Mississippi FD - 383CI Forged LS1 Stroker Build
« Reply #498 on: July 11, 2014, 05:00:39 PM »
Congrats Lane!
2000 WS6 Pontiac Trans Am Modded :wave:
1994 Base w/ PEP Mazda RX7 LS1 Swapped  :drive:

Offline halfspec

Re: Mississippi FD - 383CI Forged LS1 Stroker Build
« Reply #499 on: July 16, 2014, 10:16:12 AM »


Good News Everyone (take 2)!
3 years after taking my car to be painted originally (page 12) with disastrous results (page 18) I've finally picked myself back up and am taking another swing at getting the rx7 painted.

On Monday I loaded up the RX7 and took a trip to hand it over to my new painter.


The new painter is a friend of mine I met when I sold him my brother's 3SGTE longblock. 2 years ago he stopped by my house to pickup the longblock and looked my rx7 over. At the time I didn't know he was quite a talented painter but I soon found out he was the real article. After reading up on his mr2's restoration, I was sold:
http://www.mr2oc.com/showthread.php?t=440169
I actually had him lined up to paint the car around Christmas 2013, but had to back out when I changed my goals and put the car up for sale. Luckily there were no bridges burned and he agreed to take on the project this year.

I drove the RX7 down to Jackson on Monday and spent some time going over all the details of the job. His theory on what happened to my paint in 2011's paint job was that the painter hit the car with really 'wet' (I.E., solvent heavy) paint which dissolved some of the (many) coats of paint below it which rippled when drying. I believe that's exactly what happened.

The plan right now is to strip everything down to the metal and repaint the car from scratch.

As I headed home I got a string of txt messages showing progress already being made:


From the hatch. John said it had 5 independent coats of paint in some places!!!  :o


More of the hatch getting stripped

Yesterday's (Tuesday's) progress:


John said the fender's weren't that bad. They only had 2 coats of paint on them.


Unfortunately, we ran into a little snag Tuesday night. John found that when the last shop reinstalled my rear window they ignored some rust around the window support / seal area and simply caulked over it with eurothane. The plan is to cut out the window again and repair the rust before reinstalling the window.

All-in-all I feel like my car is finally in a true professional's hands and couldn't be happier with the quick progress that has been made over 2 days!

Lane

Offline digitalsolo

Re: Mississippi FD - 383CI Forged LS1 Stroker Build
« Reply #500 on: July 16, 2014, 10:38:08 AM »
Congrats!  I know that's been driving you crazy for a long time.
Blake MF'ing McBride
1988 Mazda RX7 - Turbo LS1/T56/ProEFI/8.8/Not Slow...   sold.
1965 Mustang Coupe - TT Coyote, TR6060, modern brakes/suspension...
2007 Aston Martin V8 Vantage - Gen V LT4/TR6060, upper/lower pullies, headers, tune.
2021 Tesla Model 3 Performance - Stock...ish.

Offline Donthitme

Re: Mississippi FD - 383CI Forged LS1 Stroker Build
« Reply #501 on: July 16, 2014, 10:46:18 AM »
Can't wait to see it finished!

Offline halfspec

Re: Mississippi FD - 383CI Forged LS1 Stroker Build
« Reply #502 on: July 17, 2014, 02:22:06 PM »
Thanks guys! This is definitely been the biggest project's motivation blows I've experienced so it'll be huge once I get over this hump.  :bacon:

Paint update

Got some good news from John. His paint prep supplier let him know that his sandpaper is around 70% off so I'm paying ~$15 for packs of sandpaper that would normally cost $40/$50!


John also sent me the pic above showing how the front of my hood originally had rock chips in it and the chips were simply filled-in instead of being repaired properly.

Since the last post we've decided that we definitely need to pull the rear glass for the work that needs to be done on the hatch. Among the work already scheduled, John talked to me earlier today reccomending that he remove the "glue" the previous body shop used to fill my spoiler holes and weld the holes shut. I had noticed that the filled holes could be seen through the paint at the right angle and it was one of the things I mentioned when dropping off the car. Of course, I'm all about getting this done the right way and I know that filling the holes with metal will allow for seamless fill so I told John to go for it.

Today John ordered supplies so he can really get to work. By my count he's using 3 different primers. One is an epoxy primer that dries ultra hard and is more difficult to work with but he says its worth it as it doesn't shrink and helps battle sand scratches coming back after the paint cures. He also ordered high build primer as well as primer with a flex agent added for painting the bumpers. He also got a ton of sandpaper and a lot of masking supplies.

A side project I'm working on is replacing my door jamb vehicle information sticker / VIN sticker. It's a sticky subject, but I'm trying to get it done because after being masked for 4 coats of paint and receiving a nice gash along the VIN barcode the original sticker is looking rough. Unfortunately Mazda doesn't offer that sticker anymore (Yes, I called Ray), so I got in touch with http://www.ecsvin.com/ which claims to reproduce legal factory identical vin stickers. They're steep (really steep), but the devil is in the details so I'm putting an order in today. We'll see how it turns out.

Still crazy excited about this. It's like Christmas every time John sends me an update on his work.

Lane

Offline scuter83

Re: Mississippi FD - 383CI Forged LS1 Stroker Build
« Reply #503 on: July 17, 2014, 03:53:50 PM »
I'd be excited too!!  Sounds like it is gonna be a clean looking car when you get it back.  My paint/body is so F'd I  guess I am lucky that just trying to buff it is good enough for me.  Too cheap to pay for the actual body work it would take.

I'm interested in the tuning after you get it back.  I know you got some things changed when you were dealing with MAF issues, but curious how it will run when all back together.....Should be pretty mean.

-Scott

Offline wickedrx7

Re: Mississippi FD - 383CI Forged LS1 Stroker Build
« Reply #504 on: July 17, 2014, 05:45:05 PM »
Lookin hella good man!

1993 Touring, 2012 L99, T-56, Ronnin 8.8, Ohlins, Speedhut, Samberg and lots of custom parts
Build Thread - http://www.norotors.com/index.php?topic=19354.0
Pictures - www.flikr.com/wickedrx7

Offline mefarri

Re: Mississippi FD - 383CI Forged LS1 Stroker Build
« Reply #505 on: July 17, 2014, 06:21:29 PM »
Sounds like the primers he's using are the right ones, which shows he's paying attention.  I've heard nothing but good things about epoxy primer over bare metal.  Then you use the high build stuff since it sands easy.
"I'm not sure what your intent was because I don't speak "dumbshit", but next time, start your own thread. "

-Jimlab

"Otherwise it looks like something I can build over a weekend, if I spent the first day watching TV."

-Blake motherfucking McBride

Offline Mik3ymomo

Re: Mississippi FD - 383CI Forged LS1 Stroker Build
« Reply #506 on: July 17, 2014, 06:25:23 PM »
As usual, done right. Staying tuned. A job like that can't be cheap.
93 CYM Base Single Turbo
94 Chaste White Base 22k Original miles Stock
94 Chaste White PEP 29k Miles (sold)
94 Chaste White PEP LS3 T56 Swap (Sold)
93 BB Touring 20B Swap (Sold)
http://www.flickr.com/photos/mik3ymomo/

Offline halfspec

Re: Mississippi FD - 383CI Forged LS1 Stroker Build
« Reply #507 on: July 18, 2014, 09:20:45 AM »
Thanks guys. Definitely looking forward to getting past this and enjoying my new paint :)


Supplies from yesterday


Uh oh! Started work on the hood and found adhesion problems with the newer layers of paint. It was bad enough that they were peeling off!


Picking it off in flakes


Was able to peel the center of the hood off in ~5minutes.


John's theory for the adhesion problems is that the last shop primed the hood then painted it with a thin base coat apparently with the intention of laying down a heavier coat later. Well the heavier coat didn't come quick enough (we estimate a couple of days) and it missed its window to chemically bond to the other layer of paint. In fact, the first layer seems to have cured well enough that the orange peel could be seen when peeling off the top layer.


Muhahaha! Slaaave labor  :D


Nekked


Yes sir! I am definitely feeling overhauled at the moment  :drive:

Lane

Offline digitalsolo

Re: Mississippi FD - 383CI Forged LS1 Stroker Build
« Reply #508 on: July 18, 2014, 09:58:01 AM »
Wow, what a freaking mess.
Blake MF'ing McBride
1988 Mazda RX7 - Turbo LS1/T56/ProEFI/8.8/Not Slow...   sold.
1965 Mustang Coupe - TT Coyote, TR6060, modern brakes/suspension...
2007 Aston Martin V8 Vantage - Gen V LT4/TR6060, upper/lower pullies, headers, tune.
2021 Tesla Model 3 Performance - Stock...ish.

Offline halfspec

Re: Mississippi FD - 383CI Forged LS1 Stroker Build
« Reply #509 on: July 18, 2014, 10:41:49 AM »
Wow, what a freaking mess.

You said it! Over the years I've considered taking a shot at doing this myself. After seeing what John is having to deal with I'm thanking my lucky stars I didn't get involved. I definitely wouldn't have known what to do if I ran into 1/2 of this stuff.

Lane