April 23, 2024, 05:58:30 AM

Author Topic: Mississippi FD - 383CI Forged LS1 Stroker Build  (Read 345160 times)

Offline halfspec

Re: Mississippi FD - 383CI Forged LS1 Stroker Build
« Reply #285 on: May 24, 2012, 04:21:53 PM »
Alright kids. Since it was requested, here's how I did my driver's side actuator:

Here are the parts and quantities you will need:

(2) - http://www.amazon.com/Absolute-SRS105-5-Pin-Socket-Interlocking/dp/B005EUWMU2/ref=sr_1_1?s=electronics&ie=UTF8&qid=1337888729&sr=1-1
(2) - http://www.mouser.com/ProductDetail/TE-Connectivity/1432791-1/?qs=R6sPIhOkp6of%252bP3hbc%252bwGA%3d%3d
(1) - http://www.amazon.com/dp/B0009SWLE6/ref=pe_175190_21431760_C1_cs_sce_dp_2
(1 - Set) - http://car-speaker-adapters.com/items.php?id=SAK068
(1) - Alarm of your choice as long as it supports lock/unlock with negative pulses


Wiring next :D


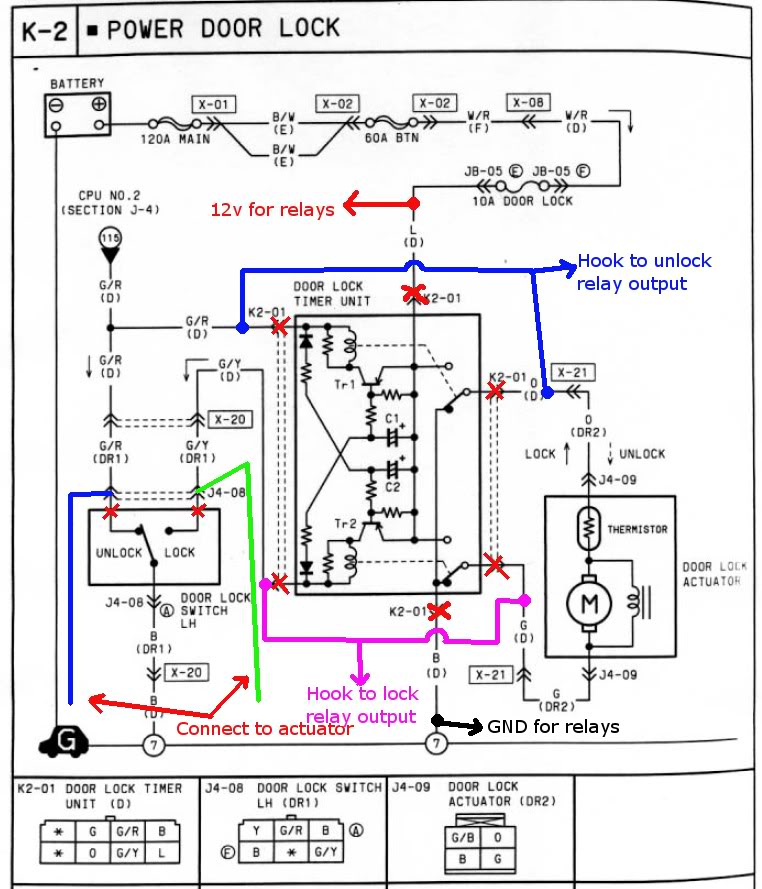
On the factory diagram, all you are really working with is two connectors. K2-01 which is in the drivers side kick panel and plugs into the factory lock controller (which is green) and J4-08 which is a connector on the upper left hand side of the driver's door circled in red below:


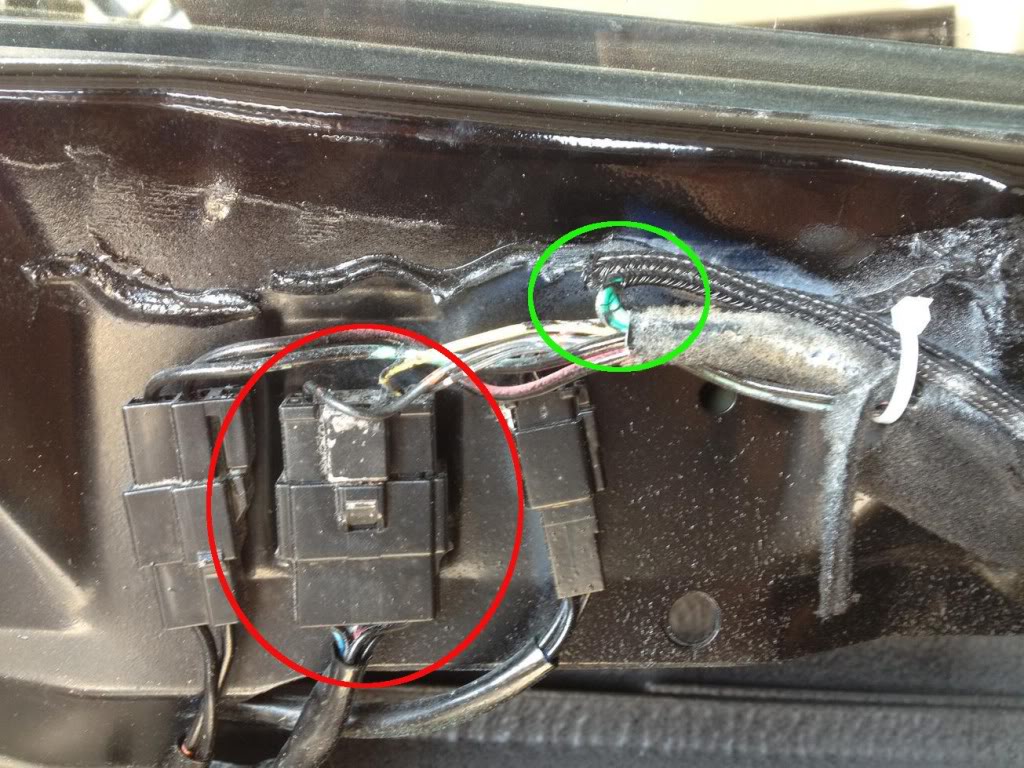
The green circle shows where the wiring starts which leads to my new actuator in the door. I just depinned the green/yellow and green/red wires from J4-08 and ran them to the new actuator. One thing I didn't keep track of is the polarity of the green/red and green/yellow wires in respect with the new actuators. If you finish and your driver's side locks when your passenger side unlocks, you'll simply have to switch the wires of the actuator.

Alright, that handles the wiring through the door using existing wiring and not having to deal with the f&#$n stupid X-20 connector. Now comes the fun part.

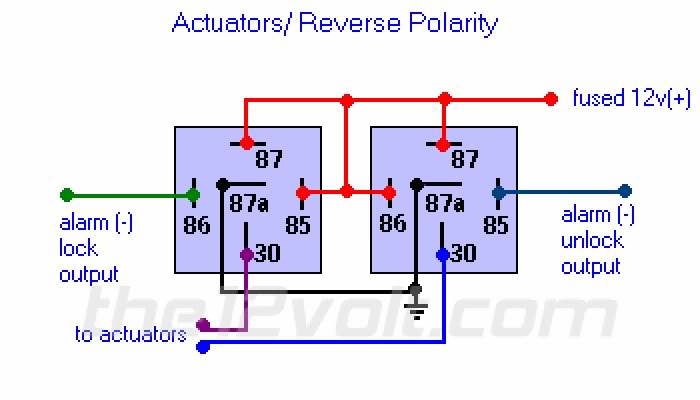
Go ahead and chop off the connector of K2-01 and throw away the OEM green lock controller. Connect the Green/Red wire to the Orange wire wire and connect both to the unlock relay output shown in blue at the bottom of the second diagram. Likewise, connect the Green/Yellow wire to the Green wire and hook it to the lock relay output shown in purple at the bottom of the second diagram. This basically ties the existing actuator and new actuators together and hands their control over to the new relay system. Connect the 12v wires in the relay diagram to the Blue wire from K2-01. Connect the GND wires from the relay diagram to the Black wire from K2-01. Now all that's left is to connect your lock and unlock wires from your alarm system to the lock and unlock inputs on the relay diagram. When you're done you should have used all the wires that ran to K2-01.

The pros of wiring it this way is that you get rid of the old lock controller and replace it with brand new relays. You also don't have to do any wiring through the door connector. The cons of wiring it this way is that you lose the passenger side mimmic of the driver's side lock / unlock latch. I.E., if you lock your driver's door manually with the latch, the passenger side lock will not actuate to lock like it used to with the OEM system.

Alright, now on to more install pics:

Here's how I mounted the actuator:


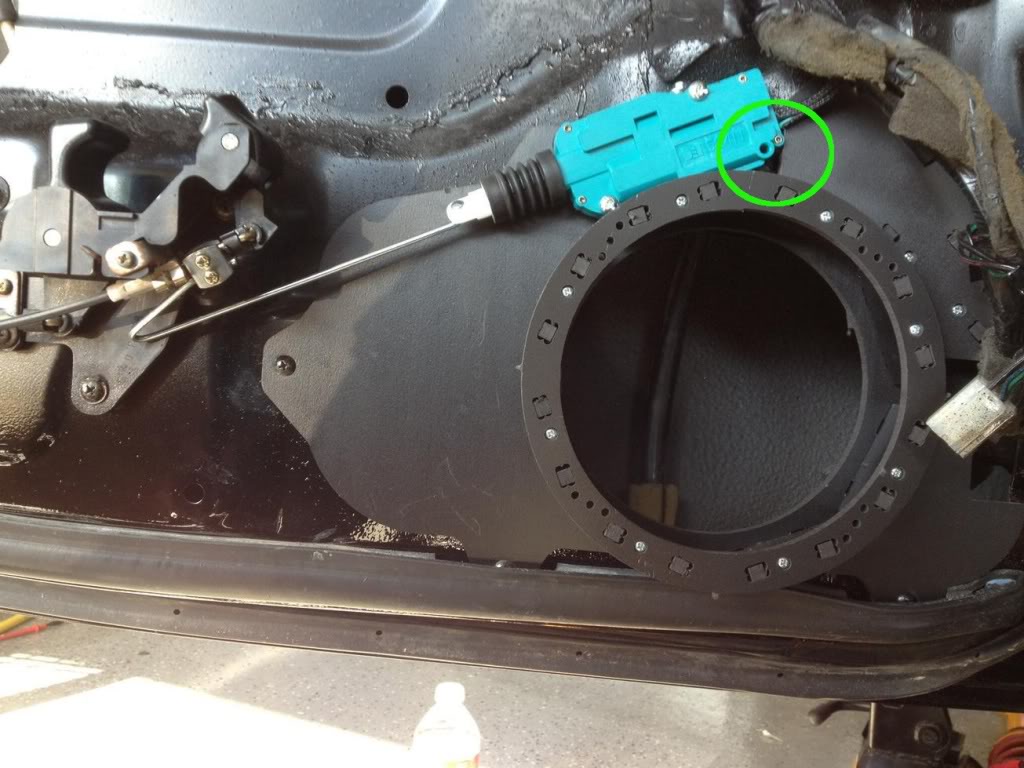
The green circle shows a good reference point for mounting the actuator. Its basically a level change in the new speaker panels. Just butt the actuator up against that and you should be golden. The actual mounting the actuator was acomplished by a nutsert in the door skin, and a bolt + nut that went throught the speaker panel.


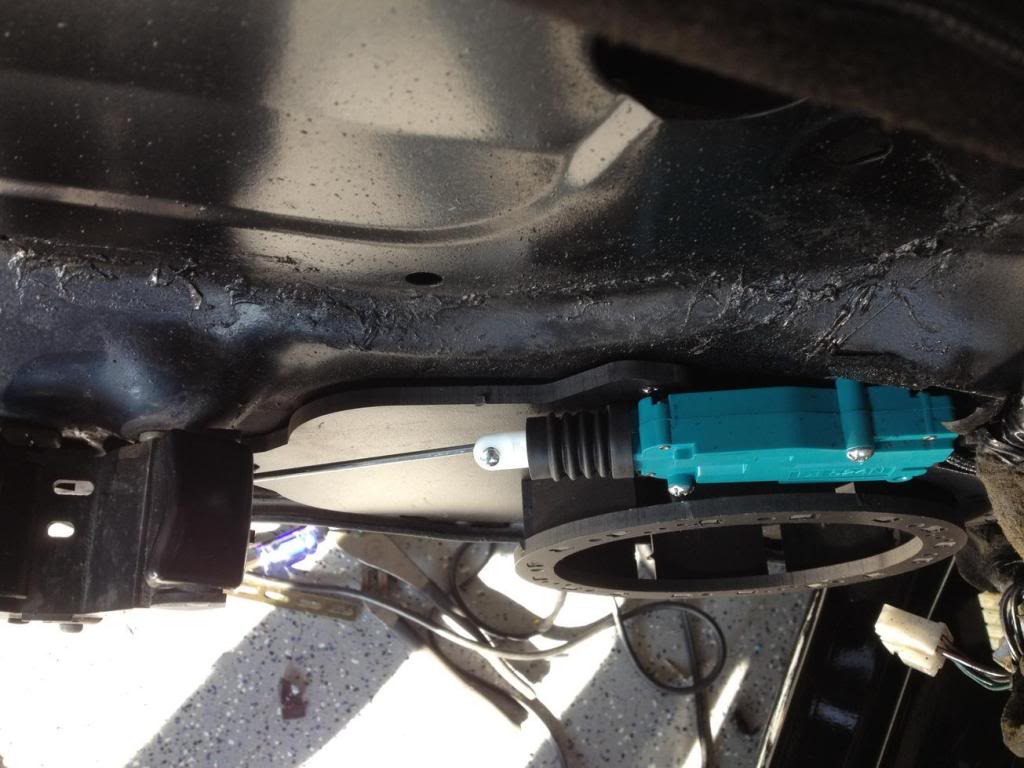
Here's a view from above. You want to keep the actuator arm as close as possible to the door skin so it doesn't interfere with the window switch that will occupy a lot of this space later on.


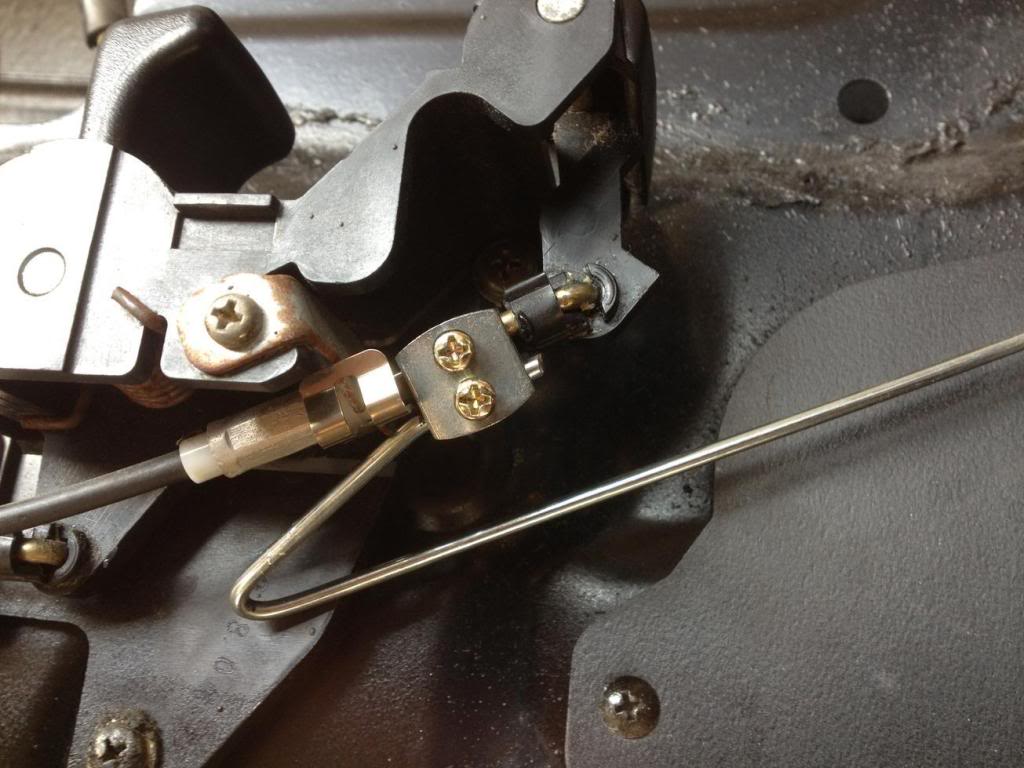
Here's a view of how I connected the actuator rod to the latch assembly. All of this hardware comes with the actuator. When installing, you'll want to manually move the actuator in and out to make sure the push and pull's throw is correct for actuating the latch. If you do it wrong, you'll end up putting pressure on a lot of parts and you'll probably break something later on.


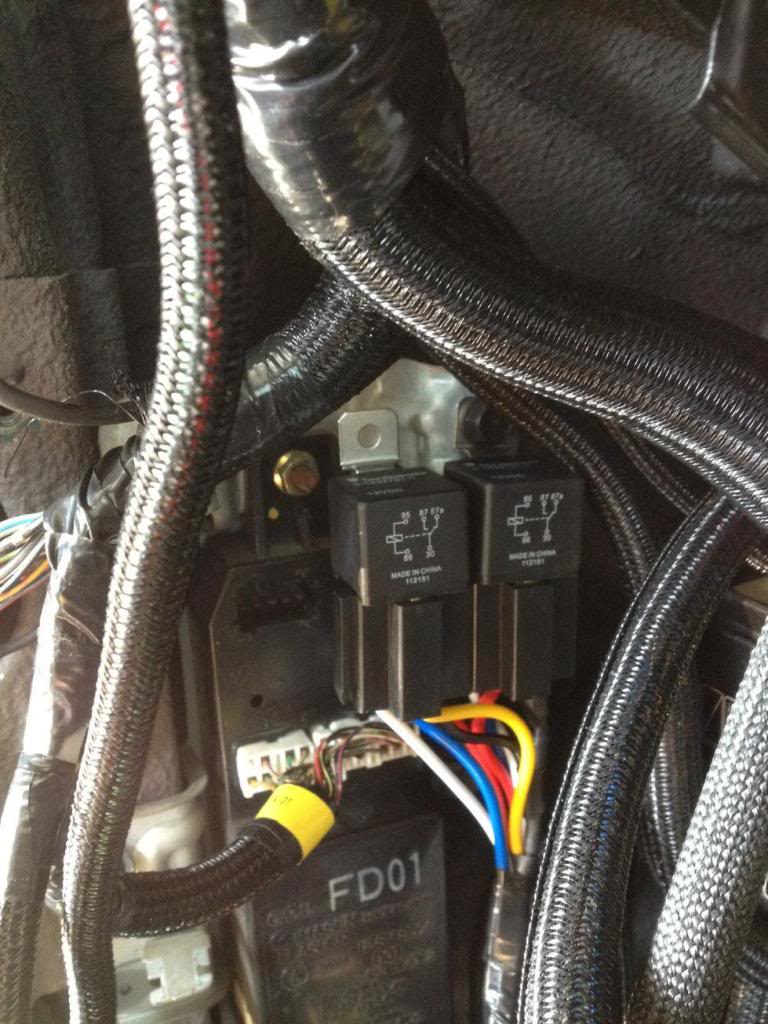
Finally, this is where I mounted my new relays.

System works VERY well. I'm happy now  :yay:

Lane


Offline halfspec

Re: Mississippi FD - 383CI Forged LS1 Stroker Build
« Reply #286 on: May 24, 2012, 04:37:54 PM »
Please do a detailed write up on this.

After some thought I have decided to post a parts list (~$150 total) + suppliers and a writeup which should be online after another week. However, I will insist that my instructions / parts not be used for profit. If I see someone start an A/C line business on here that uses my parts list I'm not going to be happy ;)

I decided against stealing business away from the existing venders primarily because Pez/Greg has helped me free of charge over the whole 2 years of my build and I don't want to do anything that would hurt his business. On the other hand, Greg has always seemed to be very open with the details of his work and I know a lot of his diagrams are floating around this forum. Because of this I think offering people a DIY option isn't going to really affect his margin since there will always be people whoes time and patience is worth more than paying $450 for a drop in AC line solution.

Look out for more pics and instructions soon.

Lane
 

Offline Donthitme

Re: Mississippi FD - 383CI Forged LS1 Stroker Build
« Reply #287 on: May 24, 2012, 04:57:45 PM »
Very nice, which alarm did you get?  :P

Offline halfspec

Re: Mississippi FD - 383CI Forged LS1 Stroker Build
« Reply #288 on: May 24, 2012, 05:15:57 PM »
Very nice, which alarm did you get?  :P

Viper 5901 althought I can't completely recommend it. Its hood switch pin was garbage at the actual brain. It had two settings. #1 = Normally Open or 12v. #2 = Normally closed = Gnd. #1 is supposed to alarm as soon as it sees GND. #2 is supposed to alarm when it sees Open or 12v. The stock hood switch shows GND when the hood is closed and Open when the hood is open. You would think it would work with option #2 would work, but it didn't. Switching the polarity of the stock hood switch to 12v to make it work with option #1 didn't work either. Turns out my brain had a problem sensing an "Open" position which screwed with options #1 and #2. It didn't even have to be plugged to a sensor for the alarm to think the hood was Open using option #2 while the hood was CLOSED. It was a clusterfu#k to say the least. I tried different things all day after I figured out what the issue was. I ended up designing a circuit for the stock hood sensor that provided 12v (using a weak pullup resistor) when the hood was closed and GND when the hood was open and used the alarm's option #1. Works great but it was a MAJOR PITA and it was a serious modivation drain. This part that really sucks is that the trunk sensor pin is made the SAME way and it worked the way it was supposed to.
One last thing is that I thought the 5901's installation manual was crap at best. It doesn't do a good job of explaining anything and leaves out some pretty critical information about how to use the starter kill when you AREN'T using the auto-start feature.

Sorry for the rants. I've invested probably 6x more time that I should have needed to to get this alarm installed perfectly. Still, they say a car alarm is only as good as its install, and mine is pretty fantastic if I do say so myself :D

Lane


Offline halfspec

Re: Mississippi FD - 383CI Forged LS1 Stroker Build
« Reply #290 on: June 18, 2012, 10:12:50 AM »
Well this weekend was a rush. I just turned 30, and I've officially had this project car since I was 27 so some anxiety set in. Also, I'm getting married this Friday, so wrapping up the car is really becoming a huge priority now.


Trimming up my 93 bumper support for my 99 spec bumper


Support structure transferred, bumper installed, and lip installed


Installed all my rear lights. Everything works!


Started throwing my trim back in


See any Dinoc yet? :)


Dash still has a ways to go. The green and white wires hanging from the roof are a switched 12v source I'm tucking in with the dome light in case I ever want to run a radar detector :)


Random shot of my surge tank back from powdercoating (65Imp)


Really proud of these. A friend loaned me his beadlock crimper so I was able to get them finished last week. Also sleeved these in DEI Firesleeve.


Here's a few shots of how I routed things and where I put my dryer. The dryer is something I scoured datasheets for. It has a M10 schrader fitting built in that accommodates the GM pressure sensor so I didn't have to build the fitting into my softlines.  More info on the lines will come soon.


And here's where I'm leaving it while I head to Jamaica for my Wedding and Honeymoon.

Lane


Offline digitalsolo

Re: Mississippi FD - 383CI Forged LS1 Stroker Build
« Reply #291 on: June 18, 2012, 01:44:56 PM »
If it is too much anxiety, just give me the car.   I won't have any anxiety about that at all.   :D
Blake MF'ing McBride
1988 Mazda RX7 - Turbo LS1/T56/ProEFI/8.8/Not Slow...   sold.
1965 Mustang Coupe - TT Coyote, TR6060, modern brakes/suspension...
2007 Aston Martin V8 Vantage - Gen V LT4/TR6060, upper/lower pullies, headers, tune.
2021 Tesla Model 3 Performance - Stock...ish.


Offline Pez

Re: Mississippi FD - 383CI Forged LS1 Stroker Build
« Reply #293 on: June 18, 2012, 02:34:10 PM »
Damn it, get that ground strap off the strut tower.  there are plenty of places to put it (maybe not as accessible, lol) that are out of sight.
FC/FD plug and play wiring harnesses, LSx swap AC systems, LSx swap power steering lines.

Offline digitalsolo

Re: Mississippi FD - 383CI Forged LS1 Stroker Build
« Reply #294 on: June 18, 2012, 02:50:30 PM »
If you send me that car, I may not send it back.  :D
Blake MF'ing McBride
1988 Mazda RX7 - Turbo LS1/T56/ProEFI/8.8/Not Slow...   sold.
1965 Mustang Coupe - TT Coyote, TR6060, modern brakes/suspension...
2007 Aston Martin V8 Vantage - Gen V LT4/TR6060, upper/lower pullies, headers, tune.
2021 Tesla Model 3 Performance - Stock...ish.

Offline WannaBeFast

  • Supporting Member
  • Top Fuel
  • Posts: 2875
  • Single and Looking
  • View Gallery
    • View Profile
Re: Mississippi FD - 383CI Forged LS1 Stroker Build
« Reply #295 on: June 18, 2012, 02:55:05 PM »
Very nice. The all black is working really well for you.

Offline halfspec

Re: Mississippi FD - 383CI Forged LS1 Stroker Build
« Reply #296 on: June 18, 2012, 03:07:30 PM »
Damn it, get that ground strap off the strut tower.  there are plenty of places to put it (maybe not as accessible, lol) that are out of sight.

Haha! Alright alright. It hasn't bothered me until you brought it up, but it does stick out now that I'm taking a second look at it. Oh well back to the drawing board. I'll have to see if there's anything I can latch on to underneath the car :)

Lane

Offline karsty

Re: Mississippi FD - 383CI Forged LS1 Stroker Build
« Reply #297 on: June 18, 2012, 03:41:42 PM »
I'm getting married this Friday, so wrapping up the car is really becoming a huge priority now.

Just don't wrap it up and then go and sell it.  ;)

Offline mefarri

Re: Mississippi FD - 383CI Forged LS1 Stroker Build
« Reply #298 on: June 18, 2012, 05:30:13 PM »
I'll be stealing that black heat sleeve thank you very much.
"I'm not sure what your intent was because I don't speak "dumbshit", but next time, start your own thread. "

-Jimlab

"Otherwise it looks like something I can build over a weekend, if I spent the first day watching TV."

-Blake motherfucking McBride

Offline Cryptic

Re: Mississippi FD - 383CI Forged LS1 Stroker Build
« Reply #299 on: June 18, 2012, 10:24:42 PM »
Sooo clean! I love everything about this build. Nice work as always Lane.
1995 427 LS3 Burnout Widebody FD
My build thread
2011 Ford F250 CCSB 6.7L