April 17, 2024, 11:21:34 PM

Author Topic: Berto's LS1 T56 FC Build Thread  (Read 45258 times)

Offline Berto

Berto's LS1 T56 FC Build Thread
« on: May 17, 2010, 10:28:32 PM »
Well I thought I'd go ahead work my way through rebuilding my build thread after it was deleted from V8rx7forum.  This will be a bit more to the point and a lot less of what the swap was really like while I was actually doing it, if that makes sense.  If you have any questions that I answered on things that I missed on the original thread please ask or if its something new I will answer it too!  I won't rebuild the whole thread in one day, it will take some time.

I bought my FC in 2002 and was a die hard rotary guy until I got to the point where I developed an internal coolant leak in my rotary pushing me towards rebuild #3, I was fed up.  It was time to sell the car (no one gave me what its worth) or move forward with a v8.

Here is the engine bay when I started:


First things first, pull the rotary!!


I snagged a 2000 LS1 out of a T/A:


nom nom, where is the V8.


Old rotary on a stand


I bought the engine that was mated to an automatic transmission so I needed to find a T56, boy was i in for a surprise on the prices! I was able to find a shop in Louisville that was selling a rebuilt one out of a 1998 Fbody. got it for $1300.


Here is my parts list through March 2010.


« Last Edit: May 20, 2010, 09:29:11 PM by Berto »

Offline Berto

Re: Berto's LS1 T56 FC Build Thread
« Reply #1 on: May 20, 2010, 09:24:51 PM »
First I went ahead and Cut the driver side trans mount. Cut it as flat as you can then grind the lip down.  I went ahead and sealed the edge with silicone to prevent water from getting in between the layers of the metal.  I also went to Lowe's and found a sweet chrome plug to plug up and seal the hole in the body.


While I am waiting for a few things I went ahead and started making the adapter plate for the clutch master cylinder (Willwood 7/8" bore). I use 1/2" thick aluminum and some studs.  To thread the master cylinder rod into the pedal what I did is took the Factory Master cylinder found out what the thread size was, and then ran a tap on the wilwood MC.  The threads are very close allowing you to do this without any bad side effects. 

I had to cut off some of the Wilwood MC rod.  I've always found it easier to slip the die onto the rod, then cut, and then back off the die to clean up the threads.


Offline Berto

Re: Berto's LS1 T56 FC Build Thread
« Reply #2 on: May 20, 2010, 09:36:56 PM »
So at this point I am waiting for my Russell Slave Cylinder Adapter (see Part number in my first post).  So I started doing a few little things to the engine before it goes in Chassis.

Here is the engine, oooo ahhhhh


I made some EGR block off plates out of some 1/8" thick steel bar stock and used an expandable freeze plug for the EGR block off.  Again I forget the size but shouldn't be too hard to find one.


I bought a 45 Degree NPT adapter for the Autometer oil pressure sender.  Please see the original parts list for the adapter that goes from straight thread to NPT.


Also, decided I was not going to run A/C or Powersteering.  A/C is no biggie since its run off its own belt.  However the powersteering pump is an integral part of the main serpentine belt.  Here is the arrangement I decided to go with.  By adding the ribbed idler I was able to get a bit more belt wrap on the water pump.  I have been running this set up for 1000 miles with no problems.

Offline Berto

Re: Berto's LS1 T56 FC Build Thread
« Reply #3 on: May 20, 2010, 09:44:01 PM »
If I had any advice for anyone starting this swap.  If you are going to change the GM quick disconnect fitting out of the slave cylinder to convert it to a -3AN fitting I recommend you order Russell P/N 640281 ASAP.  When I ordered it, it was backordered for a week, well they kept pushing it back.  I would have been waiting for MONTHS until it finally shipped if it wasn't for FCsRule shipping me an extra one. 
Unfortuantely I did not take any pictures converting the fitting because FCsRule's thread had great pics.  If you have any questions please shoot me a PM and I can try to walk you through it.  Its pretty easy though.  The only thing holding the GM connector into the slave cylinder is a roll pin that all you have to do is punch it out and put the Russell part and put the roll pin back in.

The reason I stress that you need to get your slave cylinder/line figured out is that it will basically hold up your build.   Since the slave cylinder is concentric with the trans input shaft, you can't put your engine and trans together for installation without having your clutch hydraulics figured out.


Offline Berto

Monte Carlo Radiator
« Reply #4 on: May 20, 2010, 09:58:03 PM »
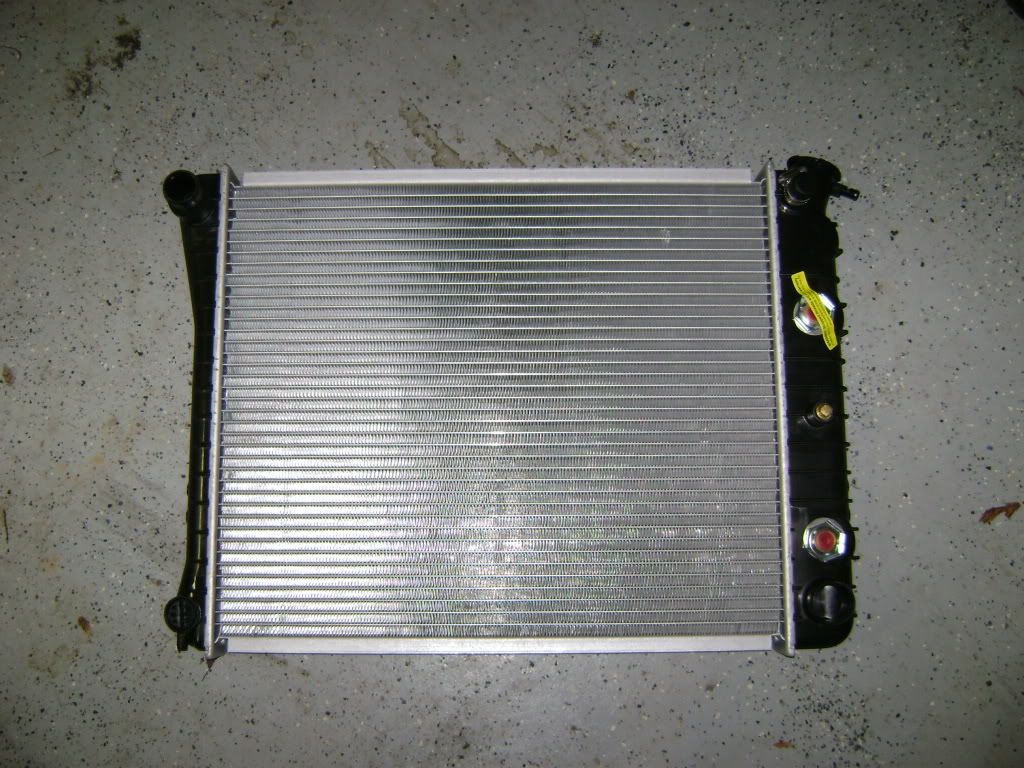
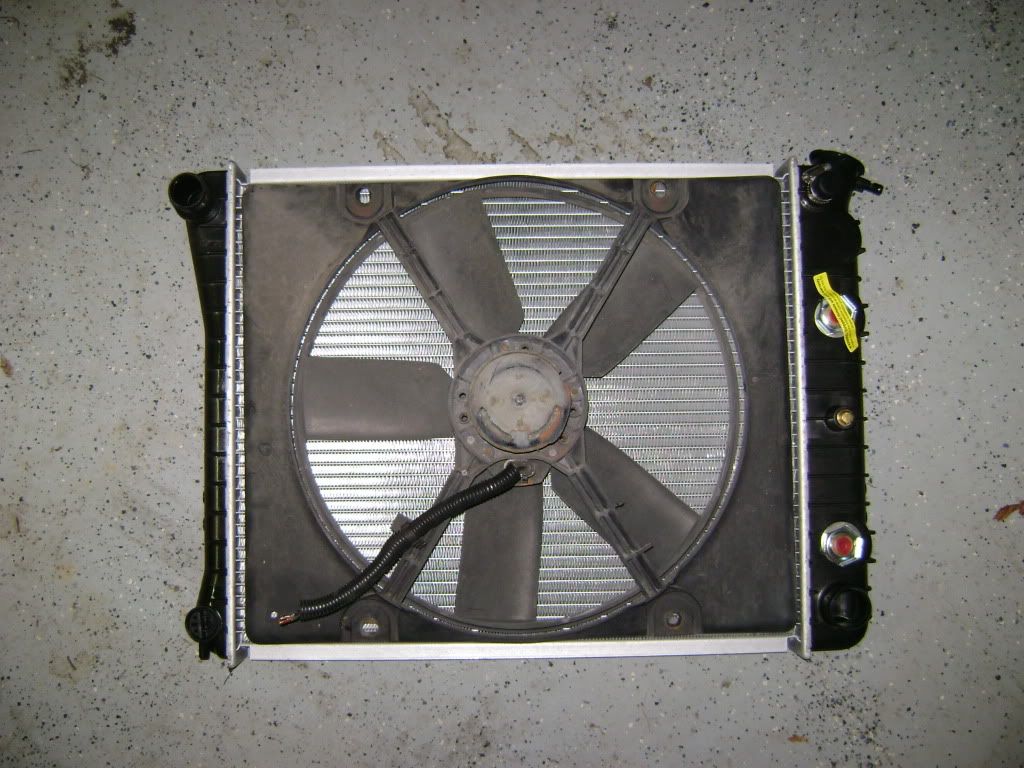
While I am waiting for my Russell fitting I decided I would go ahead and work on the radiator, which was nice to work on with the engine out of the way.  I decided to go with the Monte Carlo Radiator.  It was a bit smaller than the C4 corvette but did not require 'massaging' the frame rails.

I played around with two different fan options I found the Ford Taurus 3.0 V6 fan at the junk yard.  The only reason I got it is I didn't realize the popular Taurus fan is for a 3.8 V6.  Either way it seems to be a very similar design.  The other fan idea I got from Antirotor, turned out to be a Fiero Fan.

This pic shows the Fiero fan is slimmer than the Taurus fan.


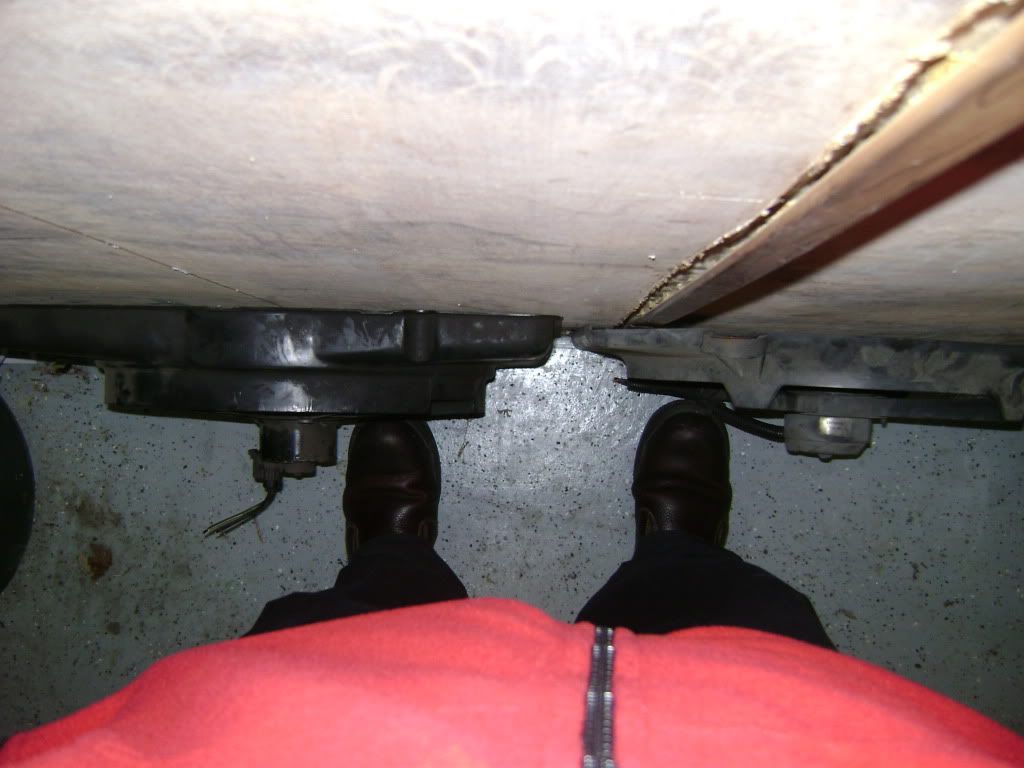
Did some cutting, you'll see once you try to fit a radiator...what has to go and what can stay. Nom nom.


Taurus Fan


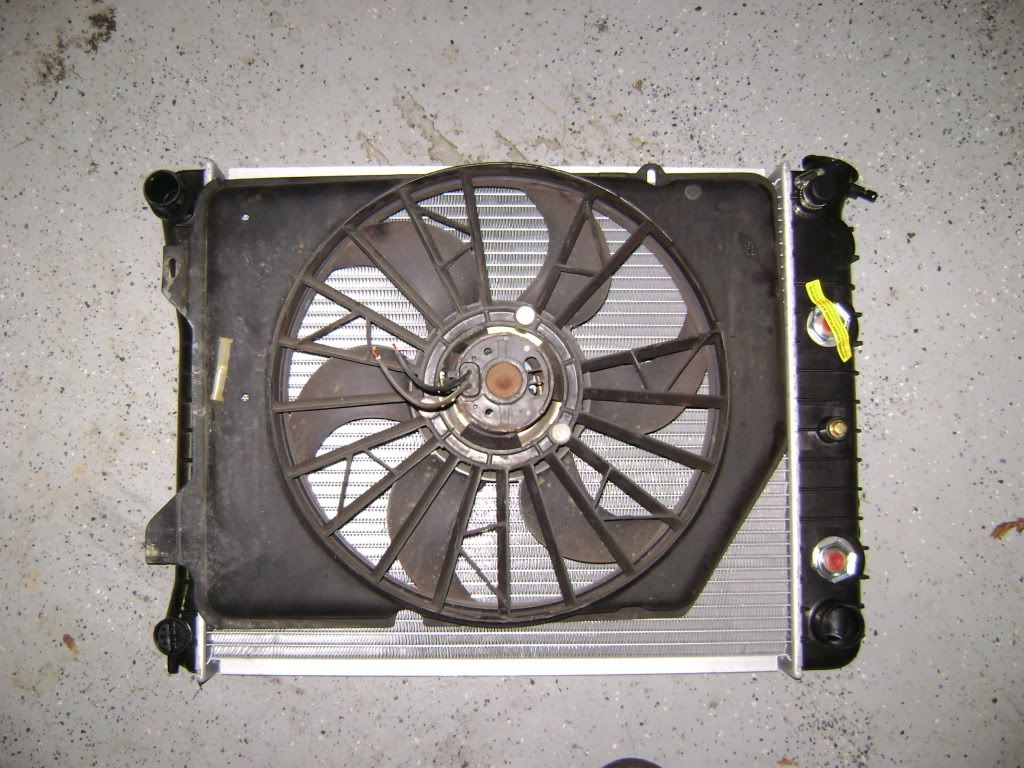
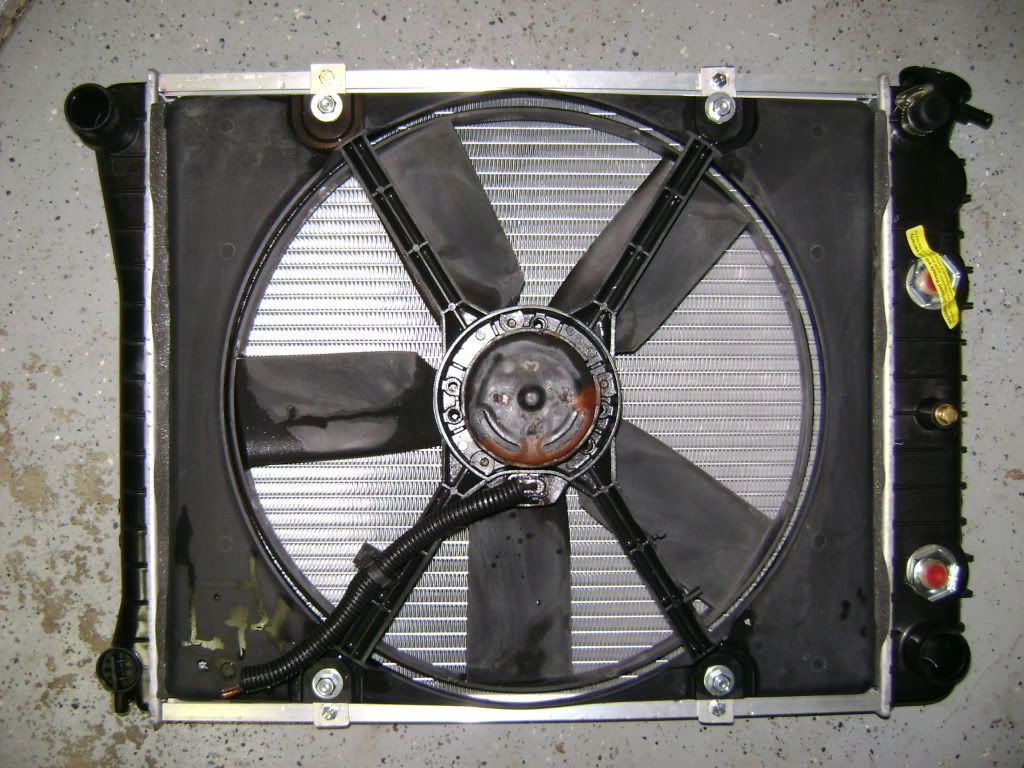
Fiero Fan, fits MUCH nicer.


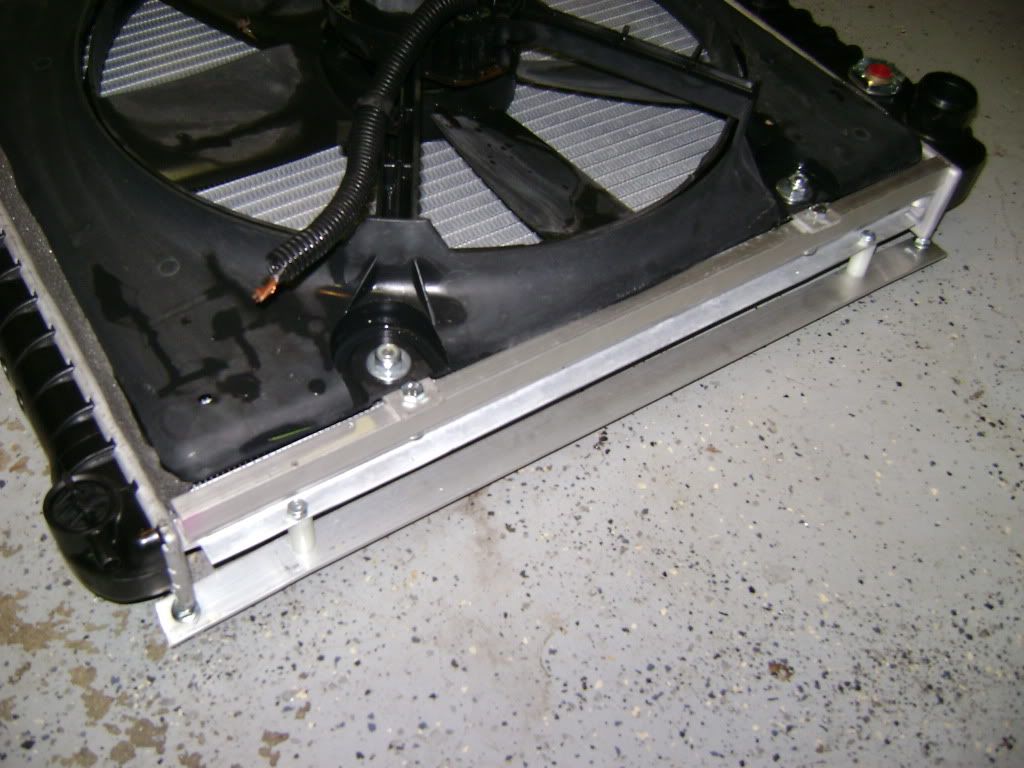
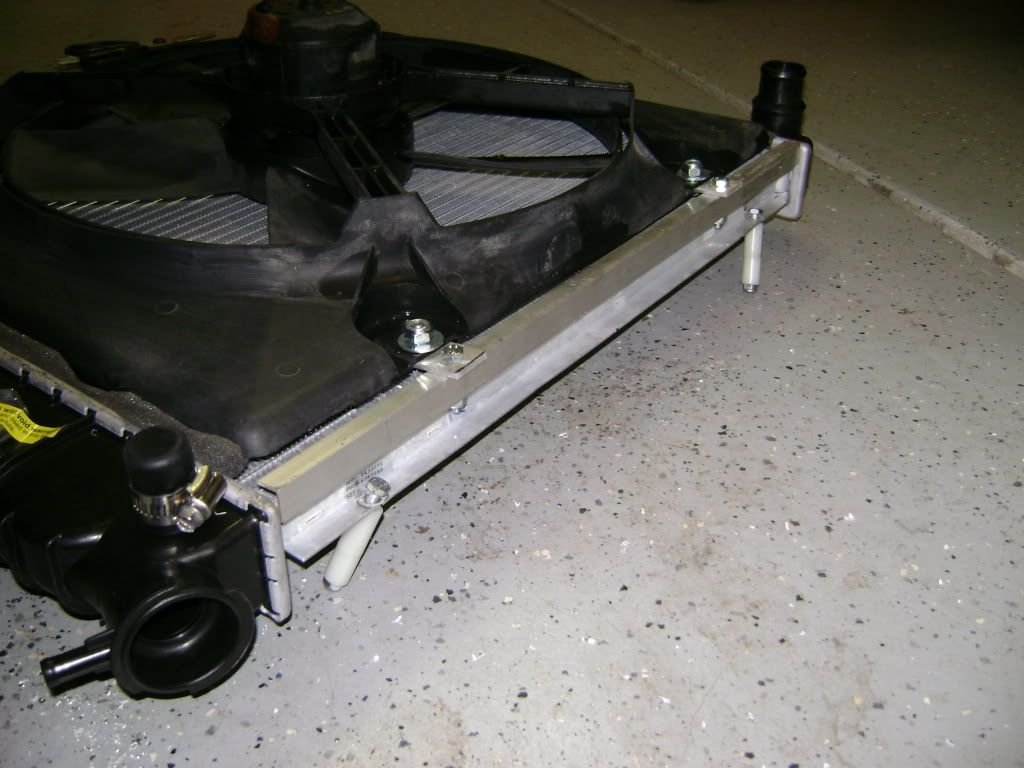
Used some aluminum U-chanel for the top and bottom fan mounting.  the U-channel helps seal the top and bottom of the fan while also spacing it out from the radiator some to help with the wind velocity profile.


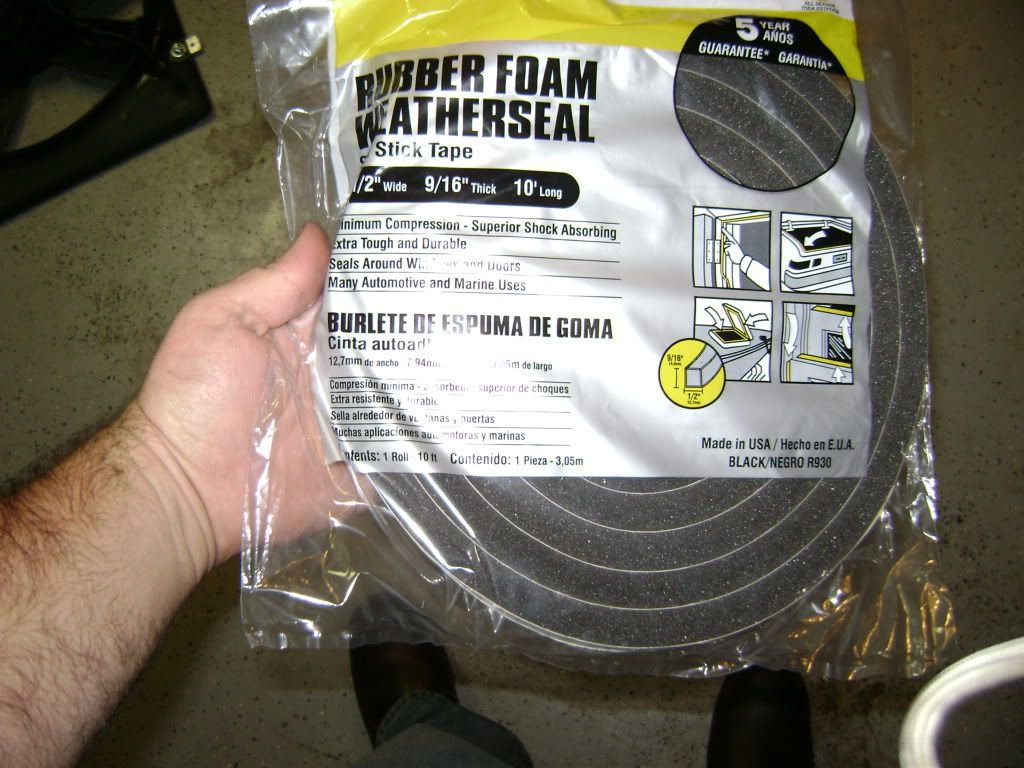
Used some foam sealer from Lowes to seal the sides.


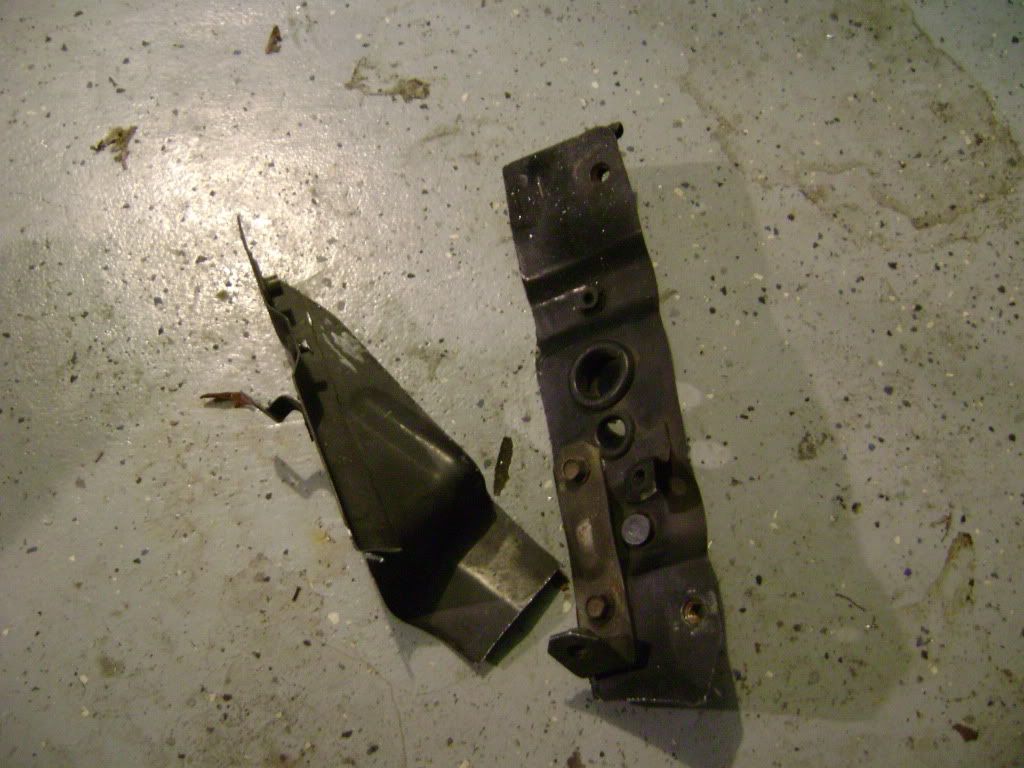
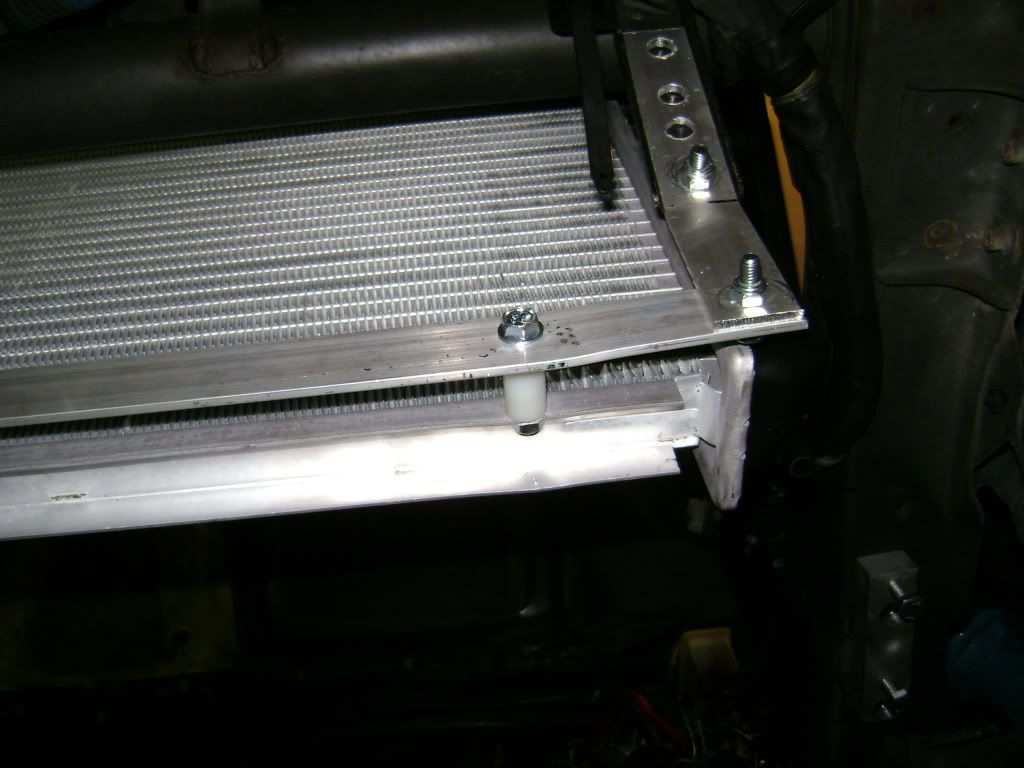
Here are some pics of the Mounting hardware I made


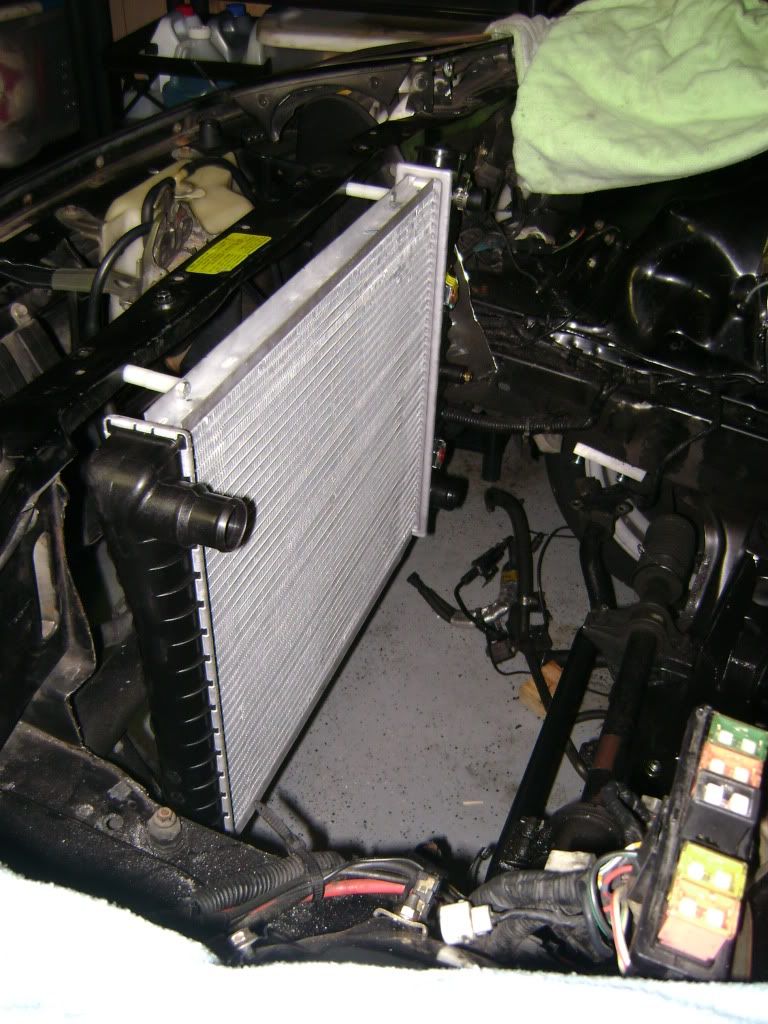
The bottom of the radiator is actually the same level or a bit higher than the subframe.


I have had the car running with this set up (use the PCM to control the fan) and have not had any over heating issues.  I am very pleased.

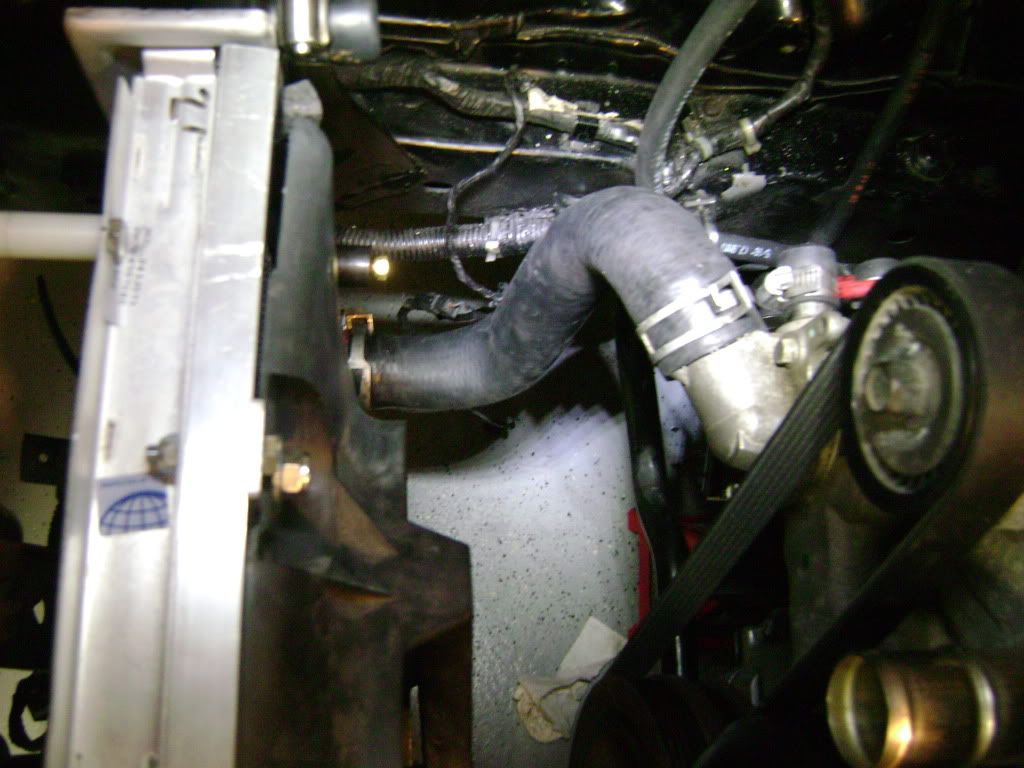
For the hoses it is very Simple.  The bottom hose I was able to use the STOCK top hose for the RX-7 radiator.  It makes a great 1 piece lower hose! (I like free stuff!)


I went ahead and ordered this steam vent from Jagsthatrun.  its a bit pricey I think $50 with the sight glass but I feel that it was well worth it.  Being that this radiator does not have provisions for a coolant level warning/sensor the site glass is crucial in making sure that you don't have an air pocket in the system.  A lot of people have problems with getting air out of the cooling system so it just wasn't worth the risk.  Fortunately I have not had any major issues with filling.  I just Undo the top hose at the radiator and fill the hose and put it back on the radiator.  Then I just bleed the system with the JTR steam vent and it does the trick very well (by getting the engine to operating temp).


In my parts list you can see the part number for a seamless upper hose, the only reason I cut mine was to put in the steam vent.  Thanks to antirotor for finding a good top hose for the monte carlo radiator!!

Offline lm38330

Re: Berto's LS1 T56 FC Build Thread
« Reply #5 on: May 21, 2010, 01:31:08 AM »
more info on the radiator mounting hardware please?
awesome build

thanks
« Last Edit: May 21, 2010, 01:40:50 AM by lm38330 »
S4 FC LS1/T-56-Gone but not forgotten

91 Coupe RX7-Hoping to get back in the game soon.

DD-2005 Altima SE-R 3.5VQ/6speed-350Z slayer :drive:

Offline FCs Rule

Re: Berto's LS1 T56 FC Build Thread
« Reply #6 on: May 21, 2010, 08:23:14 AM »
hey berto i been meaning to ask you on your setup for the belt did your bottom bolt on the alt bracket rub at all? mine did only at higher rpms i only noticed it because my bolt had rubber on it :(
._________________________
|.....Overnight.....................| ||
|........Japan Parts................||'|";,___.
|_..._...____________======||_|_|...,]
"(@)'(@)""'''''''''''''"'''"**|(@)(@)*****"(@)

hate to say it but i told you so!

Offline Berto

Re: Berto's LS1 T56 FC Build Thread
« Reply #7 on: July 04, 2010, 06:04:59 PM »
Quick pic of the battery relocation job.  The previous owner had done the 'relocation' which consisted of running wires to the bin.  This was not bolted down or anything.  I added the stainless steel cage.  Also I am waiting for a 200 amp breaker to put in there.


So I ended up going with a Spec Stage 1 clutch.  I had done my homework on the possible requirement of the 1/8" shim behind the slave cylinder depending on the clutch.  So we put the spec flywheel on, then the clutch, then the pressure plate.  After taking all the measurements for the shim it was inconclusive whether I needed the shim or not.  The instructions with the clutch said it was required.  However, the fingers were all different distances.  I talked to spec and they said sometimes that happens until the first few times everything is actuated and the clutch is 'settled in'.  After a few hours of worrying and remeasuring things, we decided the best decision would be to omit the shim.  I can say I have driven the car and so far I have no had any problems with the clutch.  At one point the gears wouldn't go in so I had to adjust the clutch rod/pedal engagement and everything has been good since.

Also, Just for good measure I got the braided remote bleeder for the slave cylinder ($50).  I figured with all of the issues of getting clutch dust in the hydraulics and just the pain in the but that clutch hydraulics usually are...this has been a great investment.


Here is me standing over a mechanical accomplishment, showing a bit of man mane and bling bling.


The only problems we had was that the two posts on the granny's cradle were too far out and were not engaging the engine mounts  \_____/ .  So we had to get one side started and then we used a scissor jack anda  2x4 on the frame to push the motor towards the other mount so we could start the threads. 

Also lesson learned after the fact was USE LOCKING NUTS on your trans mount.  After just a few miles they were able to work themselves loose and fall out to the point where 2 of the 4 nuts were gone.

Also, I got no pics but I used the C4 corvette aluminum driveshaft.  The factory slip yoke looked like it would work but I decided I would go ahead and get the longer one just to peace of mind.  I was able to find the slip yoke on EBAY.  The TII flange I got from grannys.  I was a bit worried about installing the driveshaft without balancing.  But all of the local shop had bank hours which I wouldn't be able to get to unless I took a day off work.  So I figured I would just run the driveshaft as is.  Maybe I got lucky but everything feels smooth on the first try.

« Last Edit: May 04, 2014, 06:32:18 PM by Berto »

Offline Berto

Re: Berto's LS1 T56 FC Build Thread
« Reply #8 on: July 04, 2010, 06:18:47 PM »
So for my wiring stuff. I left the LS1 stock harness completely stock. There are 5 connectors on the harness which are the interface with the chassis in stock form.  I was able to get on LS1 forum and have someone chop off the mating connectors so I could make a jumper harness.  I bought two fuse blocks (one for ACC and one for BAT) and mounted them in the glovebox along with the OBDII connector.

For the PCM mounting I drilled and tapped holes into the cooling fins on the PCM.  On one side I used the wiper motor mount. on the other I used a threaded hole in the fender area.  I bought all of the L-brackets and what not at Lowes.


For the fuel system I connected the doorman connectors listed in my build list to rubber hoses.  I used fuel injectrion hose and fuel injection hose clamps (2 per connection).  I used the brake MC mounts to hold up the corvette FPR.  I re-used the stock hardlines that go to and from the gas tank.  Also I used the hardline make the connectrion to the fuel rail.  I wanted to minimize the length of the rubber hose.  I made the line a bit too long so I had a 'U' in there to allow for some flex with the motor moving.


Also, as a side bar.  My greddy strut bar fit.  The bar has a small curve for it.  That normally was pointing forward to clear the alternator, but if you point the strut bar upwards you clear the intake manifold.


Offline Berto

Re: Berto's LS1 T56 FC Build Thread
« Reply #9 on: July 04, 2010, 06:21:10 PM »
Here is a pic of the shift boot I was able to rig up from Advance auto parts.  3 of the 4 holes lined up which was pretty good for something available at the store.  Also, I had to 'notch' the shifter surround to allow for full travel of the shifter, but all of the notching is under the leather shift boot.


Offline Berto

Re: Berto's LS1 T56 FC Build Thread
« Reply #10 on: July 04, 2010, 06:36:53 PM »
I went ahead an decided to use an autometer coolant temperature gauge.  However, the sensor that is included with the guage does not fit into the NPT to straight thread adapter.  There are some work arounds where you can drill out the adapter but there is a good chance of breaking it to torque it right.  I called autometer and they had this stubby sensor available.  It is not directly in the coolant stream but the guy on the phone was telling me that their test showed that there was only a 3 Deg F difference between the measurements taken, which on a short sweep gauge is impossible to differentiate between anyways.


So fast forward I was able to start it.  Originally I thought it sounded like it was running ok, but it wasn't idling right.  I went ahead and started troubleshooting  some stuff and found out that one of the power connectors for the driverside injector bank was off and it was running on 4 cylinders!!  I did have an idle problem which was a relatively easy fix, all I had to do was to re-calibrate/reset my IAC valve (Idle air control valve).

Vid of it running on 4-cyl.
http://s27.photobucket.com/albums/c192/BertoBizkit/RX-7/LS1%20Swap%20into%20the%20RX-7/?action=view&current=MOV03783.flv

vid of it running on all 8!
http://s27.photobucket.com/albums/c192/BertoBizkit/RX-7/LS1%20Swap%20into%20the%20RX-7/?action=view&current=MOV03367.flv


So there is a lot of misinformation about PCV systems.  As a result of this swap, I've done what I consider to be an educated decision to keep the PCV system.  I ran a hose from the intake to the passenger side valve cover.  On the back of the passenger side valve cover I capped it off.  Then on the Driver side valve cover I was able to find a PCV valve that fit perfectly and was barbed to I could run a hose to my catch can.  I wanted to make sure I kept the PCV system because on a naturally aspirated car its really the only way to keep the oil clean, other than to change it often.  I will try to find a link to the LS1 thread where it shows all the different PCV arrangements.

Looking backwards now.  The original catch can in the pictures below is just an empty can.  It would trap some oil but not all of it, as I could still smell a bit of oil coming out of the exhaust after letting off after accelerating.  I read up some more that the LS1 pulls quite a bit of vacuum resulting in oil consumption.  So I bought the Mike Norris catch can which has a mesh internally which gives the blowby more surface area to go over allowing more oil to get trapped.  So far with the Mike Norris catch can ($99 shipped) I no longer smell oil.


Offline Berto

Re: Berto's LS1 T56 FC Build Thread
« Reply #11 on: July 04, 2010, 06:46:50 PM »
The next task to do was a big one.  The exhaust.  I originally had thought I would pay someone to make the exhaust but I was looking at anywhere from $700-$1000 to get it done like I wanted...ACK  :'(  So for the same price, I could buy a welder (Hobart Handler 140, woohoo) and all the pipes and do it myself.  At least I know it would get done like I wanted it....right.

I had a friend that did a LT1 swap into an S10 help me since I had never built and exhaust or welded before in my life.

How it started.


I decided I would go ahead and route the exhaust up and over the trans cross brace in order to maximize ground clearance.  I had to shave a few bosses off the trans but nothing structural.  Also, I wrapped the downpipes to protect the trans, and used thermal paint to protect the exhaust.  If I could go back and do it all again I would have made it all of stainless and forgot about it!


A pic to show ground clearance


The finished project out on the streets.  I love this thing!  $6500 later (I already had the car BTW, that is just the swap costs)

« Last Edit: May 04, 2014, 06:33:11 PM by Berto »

Offline Berto

Re: Berto's LS1 T56 FC Build Thread
« Reply #12 on: July 04, 2010, 06:48:19 PM »
With a new engine the garage gets new 'dekorashun'.  Found this chevy tailgate trim in a dumpster.


Offline smonty

Re: Berto's LS1 T56 FC Build Thread
« Reply #13 on: July 07, 2010, 05:38:27 PM »
Tennis ball on a string .... classic.

Offline FC3S Murray

Re: Berto's LS1 T56 FC Build Thread
« Reply #14 on: July 07, 2010, 07:33:11 PM »
video!!!

Great job man, your thread is really helping mine as well.


13 years of abuse and still running STRONG!

SRM Performance Tuning LLC
https://www.instagram.com/fc3s_murray/?hl=en