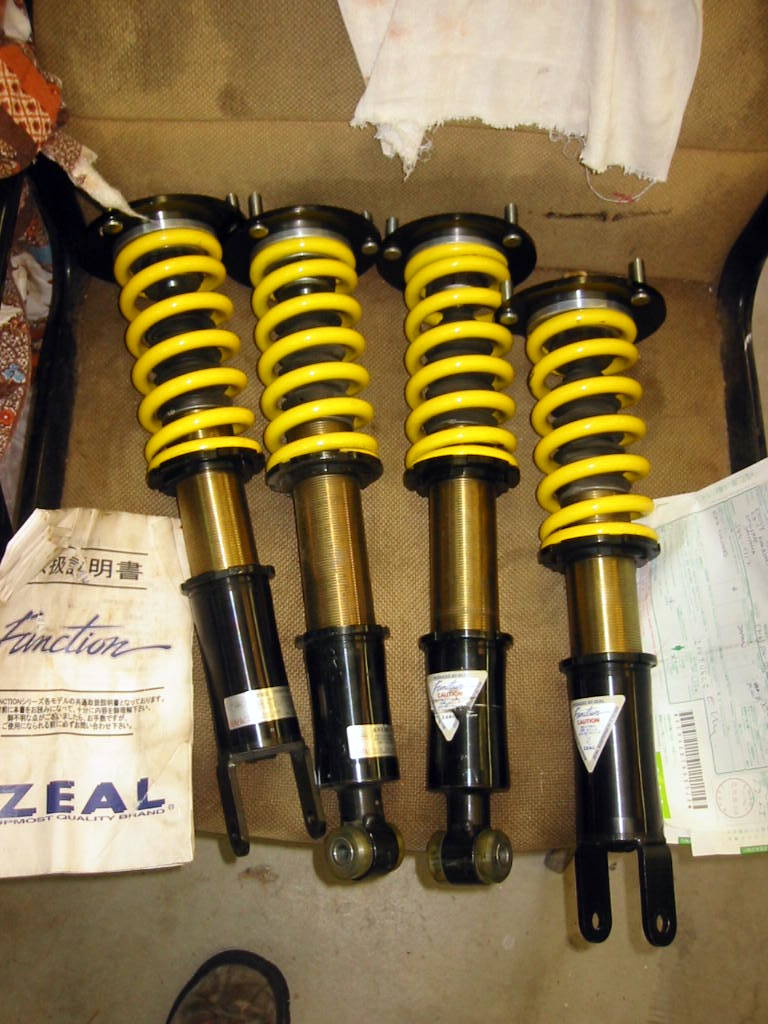
April 20, 2024, 09:39:09 AM

Author Topic: 65imp's TVR build  (Read 83036 times)

Offline 65imp

65imp's TVR build
« on: May 14, 2010, 04:56:40 PM »
I have been working on this car for a few years now, and figured making a post may give me the motivation to finish the job.  As you can see I have quite a way to go. 


Before I start on the details of my build, I feel my purpose for this project is a good start:

My attitude about a project car is that it should fit the vision of the builder.  If well done it will most closely match the original ideal and purpose of the vehicle.  What I am looking to build is essentially a TVR that I can own and operate here in the US.  I must admit I have never driven a TVR and I know very little about the make.  What I have is a feel for the reputation, or the essence, (possibly the soul?) of those cars, and that I love. 


*Note I am not planning on using this kit, but thought it should be included, as it uses the tvr lights. 

By what I gather they seem pretty similar to a kit car, with a bit of professional fit and finish.  At the same time they retain the ludicrous power to weight ratios you see with kit cars.  I see the appeal to Colin Chapman's philosophy that less is more when it comes to automotive performance.  My experience with building cars definitely favors the KISS method to combat Mr Murphy and his legislature. 
Of course there are criticisms of TVR's vehicles as well.  Generally complaints revolve around lack of creature comforts and missing driver assists.  I assume the former is sacrificed for weight savings, and the latter is possibly left out in order to make sure the drivers purchase a second car after totaling the first.  Ultimately I am aiming to build a car not quite as basic as a race car, but a ridiculous excess on the street.  That should sum it up. 


My background with RX-7's started with my first FD (yellow) back in 2000.


I never really followed the big list, but I was on the rx-7 forum since its inception.  I fully built that car up to a single turbo 400hp vehicle, and despite my careful attention to detail it went boom.  I even sold hoods to the rx7 community for several years after working with local fabricators to make a quality product.
Atihun

  Before starting over with the rotary I decided to investigate the claims of jimlab, and gnx7, as I have always had a spot in my heart for chevy v8 engines.  (283-327-502 engines in my 65 impala before the current Ls1)


I already knew about the brilliance of the ls1 design.  After contrasting my FD with my 502 powered impala I also had an appreciation for the lightweight/nimble handling side of the spectrum.  I was soon sold on the LS-FD hybrid, and I began acquiring parts.    During this time I was a member of swapcartech, torquecentral, and v8rx7forum since the beginning and in 2/3 cases their demise.  I have owned most of the subframe/transmission mount kits in the research and development of this project, and purchased from or worked with several, if not all the vendors for LS-FD stuff.  I originally purchased my current FD (audi blue) as a fully swapped and running car back in 2006.  As you will find out I have only ever driven this car for ~2 miles. 

Major objective goals for the project:
#1 ~2500lbs weight (without my ass in there)
#2 -Over 500 rwhp n/a and safe tune on 91 octane California gas (read: crap)
#3 -Maintain or improve the general handling and braking of the FD. 
#4 -Maintain some modicum of street driven ability at least to the point where I am satisfied.
#5 -Fly Low enough on the radar that I am not in constant fear of attention by the law. 

I guess I will break the build up into the various mini projects I have done to accomplish these goals.  I figure I will list what I have done, and post pictures that I have.  (It seems I lost a bunch when my last computer crashed)

« Last Edit: October 21, 2013, 04:56:25 PM by 65imp »
absolute power corrupts absolutely  :yay:
93 FD widebody - destroked
69 Suburban - positive manifold pressure
72 Blazer - 6.0, 6speed 4wd
65 Impala - 5.7
59 cad  - 5.3
53 spartan - crash pad status

Offline 65imp

Re: 65imp's TVR build
« Reply #1 on: May 14, 2010, 04:57:03 PM »
Quote from: kukri;553597
I'd love to see you make it look more like a TVR though than that kit.

Well, I am going for more TVR like in spirit and philosophy, rather than look, but it should be pretty extreme anyway

Quote from: paul_3rdgen;553649
I like the body kit, the lights will definately be more funtional then the stockers, and the back is so nice and clean looking.  The only problem I have with aftermarket body kits are, fiberglass panels never seem to keep their form for long periods of time so you will end up with more trips to the body shop then you might like.

I totally agree, which is why I am hesitant to use fiberglass parts for the front bumper.  I guess I may not have been clear enough about the fact that I am not using the above FEED kit.  Other than the front end/hood I am not the biggest fan.  Though the rear is OK. 

Quote from: FCs Rule;553677
wow dude how did you get your hands on that? that has to be my favorite car company out there i use to look for them after i played GT 1 for the ps1! i was looking in a muscle car mag the other day and someone had a TVR that they put an lt1 in! great car man can't want to see the work ahead!

I didn't get my hands on this kit, because I'm really not trying to pick up more attention than this sort of a car will draw.  Also last I heard that kit was upwards of 10k.  My budget would not allow it. 

Next update shortly.
absolute power corrupts absolutely  :yay:
93 FD widebody - destroked
69 Suburban - positive manifold pressure
72 Blazer - 6.0, 6speed 4wd
65 Impala - 5.7
59 cad  - 5.3
53 spartan - crash pad status

Offline 65imp

Re: 65imp's TVR build
« Reply #2 on: May 14, 2010, 04:58:10 PM »
If I had to pick one word to describe how my swap is different it would be: Weight

Quote from: redneck
C'mon Mike, just take a big $4!#, take the change out of your pockets, and go on a diet.  Then call it good.

  Well sure, but by that logic I could be happy with a stock ls1. 

With less weight every performance figure improves; stopping, turning, acceleration, etc. It is the pure physics of motorsports.  Significant technological innovations can offset this effect to a certain extent, but they are often expensive and failure prone.   AWD/All wheel steering, power assist steering, traction/launch control, automatic gearboxes, ABS, fuel injection, and the list goes on.  I do not mean that these things are bad, but I find that many are not necessary as weight is reduced.  For this build I wanted Spartan, but not stripped. 

Most guys I talk to would rather focus on the power side of the equation, and make more of it.  That is a great way to accelerate faster, but does not improve the braking or turning.  I think the lightweight nature of the rx-7 is what makes these swaps truly elite, so I prefer to improve on that advantage. 

More power will always improve acceleration. To bench race how we can compete to another supercar power to weight ratio is a decent comparison benchmark.
Any car with a better than 10lbs/1 horsepower will be pretty quick.  Swapped rx-7?s are generally ~8lbs/hp or better.  That is pretty serious performance. 

So after that little rant I?ll just come out and say it.  I am a weight Nazi.  If it is going on my car, I want it as light as possible.  That being said we all have a budget, and I have my limits, but I would always like any input on making this thing lighter.  Here is my original list on accomplishing this goal:

product          weight saved       
greddy titanium exhaust    30 over rb duals
rz seats            50         
cf hatch            30
fal lexan            12
CF doors            96
aluminum flywheel/cf dshaft   20
CF Braille battery         30         
remove power steering      12
remove abs            15
remove pull hooks         10
spare tire/jack delete      30
hole saw bumper reinforce   10 
rear plastic panels/speakers   50
aftermarket headlights            ~15
A/C delete            15
spare tire/jack/surround      25
 other exhaust         ~30  (the stock downpipe and cat weigh a ton)

Total loss:            ~480 lbs

Things that will add weight:
Fat Wheels/tires         +15
sound dead/foam         +30
side skirts            +4.5
rear diffuser         +10?

So if I can cut roughly 420 lbs off my base vehicles 2789 lbs, then I may be able to reach my goal of sub 2500lbs without me in it.    I knew I would likely add in some other areas, and not quite reach some of these estimations.  So I wanted to continue to remove weight whenever possible, and do everything possible to keep from adding weight. 

Notes/ pictures of the above:

-   Carbon fiber driveshaft is 2-3 lbs lighter than the aluminum one, which is 2-3 lbs lighter than the steel one. 


-   Carbon Doors weight savings estimate based on Yamaguchi?s stat that the doors on the FD weigh 62 lbs/door.  I have weighed my carbon ones at 14lbs each.  I suspect this weight savings is wayyyy optimistic.  I will get more accurate measurements as I install the doors. 


-   Have since replaced the front bumper support with the 99 spec piece (ABS vs. fiberglass), and saved the 10 lbs in the front alone.  Prolly get a couple more lbs out of the rear bumper as well.


-   Changed from the greddy titanium to the ganador titanium exhaust, hopefully to drop the noise level a bit.  Sure hope it will clear the cobra diff mount!


-   Wheels ended up being heavier than my initial estimates. Rear wheel+tire weighs in at 59.5 lbs! fronts weigh 55lbs.  This is with the lightest wheels made by CCW, and the lightest tires I could find in this size.  Compare to stock size wheels and tires combo weight ~43.5 means I gained 55 lbs with my wheels/tires!  40 lbs more than my initial seat of the pants estimate.  That is also rotational weight, OUCH!  The price you pay for traction.


Since these initial estimations  I have made some adjustments, in fact quite a few.  I will hopefully add to this as time goes on and I get better, more solid data.
 
More loss:

-   Speedglass side windows from Percy?s.-  Basically Lexan (which is a trade name for polycarbonate.  Very strong, lightweight material, but scratches easily.  Percy?s treats their lexan to make it far more scratch resistant.  If they hold up well, I may consider changing the windshield as well.  Since I have also chucked the a/c I want to be sure I retain the ability to go up/down.  Weight saved:  we shall see


-   Stainless fasteners on all the non-load bearing fasteners.  Not only does this keep me from using a bunch of my old FD hardware that is looking rough, it drops weight.  OK, ok it is also pretty sharp looking and less rust concern.  Weight saved: 25% of hardware weight on M6 size bolts. (every little bit counts I hope)


-   Removed rear spare tire wheel well.  Mostly I did this because I hated the dip in the trunk of my old FD, and entertained thoughts of a racing fuel cell for a short while.  I have it covered now by an aluminum sheet/spectrum firewall.  Weight saved: not much.  IIRC it was about 4 lbs.


-   Pruned the wiring harnesses a bit.  And by a bit I mean a bunch.  I knew very little about auto wiring when I started, and I feel much more comfortable now.  That being said, I anticipate some hiccups when I go to start her up.  This project ended up being the single biggest challenge, and took me FAR longer than my initial estimation.  Weight saved:  over 20 lbs. 

More on the wiring removal from another post:

Wiring
I removed the excess wiring from just my front engine bay harness, and the rear harness that wraps around the rear of the vehicle and what I have left is 14 lbs. After I do the dash harnesses it will likely be even more. Danzan was a huge help with me when deciding whether to snip or not. Also if ya plan it out right you can get rid of the entire long relay box up front, which helps clean up the engine bay a lot.
Actually I removed the entire passenger side of the in car loop. IIRC there are some security wires, etc over there, and the antenna. Nothing I was unhappy about removing. Also in the rear removed the ABS stuff. Now I pretty much only have the fuel pump wiring and brake lights, maybe a couple others. Under the dash I removed all the ABS stuff and the airbag stuff (also under the hood). A while back there were several threads of the airbags deploying under hard braking for some guys on track days. I figure the seatbelts work pretty well. I am also removing the a/c and associated stuff. There is a Mazda part that replaces the A/C portion of the fan/blower system with just a duct, so I can retain my blower.
In order to remove the whole front relay box I re-routed some of the relays to the box over near the strut tower. That is where all my relays are now. I can tell you that I spent many days without the use of my fingers due to stabbing the tips trying to remove those little metal pins from the connectors!

-   Racingbrake front and rear setup, despite being bigger and having better thermal capacity the racingbrake setup is lighter front and rear. Weight saved:  2.3 lbs per rotor


-   CF hood still have not decided whether to use the stock replacement CF hood, or the FEED.  Weight saved: ?


-   Fiberglass fenders ? did this more to fit the big fatty front tires, but lost a tiny bit as well


-   Pulled heater core and associated ducting/levers.  Replaced with Mazda accordion adapter also lost long rubber hoses -~12 lbs.


[added June 2014: MAZDA PART: FD01-61150b frequently backordered, so there is a bit of a wait.
to order I recommend calling Ray at Malloy Mazda's part department: 888-533-3400

-   ABS removal -14lbs, plus the associated wiring.  Also removed sensors and axle toothed rings -? Lbs

-   Airbag and wiring removal

-   Cobra rear diff swap.  I recall Jim saying it drops a couple pounds, but that was with his setup vs. Justin?s (which I am using)  IIRC Jim said ~5.6 lbs back in 2003

-   My ls1 motor should save some weight over a stocker for a number of reasons which I will detail later

-   Removed rear sway bar

-   Steering wheel swap to aftermarket

-   Both sun visors removed -1.25lbs

-   Lug nuts lighter aftermarket vs. stockers -0.5 lbs (I know, but it all counts)


-   Mirrors, went from stock to Ganador aftermarket Carbon mirrors


-   Went with an aftermarket coil over suspension.  Actually have had quote a few, and found quite a range in weight.  In order from heaviest to lightest (greater space=greater difference:

Tein ------------Tanabe---------------Apex?i---GroundControl?Zeals

I did not just pick a coilover setup based on weight. Rather I picked up used sets of coilovers that are considered "good" setups in the eyes of the more knowledgeable club members.  Over the years I have pitted one against the other and kept an idea of the weight as well. 

Unfortunately I never weighed the stock suspension on the car, so I don?t know how much weight this saved, but my impression would be a notable difference.


[Warning, potential flame material here]

-Manual steering ? I have chosen to go with a manual rack converted by maval gear (unless I win the lotto and purchase one from atomicRex).  I had manual steering on my old FD with 285 series front tires, and it really did not bother me much, if at all.  In fact I felt it really added to the overall steering feel and driving experience. 
Literally unless I am at a dead stop I have very little problem with steering effort, and at highway speeds it is the most direct steering feel. I will reserve the weakling comments for the Honda boards... But I do like getting rid of excess systems in my engine bay as well as dumping the weight. Unfortunately I get left out of all the fun "power steering spring mod the right way so Bernoulli's equation gets satisfied" threads, so you may want to keep power steering just for the fun of figuring it out...

I will agree that people who autocross a bunch often prefer the power steering since there are far more low speed turns, and fast, tight transitions. But other than that losing the power steering has been one of my favorite mods in both the FD's I have owned.


No savings: 
-   I considered replacing the stock carpet with thinner lighter carpet, but the savings was about 2 lbs, I would have to use lower quality carpet, and I lost the formed foam that comes with the factory carpet.  So in the end I decided to keep the stock stuff.

« Last Edit: June 30, 2014, 08:20:47 PM by 65imp »
absolute power corrupts absolutely  :yay:
93 FD widebody - destroked
69 Suburban - positive manifold pressure
72 Blazer - 6.0, 6speed 4wd
65 Impala - 5.7
59 cad  - 5.3
53 spartan - crash pad status

Offline 65imp

Re: 65imp's TVR build
« Reply #3 on: May 14, 2010, 04:58:32 PM »

The word "budget" is a pretty sticky point for car guys.  Our hobby, just like any other, has exponentially increasing costs as you move to the more exotic stuff.  Whenever I see a nice build I figure there is no way I could do that as I don't have the coin to drop into my project that others do.  But here I am in my build, with a lot of guys thinking the same. 

[Let me preface this by stating that for many of you this info may be old news, and you can skip to the next section of content.] 

I think I can help explain my use of the term "budget" on my build as well as possibly help out someone reading this thread and considering building a car on their own.  Here are a couple techniques I have used to make this build fit my "budget."
Tip #1
I sacrifice a great deal of time constantly looking for used parts.  I imagine if I added it up I spend more time doing this than I have working on the car at this point.  This is reflected by how long I have been working on this car ~3 years now.  If you want it done asap, then you will pay a premium for it.  It takes time for me to save up $, sell off parts, find a great deal, etc.  I would wager that many of the guys here would have a much bigger budget for their car if they saved for 3+years.  I have sacrificed the time enjoying my finished car, to have a more exotic build when all is said and done.  So my #1 tip is:

"Don't buy new unless you absolutely have to, or unless time is of the essence"

#2 would be:
"Be Patient, the deal of a lifetime comes up every 2 weeks"

I think that less than 25% of the stuff on my car was purchased new.  I find I can get substantially more for my $ with this sort of method.  I generally pay less than 50% of the new price for parts by watching for a good deal, and it is amazing what you can pick up that is as good as new for half price.   Also I can afford to change my mind, without loosing much if any $ in the process.  In fact most of the time I purchase parts that are a smokin' deal, then later sell them and make $ in the process.  Shipping does get expensive, but I am married to a fedex employee and that helps a bit(every little bit counts). 

Then sell your old or unused parts to the best market for those parts.  The better you describe what you have, the more you generally get for it.  You can often get more $ for popular stuff on eBay.  But you can sell it quicker on the forums.  Be sure to do a bit of research on what the stuff sells for so you don't lose your shirt, or ask an unreasonably high amount. 

Trade stuff when possible, but make sure it makes sense for you.  I was having a hard time selling the trans out of my impala a while back, but it turned into a great trade for a t-56, mounting gear and a carbon driveshaft. That stuff would have cost me triple what I could not sell my trans for.

The big tip #3 is:
?Do it yourself?
 Give it a try, and you will be surprised at what you can do better than a pro.  It just takes time, attention to detail, and persistence.  At the end of the day you may sell the car, but you will not lose the personal improvement and skills you have developed. 

Try not to require custom parts if you can't make them yourself.  If you need something made, hope you have a friend who can do it for ya.  Barring this; If you have to have a part custom made and pay the higher cost, make a couple and sell them to like minded individuals.  I?d say half of the parts for these swaps were made in this way.  If you sell a good number you may get yours at no charge, or make a couple bucks for the rest of your project.  At the very least you will have a contact or vendor who will be happy to help ya in the future.  These folks, and their expertise come in handy. 

Other tips:

Group buys on these forums are also a great way to save some $ if you can't get a used deal.  Not going to be as great a discount, but still decent.  Once again you do sacrifice a bit on time. 

Do your research.  I know many members who bought parts or "kits" from a vendor when they could have used the stuff they had and saved a bunch of $.  Or they could have only bought the custom stuff from a vendor, then sourced the generic parts cheaper elsewhere...

Get generic parts from a larger online store like summit or jegs.  Specialty places often crank up the cost of purchasing these parts due to the convenience.  Also use a coupon, just do an internet search before checkout. 

Don't be afraid to think outside of the box.  Takeoff race parts at the end of the season are a good source of carbon fiber stuff, assembled AN hoses, safety equipment, etc. 

As a reference I buy and sell parts off the rx7 forums:
rx7club classifieds
no pistons classifieds

Ls1 forums:
LS1tech classifieds
corvetteforums classifieds
corvetteforum classifieds

Ebay:
ebay

Craigslist:
craigslist

and even specialty forums for a given task:
second skin audio sound deadening forum
powdercoating supplies
Eastwood shoptalk forum is currently down

You can find a deal on other enthusiast forums as well, if the part is not rx7 specific.  I get a lot of my lightweight stuff off the lotus guys when they find something lighter:
lotus forum

These techniques have got me to where I am with my project today.  For those who will ask:
For the vast majority of the time with rx-7's I was a student.  Since I started working, I have not had a notable income as I started my own business.  Long ago I created a separate account for these car projects, as I know it would strain my relationship with my wife if I used the $ she earns to support our family on car stuff.  I have occasionally infused the car account with $ from flipping a car, or performing odd jobs during breaks. 

I have not listed a lot of the deals I have got, because it often seems unrealistic, boastful, or upsetting to those who spent a bunch more.  This is not my intent.

I state this info to try and assist the guy who dreams bigger than his means, not to brag, or say that I have been anything but very lucky.
absolute power corrupts absolutely  :yay:
93 FD widebody - destroked
69 Suburban - positive manifold pressure
72 Blazer - 6.0, 6speed 4wd
65 Impala - 5.7
59 cad  - 5.3
53 spartan - crash pad status

Offline 65imp

Re: 65imp's TVR build
« Reply #4 on: May 14, 2010, 04:58:56 PM »
Quote from: jacklin6;555413
any pics of the fenders installed?

Sorry Jack, not yet.  I realize a lot of my post is just showing the parts that i have gathered up to this point.  I will add new updates as I make further progress with various tasks.   
I think the fenders will be a while though.  I will likely do those after teh engine install to prevent potential damage. 

Quote from: V8FD3s;555482
Wow, very informative and detailed thread. Nice work so far!

Quote from: LargeOrangeFont;555492
Nice work. I am local and hope to see this thing in person sometime :)

Thanks guys,
I am finding the limited number of hours I can spend each week is the main limitation to my progress.
absolute power corrupts absolutely  :yay:
93 FD widebody - destroked
69 Suburban - positive manifold pressure
72 Blazer - 6.0, 6speed 4wd
65 Impala - 5.7
59 cad  - 5.3
53 spartan - crash pad status

Offline 65imp

Re: 65imp's TVR build
« Reply #5 on: May 14, 2010, 04:59:22 PM »
Quote from: Sabre002;555819
Mike where do you get the Carbon doors hatch and rear lexan glass?

I got my hatch and doors through a local guy who had started up his own shop.  I drove by a while back and he is no longer around.  I am pretty sure they are seibon units though.  I got a pretty decent discount by getting everything together.
The rear glass is from Flex a lite (FAL) and I got mine through summit:

FAL at Summit

the price was lower, but the shipping is oversize, and therefore pretty expensive.

Been working on pictures for the next batch of info.  Hopefully by tomorrow.
absolute power corrupts absolutely  :yay:
93 FD widebody - destroked
69 Suburban - positive manifold pressure
72 Blazer - 6.0, 6speed 4wd
65 Impala - 5.7
59 cad  - 5.3
53 spartan - crash pad status

Offline 65imp

Re: 65imp's TVR build
« Reply #6 on: May 14, 2010, 05:00:32 PM »
Engine

I initially had a 400rwhp ls1 in the car from the previous owner.  It was a patriot heads/cam setup.  I was planning to swap to premium heads (TFS) and the ECS cam that was maintaining drive-ability and making ~500rwhp.  At the time that was quite rare and required very precise attention to detail.  At the same time the tuning of this setup was required to keep it right on the acceptable edge of the ?street-ability? spectrum.
 
But then my whole ?outside the box? mindset had to get hyperactive.  I saw the Katech ?Sneak Attack? ls based engine and fell in love.  But I had nowhere near the $ they wanted for such a thing.  So I slowly gathered up parts (with my budget method) for my engine build.  While collecting most of the stuff for the bottom end I researched an engine builder who would be able to meet my needs for this build.  Once I had the bottom end stuff ready I sent them to a well known ls1 engine builder.  That was about 2 years ago? 

More on this saga later.  Suffice to say I empathize more with Labreck then I ever thought I would when it comes to engine builders.  Still I think I will accomplish my goal if I ever see this darn engine.

Just an aside on automotive ?professionals?:
This may sound like a rant, but there is an element of risk when dealing with ?professionals? in the automotive community.  (Google search Hennessey sometime, or see Jimlab?s experiences with custom projects in his v8 monstrosity thread)  I think that this sort of thing is very underplayed in the aftermarket community, but VERY prevalent.  IMO this is one of the biggest hurdles for guys that want to build their own rather than buy off the lot. 

In general people who make their living in the automotive field are scum-bags.  You get to deal with the imperfect mix of honesty, quality, or timeliness and you can only pick 2.  For example if you can find an honest guy who makes a quality product, he prolly is not hard working and you will wait forever to get your stuff.  Factor in your budget (and mine is smaller than many) and you have a recipe to get ripped/be disappointed in the time it takes to complete your job. 

That being said I think that this forum and the vendors that support this forum are FAR better than most.  We have had some hiccups, but we also have a list of VERY capable guys who give away their time and services.  (Danzan, Eat-Pez, Frijolee just to name a few)


Accusump & oiling


  I am planning on using an accusump for my new motor, but I would like to keep it in the engine bay. I have seen a couple guys with it in the cabin, but I imagine it gives off a ton of heat.  I think I will plan to run it in the front bumper, as some on the forum have been able to do.   
I am also planning on running the canton road race pan for the increased baffling, and ~1/2? clearance it provides underneath.  It does require a remote oil filter to be installed, and I am waiting for the engine to arrive before I mock that up as well as the lines.


I am open to suggestions on the location to feed the oil in/out of the block and where to fit the filter into the system.  Also looking for recommendations on a remote filter base, though I am leaning toward the nascar style.


   Basically I have not finalized the design of the oiling system, but have most of the components ironed out. 

Cooling system:

I had been planning a custom OTR design with the Howe setup I owned for quite a while.  Or possibly something like what Hyperion did.  But Justin came along and solved that problem for me.  So I happily plunked down the $ for the Samberg radiator setup, since the local custom aluminum fab guys would have charged me a bunch more than that.  Justin was even nice enough to weld on my AN input and output bungs at no charge, nice guy there. 


(WHOA Brismo's camera takes huge pix! I'll see if I can figurte how to resize them in the future)


I am also simplifying the front of the engine for the weight savings, and I went with the BMR alternator only kit. 


This called for an electric water pump.  Since I was not running the heater here in sunny southern California, I could go with the racing water pump from Meziere.  It is available with 2 different flow rates, one uses the same motor as the street pump (that is the higher flowing option.)  My one concern is that at extended high rpm use the stock waterpump will outflow this unit.  I believe for my purposes as a primarily street driven car I won?t run into any issues, but I do plan on monitoring engine temps in case a change is warranted. 


Also pictured are the AN input and output adapters that Meziere makes if you choose to use AN style radiator hoses.  There are 2 locations on the pump on the low pressure (return) side.  There is only one outlet port, and then a smaller threaded outlet plug that I imagine if for vehicles with a heater?  Unfortunately the width of the AN adapter does not allow it to thread into the high pressure outlet port, unless I have it machined down.  So that is next on the list. 


Also I figured I could go with a little more of a race look at not to much cost by picking up used/unused race parts off ebay for my hoses.  You are looking at what ~50 bucks will get ya in Kevlar lines off eBay.  My plan is to use the configuration that fits the best, then sell the unused ones back on eBay.  In the end it should not be a big cost difference vs. local parts stores selling me 6 different rubber hoses that I fit together with adapters.  Added bonus I got a bunch of lines that I can use for my oiling system, not to mention thermotech-style heat tubes for my clutch line!   


Brismo came by yesterday and helped me mock up my cooling system.  Looks like I will need to have some ends re-done on my radiator lines which was expected.  Now I have to find a place that can do this reliably.  Here?s a some mockup pictures of how far we got:


Trans:

I?m sticking with the t-56 for now.  The brief drive I had with it earlier demonstrated smooth shifting, and I hope it holds up to the abuse I plan for it.  I did go through the effort of cleaning the case up.


Shortly after this picture I gave it a coat of my favorite ?low gloss black engine enamel? to make cleaning it off easier in the event of oil/grease/grit. 

Clutch is going to be a Spec stage 3 with all the lightweight options, such as an aluminum flywheel, and lightweight pressure plate. 


(this is not a picture of my actual unit, but wanted to break up the text blocks)

For the clutch Hydraulics I will be using a Toyota landcruiser part that was discussed in a thread a while back:

Clutch M/C alternative

I find it cleans up that side of the engine bay quite a bit, and has a much more "stock" type appearence vs. the other units used in these swaps that look a bit out of place.  Here's a picture of it:


And for those who want to know, here;s the box with part # info.  I got this off eBay.


For installation it did require:
-a bit of grinding(~1-2mm) on the firewall hole.
-shortening of one mounting arm as the part originally comes with one arm~1cm longer than the other.  The FD requires two even arms of the shorter length.  Then it requires drilling a new hole and threading that hole. 
-Afterwards I found I needed to do a bit of cutting away at the clutch pedal mount bracket on the inside of the car.  If anyone really needs a picture of this I can provide one later. 

Now that it is done I cannot say if it works or how well it works until the car runs.  But it should be as good as any 3/4 bore master cylinder.  I plan to follow Andrewb70's example before motor/trans install in order to troubleshoot before it becomes a real bitch.   

Drivetrain:
Driveshaft
Driveshaft is a carbon fiber unit, that I got in a combination transmission trade with a member on torquecentral back in the day.  It was set up for a hinson subframe/trans kit, and went to the Mazda rearend.  I have some concerns about the length being off, as I have the Cobra rear, end, but time will tell once I get my engine.  I know I will need to swap the pinion flange, but want to get an idea on length first.  If you want a picture you can check the first page...

  Much like the flywheel, I have made a great deal of effort to reduce rotational mass.  My rationale for this is to have the exotic and rev-happy nature of a smaller engine, that has an eager/taut relationship with the gas pedal. 

An additional benefit I have read about the improved safety of a carbon shaft in the event of driveshaft failure.  Apparently it shreds itself to pieces, rather than bursting through the floorboard, turning the driver into pieces.  Many also report that a carbon shaft reduces vibrations which are a common plaque of these swapped cars.  Here?s to crossing my fingers. 

In every vehicle I have ever reduced the flywheel/clutch weight I have been very pleased with the improved freedom of the engine to rev.  I consider it a consistently good modification.  The criticisms are often about the need to rev a bit higher before clutch engagement to prevent stalling.  With the high torque ls1 in an rx7 I believe it will not have a notable negative effect in the least. 

Cobra rear diff:

Because I did not want to risk the failure of the Mazda unit with the power level I plan to be at, I started to look at options.  I think the 4.10 gears used by Mazda were a band-aid fix for the rotary?s lack of torque.  Once we solve that torque issue with some cubic inches the 4.10?s become a waste of one or more gears.  How often do we hear ?1st gear is totally useless??
Considering Goal #1 and the loss of a bunch of weight in the car, traction will be a premium commodity.  Add to that the higher power levels I plan on achieving, and the spin potential becomes difficult to control.  Since I would rather have six useful forward gears, I needed to make some adjustments. 
Lower rear gears help with traction, as well as lower rpms on the highway.  The lowest gearing in the mazda unit are the auto rear?s 3.90 gears, not much change.  The Mazda units also seem failure prone at over 450 ft lbs of torque.
So I started looking at the Cobra rear swap.  I get the traction benefit from keeping the cobra?s stock 3.55 gearing, increasing the diameter of the rear tires over stock, and widening the rear tires (we can save the contact patch argument for later).  Not to mention there was a guy selling his Cobra rear pumpkin and axles on the club for a pretty smoking deal?. 
So if you have not guessed by now, I decided to go with the Cobra rear setup from Samberg.   

    That decision was made, but I was concerned with kingkyle?s assessment of the Cobra torsen?s engagement:

Quote from: kingkyle
Corner entry... i'm entering a corner so I need one side to break free from the other to help turn the car in. This diff does a wonderful job of this. The stock Cobra diff was absolutely horrible. When I would be coasting into a corner... the stock cobra setup was trying to push me straight off the track because the diff requires alot of force to unlock.

Mid Corner... the DPI diff transitions very smoothly from power on and off... I tend to feather the throttle mid corner depending on what the car is doing. The stock cobra diff was and on/off switch, very very harsh and upsets the cars balance.

Corner exit... The DPI does this best, while exiting a corner, the diff transfers more power to the outside wheel than the inside wheel. This helps turn the car. The cobra diff applied just about the same power to both wheels and this caused the car to go straight. I had a very hard time with this. When I would smash the throttle, the cobra diff would "sometimes" brake loose, and when it does this you better hold on.

The Mazda torsen diff was actually the 2nd best diff I've ever experienced behind the DPI diff. Too bad the Mazda setup wont live very long. You might get 3 track days.

Since driving ?feel? is highly subjective, I took these words with a grain of salt.  It was a tough decision to make due to the added cost of both the DPI unit, but the need to have the rear end set-up.  Eventually I figured it would be much more of a PIA to remove everything after install, so do it right the first time. 

I contacted DPI, and had them send me the street version of kyle?s diff.  Kyle had the gold trak diff, and they had since made the platinum track diff.  Not much change, other than the platinum had a set preload, as they found many guys had a hard time setting the preload that was best for their cars intended purpose.  I was informed that they can build their street rod differential with all the same components as their track diff, but without the noise issues, and without quite the preload.  Apparently all their differentials gain more preload as they wear, so this worked for me. 


Axle assembly:

 Of all the projects on this car so far this has been the most frustrating.  I guess because axle grease is a pain to work with, and it was my first time disassembling/reassembling axles. 

After I disassembled the stock cobra and rx7 axles I got them all cleaned up, no problem.  Then I decided wouldn?t it be neat to have them look good, as well as being functional?  Well sure that would be great, but pretty finishes scratch during assembly, and axle boots that don?t fit are easy to tear.  After a couple calls for new boots/crimp clamps, and the wrong parts being sent more than once, I was getting pretty pissed.   So I set the axles aside for a couple months instead of throwing them out on the driveway. 
So the backup plan was to source what I needed locally.  I found out that no-one in southern California assembles their own axles anymore, and only crappy universal-type axle supplies were available anywhere.  The crappy universal crimp tools break after ~6 crimps, so you gotta go return them and get another, then no one has any of the crimp style clamps, etc, etc?.   For the love of all that is holy, I would have paid anyone to get these silly things finished for me.  But I can throw some $ at a jackoff in a garage somewhere, and then he will likely mess them up the same way (I have done this before).  At that point I?ll be worse off then I am now (at least $ wise).  So I set them aside for a couple months, and worked on other parts of this build. 
Eventually I re-coated the axle that got the worst of the marring to its finish, and got the proper boots from a local supply house that had pity on me, even though I was not a vendor.  That same week saw me getting my diff assembled!  So I got the axles assembled and installed, along with the diff.  All in all it was a glorious day!


absolute power corrupts absolutely  :yay:
93 FD widebody - destroked
69 Suburban - positive manifold pressure
72 Blazer - 6.0, 6speed 4wd
65 Impala - 5.7
59 cad  - 5.3
53 spartan - crash pad status

Offline 65imp

Re: 65imp's TVR build
« Reply #7 on: May 14, 2010, 05:01:06 PM »
Quote from: gnx7;556696
Looks great Mike!  That is going to be one bad ass ride.

I like the look of the TVR; their frame looks a little too race car like.  The FD is a proven chassis.  You don't hear of TVR's setting the automotive world on fire.  Body kit on the FD would be pretty slick.


Thanks Mark,
My TVR reference in mainly in the spirit of my build.  But I think their lack of automotive "cred" is mostly due to being too small a comany to be able to play hardball with the big boys.  After all they did start the Speed 12 program:

Speed 12 Wiki

I get grins for a company that builds a car that becomes obsolete after a rules change.  Then they try to make it a street car and decide it is wayyyyyy to much of a handful, and refuse to sell it!  :ohnoes:
I guess a 2200lb car with ~1k hp n/a will do that.

Quote from: stiflybi;556785
Sick build that things gonna weigh practically nothing with all thee weight mods youve done

Hope so.  Steve and I weighed the doors this weekend, and it looks like I will only be losing ~60lbs total for all the effort.  But every bit counts.  With the weight thing it is so easy to take 2 steps forward, then 1 step back.  :rolleyes:
absolute power corrupts absolutely  :yay:
93 FD widebody - destroked
69 Suburban - positive manifold pressure
72 Blazer - 6.0, 6speed 4wd
65 Impala - 5.7
59 cad  - 5.3
53 spartan - crash pad status

Offline 65imp

Re: 65imp's TVR build
« Reply #8 on: May 14, 2010, 05:02:25 PM »

Coil over suspension

As mentioned before in the weight section I went with the Zeal setup after trialing a couple different types of coilovers.  The Zeal setup best fit my requirements for light weight, great ride quality, excellent build quality and adjustability.   They also avoid the use of a pillowball top pivot that wears quickly, transmits a ton of noise and vibration, and offers no real performance benefit. 


Bushings

When I first got this car from the previous owner he had mentioned having the rear end clunk that is typical on higher mileage FD?s.  I got a full set of pillow ball bushing replacements and seals from Ray at Malloy Mazda, and began searching for a set of Jimlab?s unobtanium bushings.  As is typical for me I got a set off the club at a smoking deal, after a too zealous owner realized they would never undertake the suspension bushing job.  At this point they were still the only option to replace the stock rubber bushings.  I figured I should install them over a weekend while I was home from an internship.  Not a good idea.  IIRC it was raining, and I was working on the driveway in late December.  I later got pretty sick from the long hours in the cold and wet.  I learned that stress is not a helpful factor when working on my car.  After the install I only drove the car about 2 miles.  It felt great, and even with the ~400rwhp that it was putting out, it felt like quite a handful ? more than enough for a driver of my caliber.  So I went home and tore it back apart to create a true monster?.
 
As the months (more like a year) progressed the polyurethane bushings from superpro became a reality.  As this new option turned up more and more unobtanium users found their voice and griped about the ride quality of their bushings.  Then I also saw the results some of the guys were posting of their control arms after their suspension rebuilds.  They would bead blast the suspension parts, then throw on some clear coat.  It looked as good as it handled, and I wished I had taken the time to get as nice a result.  I considered what my final goals were for my car, and realized I wanted a ?street? car that could hit the track, rather than the converse.  The sacrifice of Noise and vibration was a real factor to consider with the nylon (or delrin) style bushings. 

 Then came the day when the superpro bushings were on super-closeout-special-one-time-only-buy-it-now-holy-$hi7-what-a-deal pricing, and the straw broke the camel?s back.  I bought a set.  In the following months I had my suspension parts sandblasted locally.  Of course the guys ruined all my wheel bearings and rubber boots in the process.  Then I got the pleasure of replacing rear wheel bearings on a FD.  (If anyone needs any pointers I have done ~4 or 5 at this point.)  I was unfamiliar with how much prep would be required of me vs. what the blaster would take care of.  The end lesson is to count on the fact that the shop doing something for you will screw up anything you don?t specifically prevent. 

Since then I bought my own sandblasting cabinet?


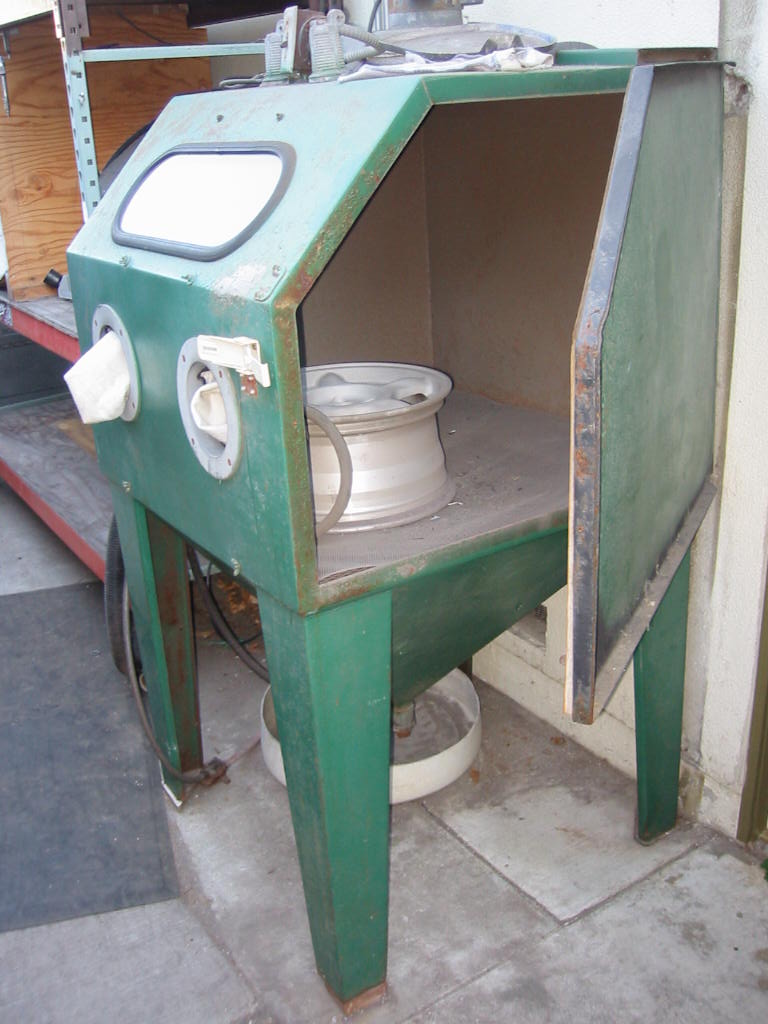
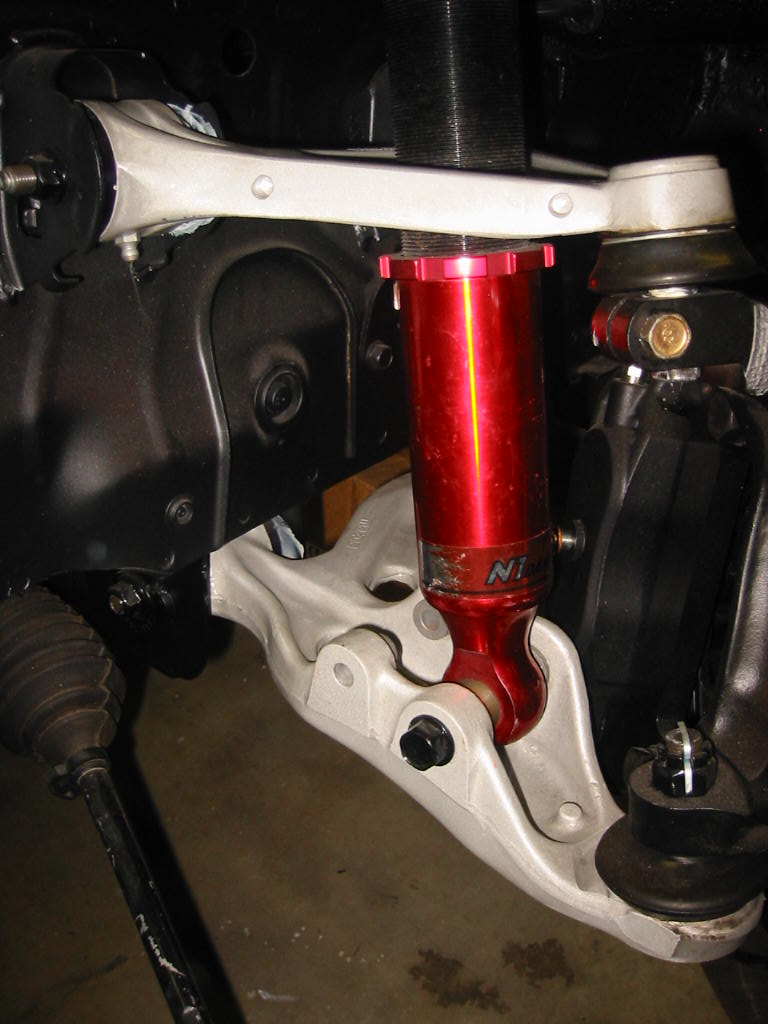
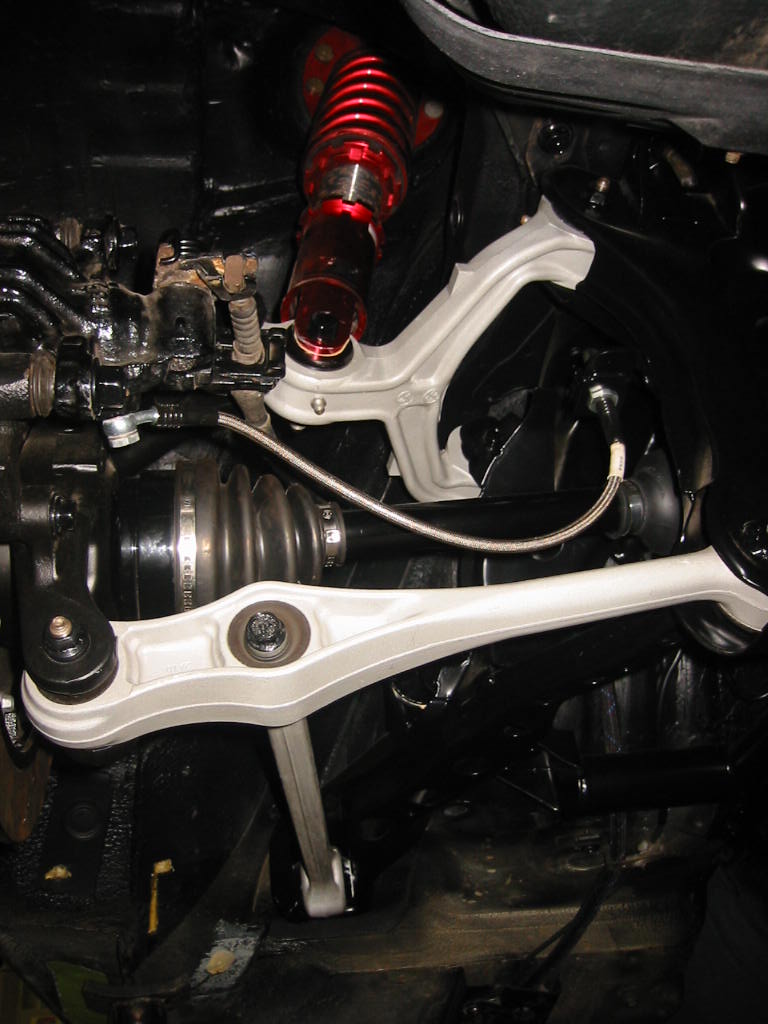
Now the parts looked brand new, but the sandblasting process leaves a bare aluminum finish that quickly absorbs all that touches it.  I knew my efforts would be wasted quickly without a finish on the arms.  I originally thought about powder coating the parts, but there are several bearings and ball joints that I was concerned about damaging if I exposed them to the ~400 degrees required for curing powder coat.  After a bit of research I decided to coat my suspension parts with glisten PC from POR-15 and reinstalled the (now polyurethane) bushings.  To help with the budget I was able to sell my unobtanium bushings back on the forum, obviously at a bit of a loss, but it made the pain a bit more bearable. 


Oh, and since my Harbor Freight press and I got to be very close during these bushing/bearing swaps I thought I would include a post I made about using the thing for this job:


Quote from: 65imp on using a press

Quote from: jimlab
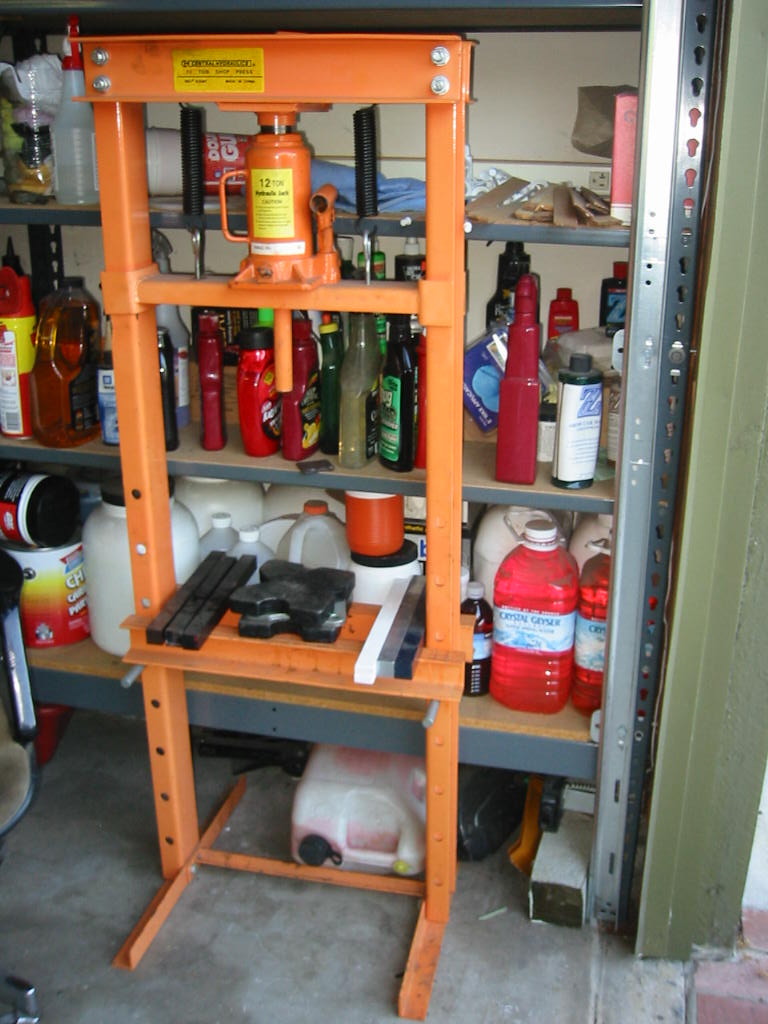
Did you break the press or one of the arbor plates? I actually cracked one of the cast iron plates and one of the sockets I was using went ricocheting off the wall.

Always stand to the side of the press when applying pressure so at least the frame of the press is between you and any potential flying objects. 

No kidding! I got about 20 or so gouges in my concrete near where I did my bushing job from blowing apart the fixtures of arbor plates, steel rods, harbor freight presses, and suspension arms/bushings.

When we replaced Dan's rear wheel bearing last month we had a helluva time removing the axle from the spindle splines. After mounting it in the press we tried a number of times to remove it. Finally just pumping the press from "damn that's a ton of pressure" to "$h!t everyone stand back" to finally "well lets see what breaks first" before "BOOM!" then we all stand around checking our limbs before we see the axle popped free, sending parts everywhere. Then the celebration begins for integrity of biological systems, and their triumph over mechanical demons...

 Honestly the bushing job is waaaayyyy more of bitch than many think. I damaged one of my front control arms when the socket I was using to press the bushing bound and gouged the side. Be really careful, I half expected to see that someone had taken off a finger/arm/other appendage doing this job. When those suckers let go with that kind of force behind them, it sounds like gunshots! My concrete garage floor still is gouged from the resultant projectiles from my bushing swap!

Torsional rigidity:

 The stock torsional rigidity of the FD is ~15,000 Nm/deg.  The Ancas book says that the FD has 20% greater rigidity than the FC (I guess that puts the FC ~12,000 Nm/deg?).  But the Rx-8 is supposed to have 30,000 Nm/deg! (It basically has an I-beam running down the center of the car)  Shit! Time to get this thing stiffer (I know, I know That?s what she said). 
 I wanted to improve the torsional rigidity in order to increase responsiveness, and reduce deflection under the higher strains I plan to put the car through.  I saw a couple options:
 
Braces

You can buy braces to and from most anything in FD?s.  Some may help a bit, others may not.  Accurate data on how much any of them help is a unicorn.  All cost money, and all add weight, so I figured I would go with whatever seems to offer the most help, and the least weight in my budget. 

 Front ? Cusco makes a titanium bar that is insanely light (wait hold on I?ll go weigh it? ) and I found a guy in a pinch looking to get rid of his.  IIRC I got it for 150 shipped.  Also it has the same general shape as the eBay front bar a lot of the guys got to fit with their swaps. 


In the future I may have it made into a 3 point unit, or add on an additional unit that ties to the fender wall such as this piece:


[Almost went with the autoexe front gymnasium, but it weighs in at 6 lbs or more, no guarantee it would fit, and costs a ton of $. Not to mention a lack of any data on how much better it would work.]

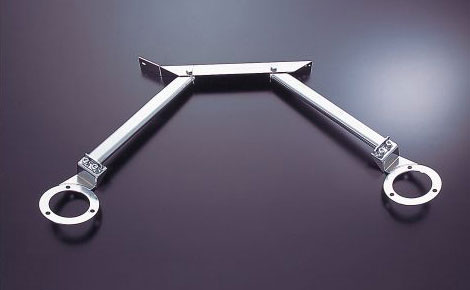
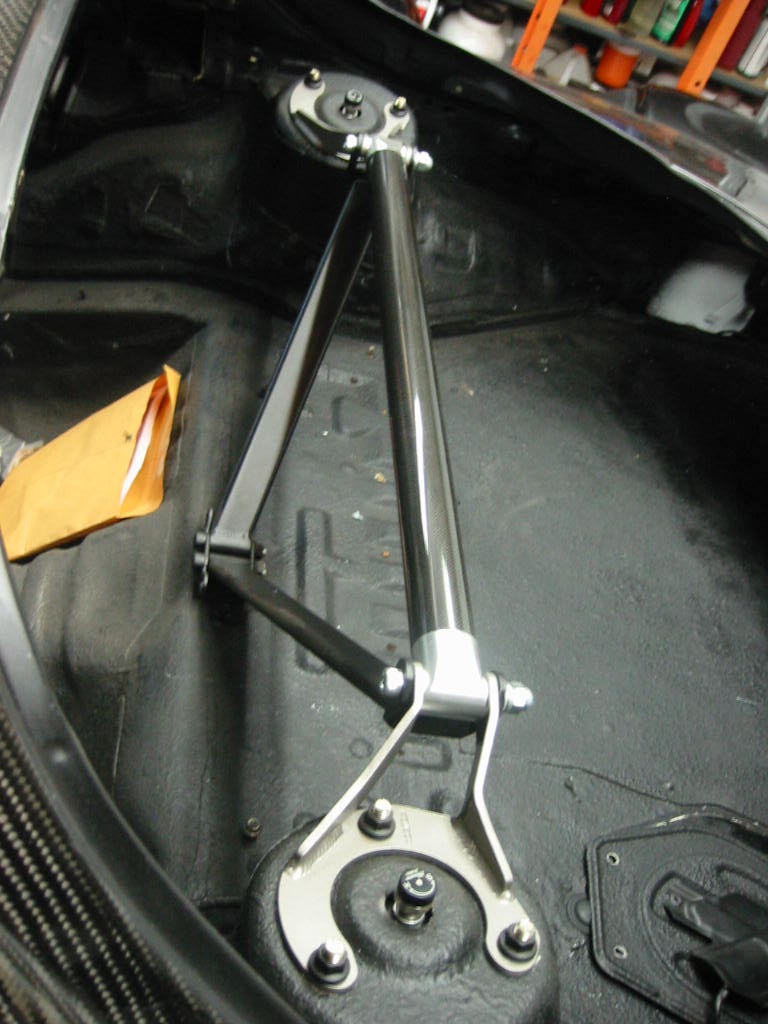
 Rear ? Cusco makes a CF rear brace, and once again I found a deal and had to have it.  It has triangulated aluminum braces to the floor of the trunk as well.  They come polished, but I powder coated them to fulfill requirement #5.  Ya need to drill 2 holes in the floor of your trunk, but after what I did to my trunk it was no biggie. 


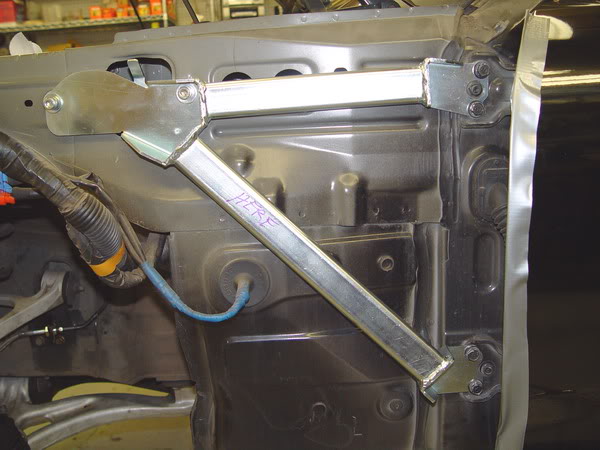
 Fender ?Nagisa makes a fender brace, that has had some good reviews.  Since my fenders are off anyway it won?t be too much of a bear to install these.  The set of 2 weighs in at 5 lbs.  Also they are of steel construction, which was a bit of a surprise to me.


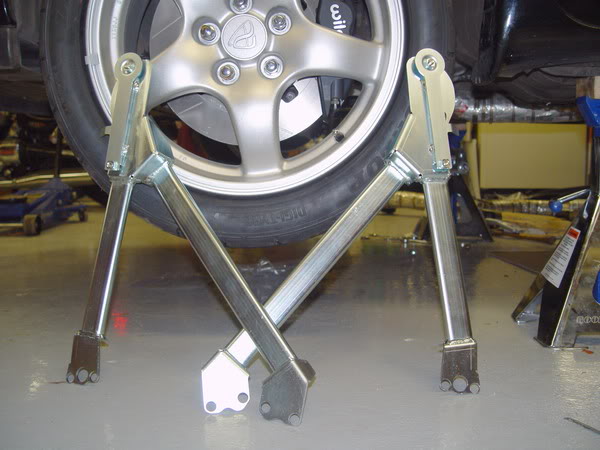
 Undercar ? I realized I would not be able to do a lot of these until I finish the exhaust as clearance is critical, and space is a premium down there.  I imagine there will have to be some custom stuff made up, as existing braces are made for the rotary sub frame/stock driveline/exhaust. 

* FWIW I do not know how much the removal of the stock PPF reduces the torsional rigidity of the FD, if at all.  The possible concern is the removal of the rear cross member of the front PPF that we replace when making our ls1 subframes.  I feel that the thicker gauge metal we use helps, but don?t know if it matches the rigidity stock setup. 
I do plan to create an undercar brace that supports either side of the trans tunnel somewhere near the front to account for the elimination of that rear bar. 
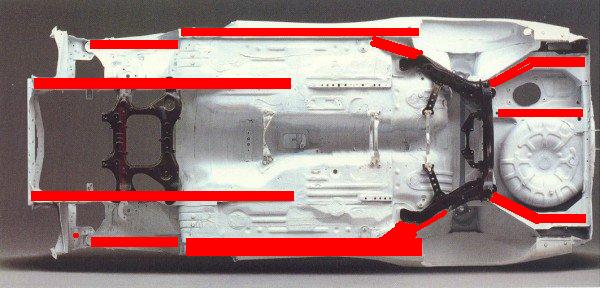

Structural foam in the frame:

So I was looking for a way to stiffen the chassis, but was having difficulty with the decision to step up to a full cage.  What I came across was a bit of a cheat that Ford uses to stiffen up their truck chassis, and also keep things quieter. 


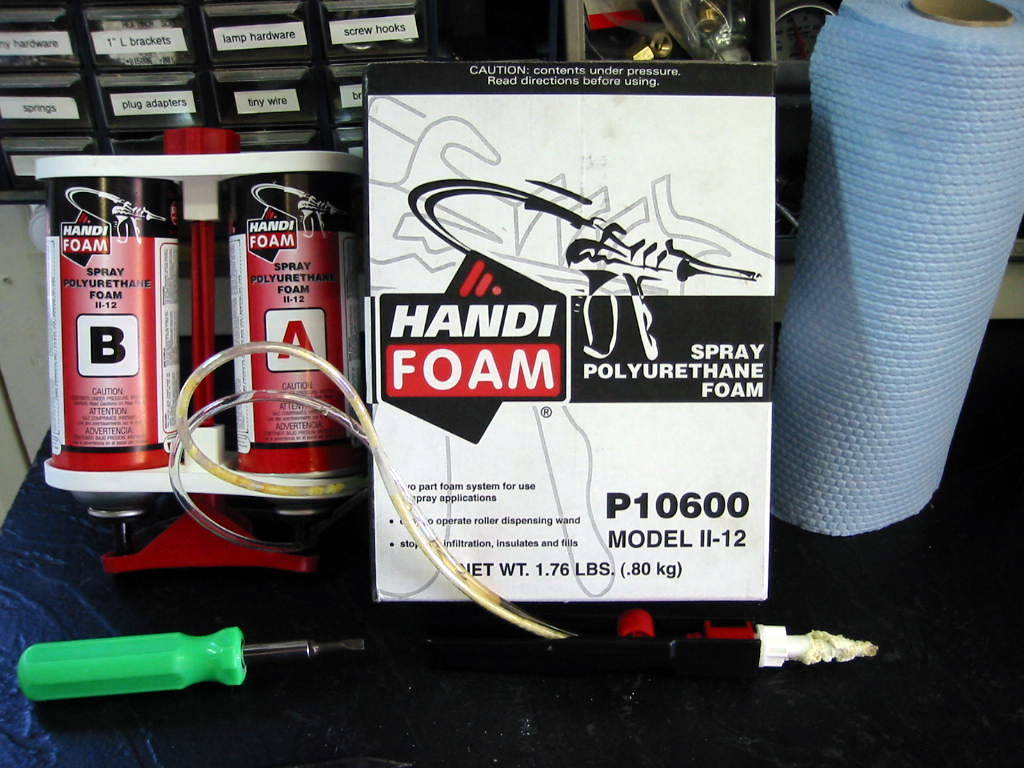
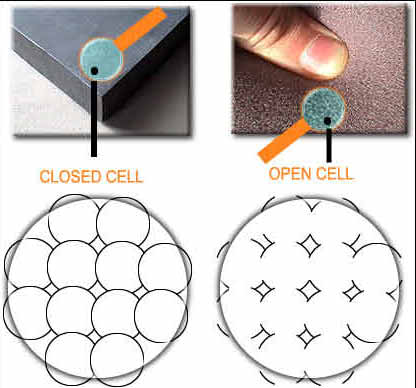
This stuff is not to be confused with the open cell stuff you can find at your local hardware store.  It is far more dense when compared to most open cell foams, so it does a better job of supporting the chassis.  Also It is chemically cured, so that it will fully cure in your frame rail unlike the oxygen cured open cell stuff that cannot cure fully without exposure to air.  Finally closed cell foam's components are sealed from one another.  This prevents water from seeping into the foam as it sits in your frame rails, and being held there, effectively rusting your vehicle from the inside-out.


When applied to the hollow members of the uni-body on the rx7 they will better resist deformation, while at the same time reducing vibration and noise.  I ended up filling the members that seemed structural as I examined my car, and various diagrams in the FSM.  This took quite a bit of time, and I cannot yet say what the final result offers.  In fact I don?t imagine I will ever get more than subjective results, but time will tell.  Here?s more of the background.
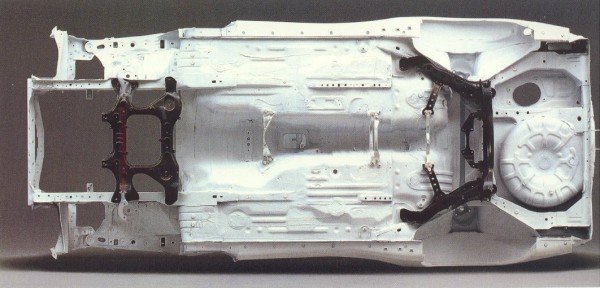
Here are a couple underside pictures that show the members I filled with closed cell foam:


I hate to do it but I will quote SCC:

Quote from: Sport Compact Car
?Structural foam, in the 2 lb per cubic foot density that we used, can stiffen chassis members up to 40 percent.?

This is from their project 300zx:

SCC article on Foam in the chassis
 
Hey 40% stiffer sounds good.  Better yet, it adds little weight vs. most options that offer similar results.


I know what you are thinking:
Q:  ?Hey Mike, why not a cage? ?
A:   I did not go with a cage for several reasons;
 
 #1 I needed to draw a line between street car and race car, and IMO it is not a street car with a cage.  I didn?t want to be dancing around a cage during ingress/egress, and the interior in the FD is already pretty tight (or maybe I am too big).  Since I plan on driving mostly on the street, I did not want to live with the compromises of a cage. 

 #2 there is the question of safety.  While on a track a cage improves safety and rigidity, but it?s a different story on the street.  On the street a cage is usually used without race gear such as a helmet or 5 point harness.  This opens the opportunity for soft squishy human to interact intimately with hard metal bar in the event of severe jostling (i.e. an accident).  Factory engineering spends a great deal of time preventing this sort of interaction from occurring in a variety of accident types.  I did not want to toss that out the window in order to run a custom cage.  For this reason I believe a cage is more a greater liability than not having one on a street car. 

#3 The best and most effective cages are custom and welded in, which means adding a bunch of weight not to mention cost.  Even chromo cages often eclipse 100 lbs, and as you saw with goal #1 I worked pretty hard to shave ~100lbs.

 #4 There is the risk you run by involving another ?professional? to fab your cage.  Finding the appropriate individual locally can be a daunting task.  Afterwards your cage is only as good as their engineering and skill.  Add to this the ease with which your car can be damaged, or otherwise devalued as you leave it with said individual. 
 
 
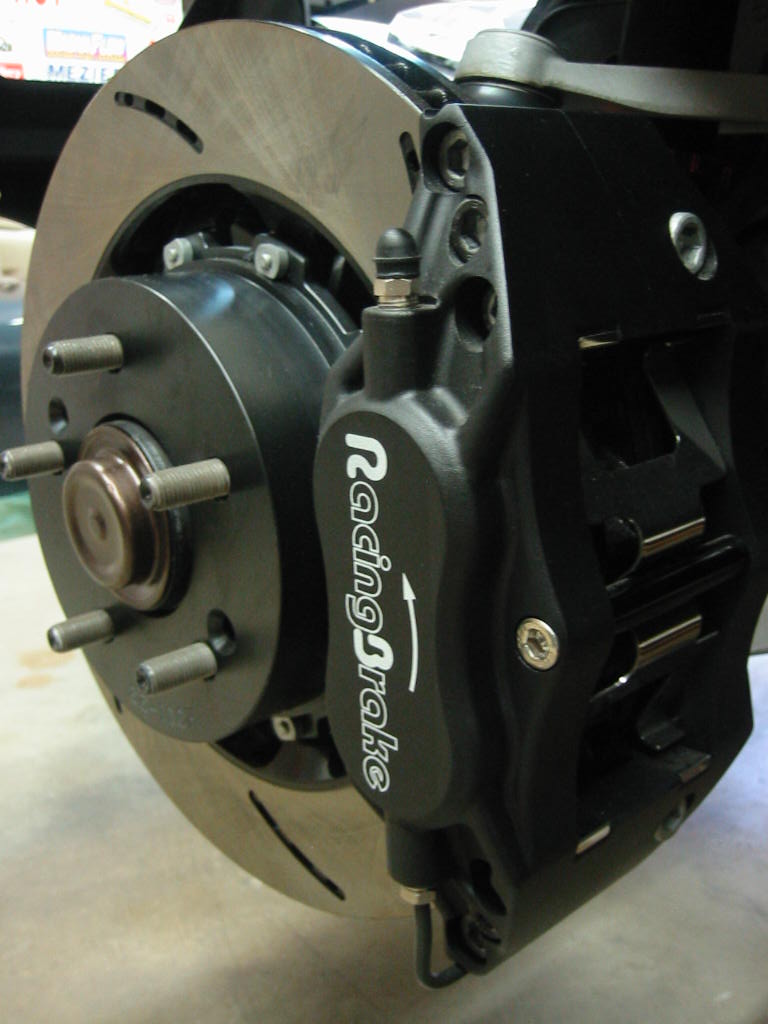
Braking

 The astute reader (or viewer) would already know that I upgraded to the Racingbrake BBK front and rear partially for the weight savings.  But the biggest reason I upgraded to their kit is to have improved thermal capacity of the larger rotors.  Other strengths of this kit are the improved brake cooling due to the design of the rotors, balance front and rear braking with the retention of the stock parking brake, and finally the economic price point of this kit (especially on the initial fitment group buy). 


[Warning, potential flame material here]

Also I have removed my ABS, which lost some additional weight as well.  Now I am not Michael Schumacher, nor do I claim outstanding driving ability.  But over the years I have gathered some corroborating info that tipped the scales for me in that decision. 
 
-If running different diameter tires from the stock setup, the calculations the Mazda abs system uses to determine spin are thrown off, and the braking becomes substantially worse than stock.  My tires are far from the stock size.
             
-The stock system is pretty rudimentary in the 93 model year, and has many improvements through the years.  Since I had a 93 setup, I was not too sad to ditch it. 
 
- The stock system is notorious for leaks and various failures.  I figured I would eliminate the potential for problems down the road.  Sticking to the KISS is one of the doctrines I swear by in my vehicle builds. 
 
-   In the 5 years I had my rotary powered FD on the street I never once got into the ABS.  In fact I actually considered that the ABS may have never worked before I sold it.  So I took it out on a rainy day, and railed hard on the brakes, sure enough they pulsated as an ABS system is designed to.  Even with the hawk HPS pads I had on for 3 years I never got into the brakes enough to trigger the abs, until the day I actively tried to.  This is not to say that someday I may regret this decision, but the chances are minimal in my mind. 
 
-  If I was planning on actively tracking the car and frequently using maximum threshold braking I may re-consider.  But for the time being I believe that my setup when properly adjusted will work well for a predominantly street driven vehicle. 
 
929 Brake MC

 I know that a lot of guys go with the 929 master for the older FD big brake kits. It apparently gives much better pedal feel for the larger calipers. I have mine installed for my FD, but have not driven it yet, so I can't give you any impressions. 
But I do expect to have more confident braking due to it, albeit with more pedal effort.


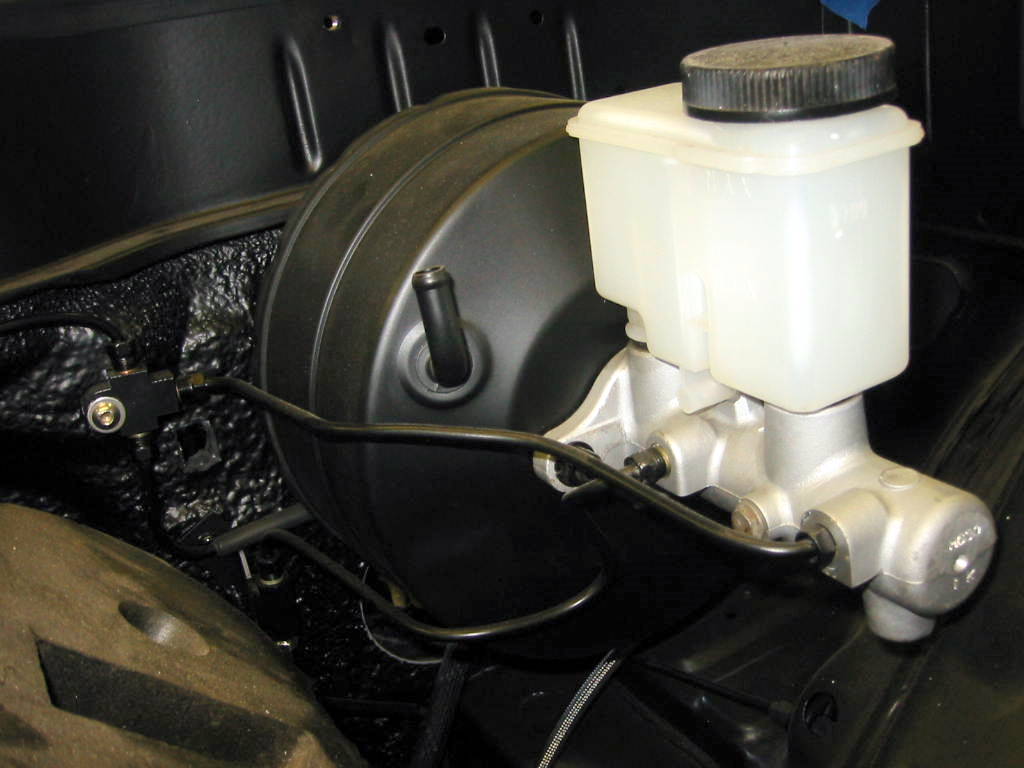
On the FD it flips the side that one of the lines mounts to, which requires a new line. Since I removed the ABS as well I had to do a prop valve, and while I was at it I replaced all my brake lines.
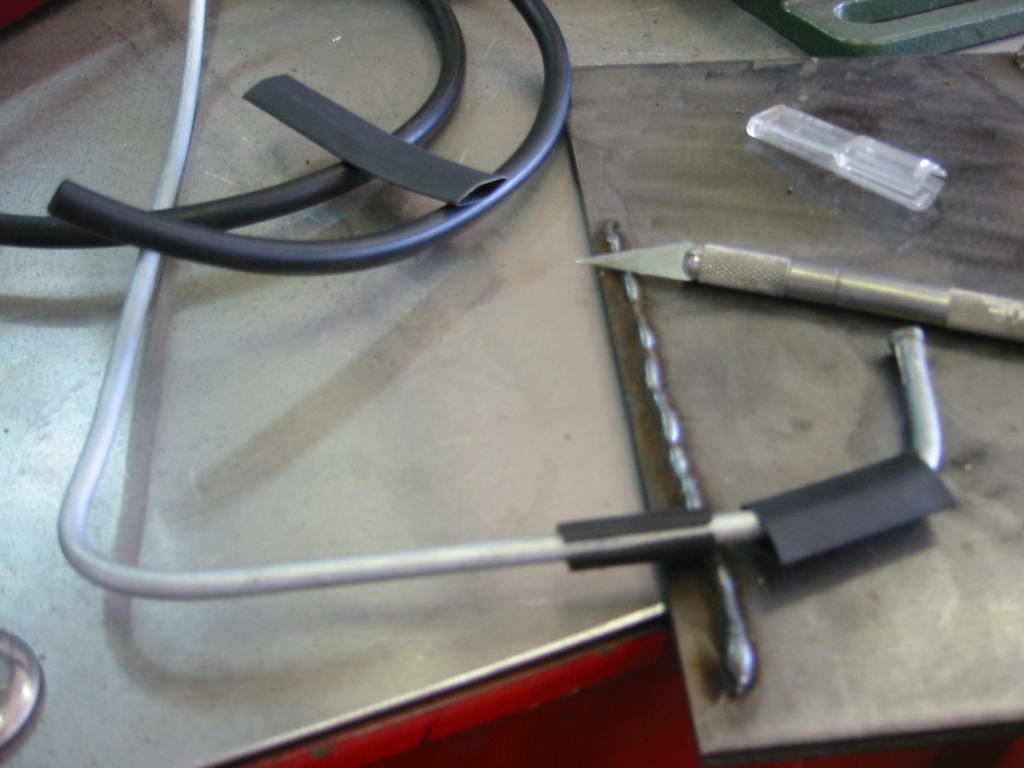
One of the problems I had with the brake lines was the retention of the factory protective coating.  I didn?t want to lose the protection, but it quickly bent and looked like crap after changing any bends in the line.  Here is the solution I came up with:

1. Form the line into the shape I needed (I know duh)
2. Slicing the side of a silicone or rubber vacuum line to the length desired for protection
3.  Slide the hose over the brake line, and position to minimize the gap between sliced hose edges. 
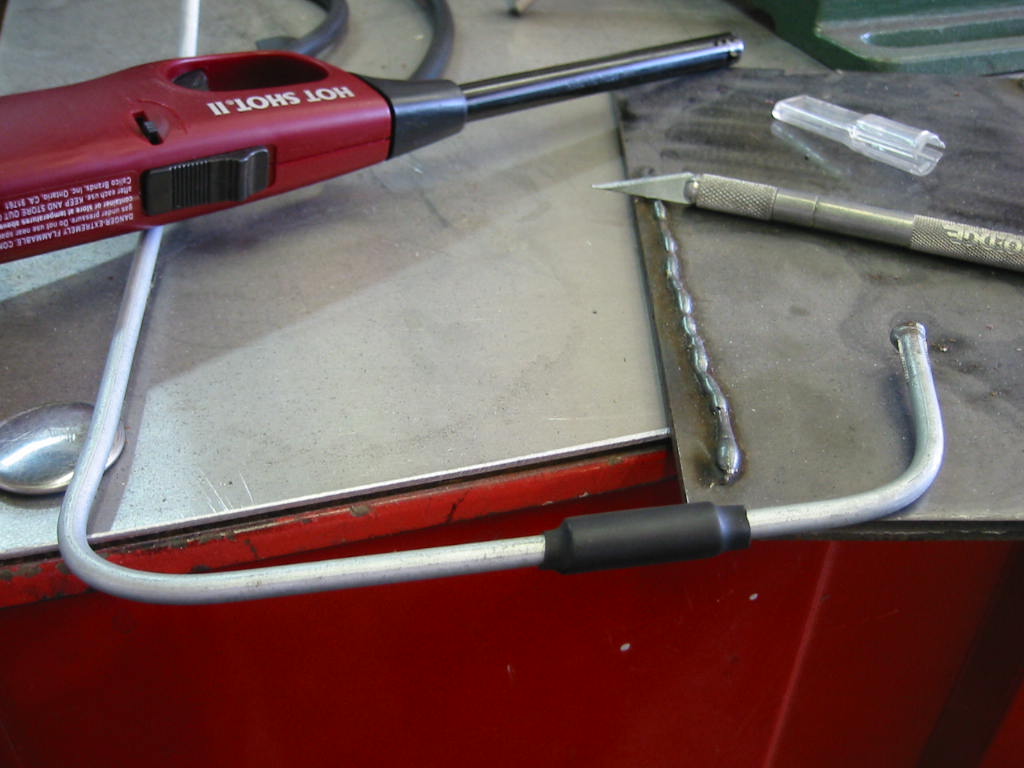
4.  Take a length of heat shrink and place over the entire length of hose
5.  Apply heat to the shrink, and celebrate
6.  Curse if you messed anything up
7.  Question your sanity after spending WAY too much time on your brake lines
8.  Have a beer to forget about steps 6 &7

Here?s a picture or two:


Brake proportioning valve:

What a prop valve essentially does is reduce the line pressure in the brake system for the rear brakes.  This is done due to the natural tendency for the rear brakes to lock before the front when the weight of the vehicle shifts forward under hard braking.  Stock brake systems have this set for the stock components.  Since I altered the stock setup quite a bit, I needed to add an adjustable valve to maximize braking with my setup.  I also gain the ability to dial in my brakes for a variety of conditions.   

There are a couple different aftermarket prop valves.  Most are a screw-type, some are a lever type.  Also some have detents and others are more of a continuously variable adjustment.  I found it hard to record or measure the adjustment of the latter, so I preferred a detent style for this project.  In addition I could only find one that was available with metric brake line fittings.  So I went with the Tilton prop valve which I got off EBay for ~20 bucks from a race team.  It came with the SAE fittings, which I figured I could just swap with the metric fittings.  Urns out the Black valve (what I have) and the Red? Valve (the metric one) are machined differently and the fittings do not swap directly since the metric threaded portion is longer and therefore will not seat.  But with a little machining I was able to get the metric fitting to seal, whew!

Here?s what it looks like in the position I chose:


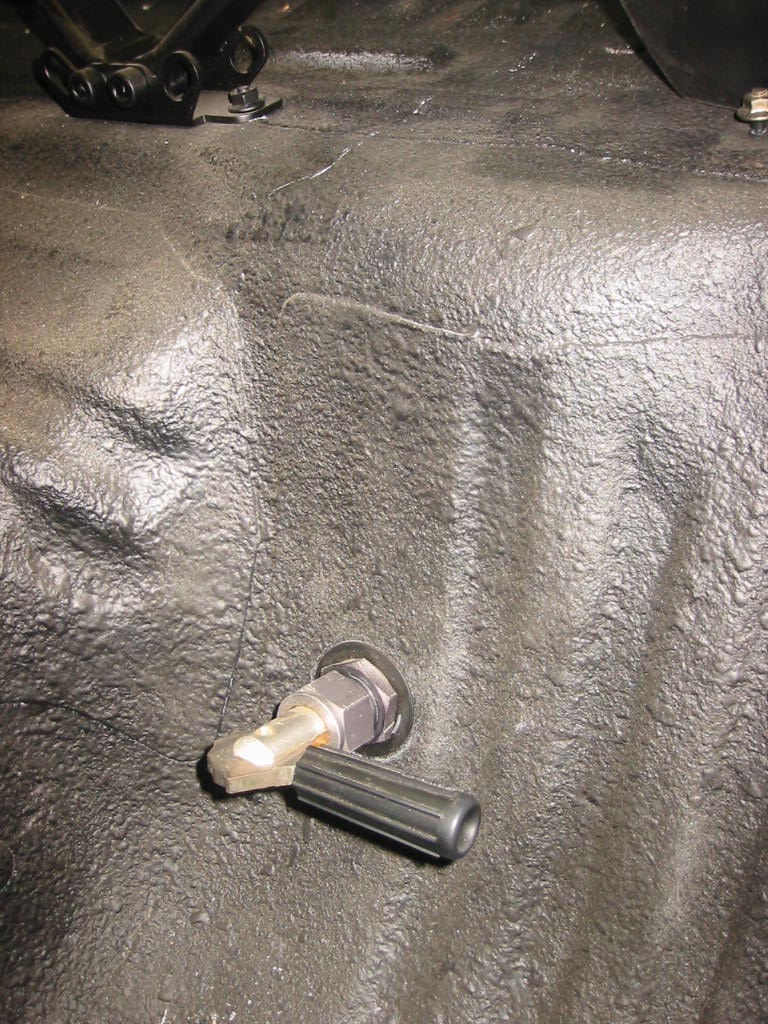
This should be easy enough to access even while driving.  Hopefully I will be able to get it dialed in faster this way, and adjust if needed for conditions. 


Manual steering

  As was previously mentioned I went with manual steering for the improved road feel, weight savings as well as simplification.  While I had no problems with 285 front tires, the 315?s I plan to run now may make things a bit tougher, so time will tell.  Currently it is the Maval unit I plan on running:


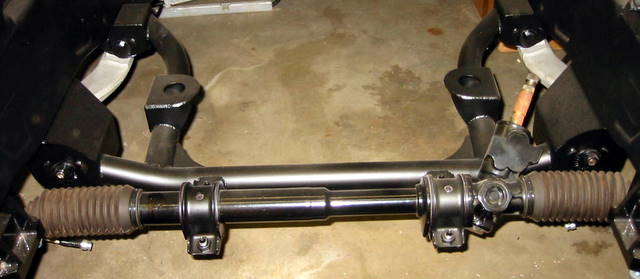
 But I am also strongly considering that AtomicRex unit.   


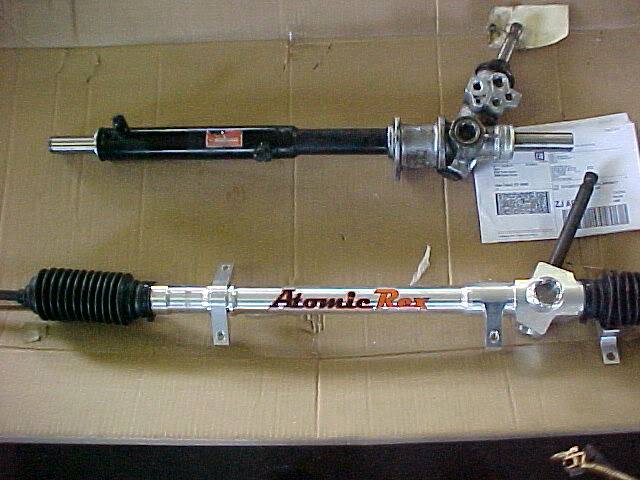
 I would like a couple more reviews and info on this unit.  Also I would like to take some bump steer measurements, and decide what height I can raise my rack under my canton oil pan.  Then I may have the lower solid AtomicRex mounts machined thicker to accomplish this raise. This resolves the bump steer issue in two ways.  First I drop the overall rack less, and therefore need less of an outer bump steer spacer.  Second it allows mew to avoid the issues that others have dealt with when using the inner bump steer kit. 
 

Wheels & Tires
 Wheels and tires are kinda a big deal.  After all they are the only thing holding my car to the ground.  If you go too nuts, they become a huge deal.  So that is what I did?

 Guys like kingkyle, and NateTerry went wide with their tires and were doling out shovels of whoop-ass to other supercars on the track. 

http://www.youtube.com/v/NmJT6mfTBhU


After I saw that I figured I needed in on the action.  So I traded my 18x10 CCW classics with 285/35r18 Pirellis on all 4 corners for some 18x13 rears, and some 18x11 front CCW c14 corsairs.  They drop about 2 lbs per corner over the equivalent size Classics. 

For tires I went with Pirelli p-zero rosso tires in a 315/30r18 front and a 335/30r18 rear because of their traction and the tiny bit of weight savings vs. other max traction tires available in these sizes.  And the fact that I could get a deal on some low mileage take-offs didn?t hurt either.  Also IMO tire compound is more critical to grip than some stretch/bulge, so I considered what kind of driving I do and picked a good max traction street tire.


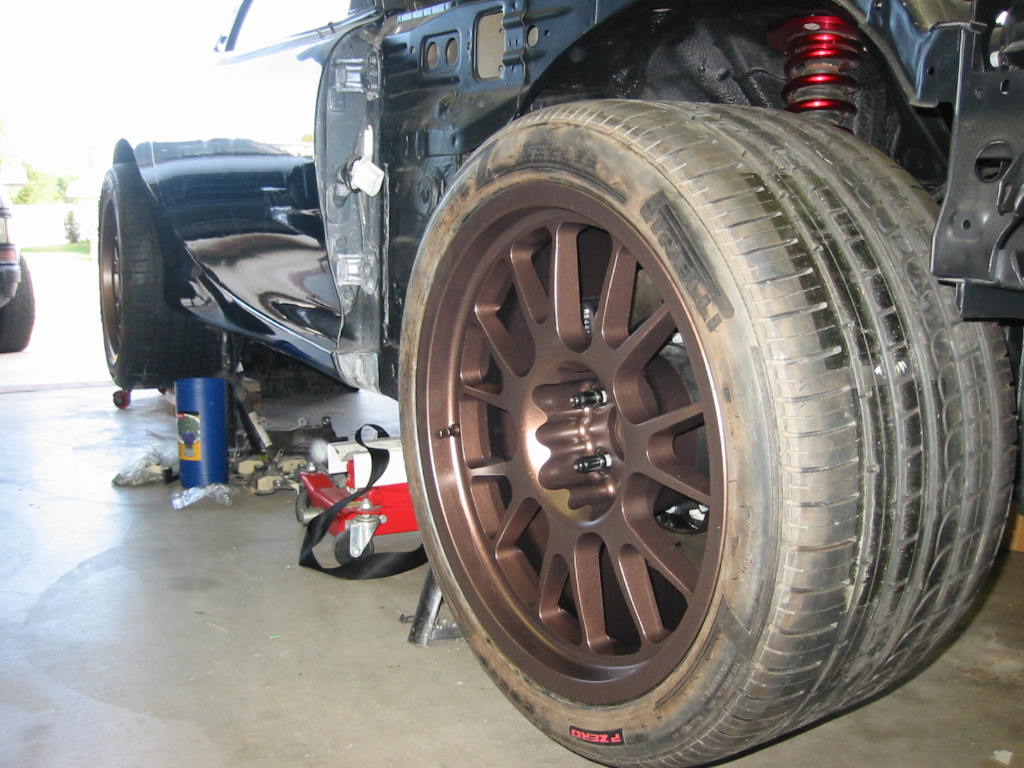
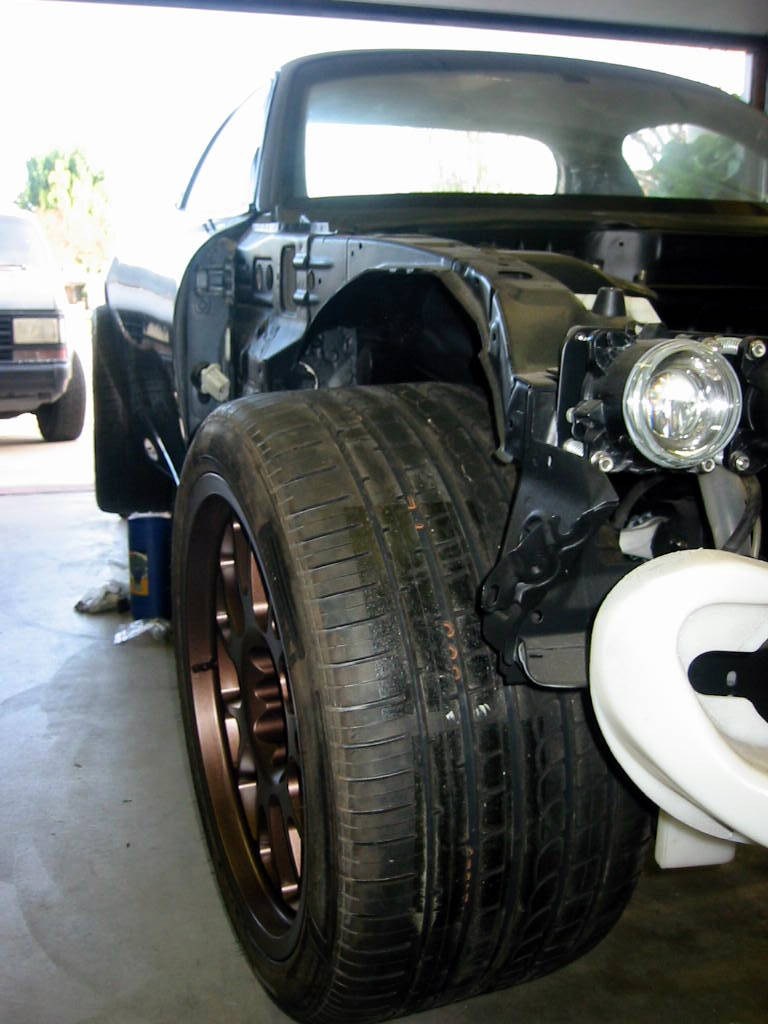
This jump in wheel and tire size did cost me in the weight department, to the tune of ~55 lbs rotational weight.  But I feel the trade-off was worth it for the greater width to my contact patch and corresponding lateral-g?s.

One other aspect to think about for your rear tires is overall tire height.  Stock rear tires are 205/55r16?s and have an overall height of 24.9.  My new tires are 335/30r18 and end up being 25.9 inches tall. So this is a 4.2% change in overall gearing.  The taller the rear tire, the taller your effective gear ratio.  I already lowered the diff ratio to 3.55 via the Cobra rear, but the tires I am now running drop that effectively to a 3.413.  For my purposes I believe this will be plenty steep for street use and traction after considering the weight of the car and torque I plan on putting out.  If I finish off the calculations it looks like I?ll be turning over about 1500 rpms at max legal speeds in 6th.  That should allow for some decent mpg. 

Oh, and I can?t help but post a link to one of my tire hookup guys, ridiculously low prices, and killer used tires:

Atlantis Tire

Especially for fitment, and working out the bugs, it is hard to justify new rubber.  I plan on getting some fresh rubber after these bear the brunt of the ?break in? miles?:D
absolute power corrupts absolutely  :yay:
93 FD widebody - destroked
69 Suburban - positive manifold pressure
72 Blazer - 6.0, 6speed 4wd
65 Impala - 5.7
59 cad  - 5.3
53 spartan - crash pad status

Offline 65imp

Re: 65imp's TVR build
« Reply #9 on: May 14, 2010, 05:03:24 PM »
Quote from: imatuner;558709
kinda interesting that your doing the TVR conversion to your FD i would like to see somebody do a Panoz Esperante version as well im surprised i havent seen a kit made yet since they look so much alike the panoz and FD, cant wait to see your final outcome im sure it will be jawdropping

The "conversion" is more in the character of the vehicle, rather than the look. 
Though I imagine my title and the initial picture may have incorrectly given the impression that I am using that FEED kit.  I considered it briefly as I love the front end, and the rear is pretty good as well.  But the sides, and especially the fenders with the backs chopped off really kill it for me.
absolute power corrupts absolutely  :yay:
93 FD widebody - destroked
69 Suburban - positive manifold pressure
72 Blazer - 6.0, 6speed 4wd
65 Impala - 5.7
59 cad  - 5.3
53 spartan - crash pad status

Offline 65imp

Re: 65imp's TVR build
« Reply #10 on: May 14, 2010, 05:04:41 PM »
This goal was one of the big reasons I made the jump to the ls1 over the 13b-rew.  I was making great power with my single turbo FD, but ?reliability? and ?streetability? were greatly compromised.  This is a place where the v8 does much better, as it naturally has no need to work as hard for the same output.  Here is a post I made back on ?the club? regarding the issue:

Quote from: 65imp
The term "streetable" gets thrown around a lot and the point is argued a great deal since people have a different definition of "streetable"
"streetable" is somewhat flexible in defining, yet I think most would want the qualities I list below to define as a "streetable" vehicle. Many times this term is similar to "daily driven", although some people will drive a race car everyday, most would prefer the stated qualities.  The more you sacrifice from these qualities the farther from ?streetable? you go. 

"Street-driven" is a bit easier to define, as any car that has ever been on a public road whether legally or illegally, and concessions are only made due to owner preferences. Most high hp rotaries fall into this category.

"race" is generally considered a vehicle purpose built for timed events, so does drift qualify? IDK
(yes I did just quote myself, I recognize this looks pretty arrogant, and for that I apologize)

So I came up with a list of reasons to include my rationale for Goal #4: a street driven car:
 
-It seems that most of the guys that have had highly modified cars get rid of them for NVH reasons.  I did not want to finish my project and then decide to sell it because it was brutal on my senses with frequent street driving. 

-It would be nice if I didn?t have to apologize to every woman who was brave enough to sit shotgun. 

-I don?t want to feel like I was too ?grown up? for this car in 5 years. 

-I did not want a headache after a spin to the supermarket from the noise or the fumes.

-I am not a fan of the car shaking so bad you can?t read the gauges from the retinal detachment. 

-I did not want my balls to get a tan from the transmission tunnel heat
 
As much as we may bitch about factory engineering, they get the NVH tuning far better than us aftermarket guys.  Truth be told I think the aftermarket is much more focused on looks and power then drive-ability. 
 
Exhaust:


I plan to use dual 3? to only a 3.5 inch single exhaust.  I know ?only? is pretty relative, but it should be about the minimum for the power I plan to put out.  I have found that the #1 way to decrease noise is the size and type of muffler and exhaust pipe and tip sizing in your project vehicle.  For this reason I went with the rear catback with the largest canister size for any of the pre-made titanium catbacks.  If it does not get me to an acceptable noise level I do have a racingbeat dual tip waiting in the wings.  I have done my best to attempt at a fine balance between weight, and noise.  It is very easy to add a lot of weight with an exhaust setup when you consider headers/muffler(s), cat(s), piping and merges. 

For the midpipe from the headers back I plan to squeeze another fullsize muffler,  as I am confident that the catback alone will not do a sufficient job.  My current plan is:
Pypes Performance MVR44 - Pypes Race Pro Mufflers


It has a 3.5 Inch inlet/outlet without much if any flow loss.  I have often used the dynomax ultraflow due to it?s great ability to be a ?no loss? muffler if sized correctly, and also good muffling ability.  The pypes unit looks to be of similar construction, and comes in a stainless 3.5? size.  Right now I am tentatively trying the Pypes unit unless I can find something a little lighter.  It is also stated as the quietest muffler that company produces, which should also keep.  Anyone with more input or options?  I am listening. 


Noise & Vibration

In the past I have worked with a good amount of the Dynamat/Brownbreat/RAAMMAT type foil backed butyl products.  They were a PIA to lay down, added a lot of weight, cost a lot of coin, and the results were not so impressive.  I covered an entire FD interior with the stuff, and still had  unacceptable noise levels even with a racingbeat dual tip exhaust.  (one of the quietest stock FD catback setups available).  In addition I used it on my 65 impala, and just a bit on my mini, and was not impressed.  After some investigation I was intrigued by the liquid sound deadening available.
 
Hopefully you will excuse me as I quote another one of my posts:
 
Quote from: 65imp
I have previously used RAAMMAT(also used Dynomat & Brownbread on other projects)  on my old FD, and it was my favorite of the butyl based sound deadeners.  But it is a PIA to work with, sometimes smells, adds a ton of weight and virtually impossible to remove.  So my opinion is that it is not as good as the spray on stuff.

I covered all the internal surfaces, and a great deal of the external surfaces on my new FD project in Spectrum Firewall:

Firewall - Thermal Acoustic Insualtion and Heat coating

You use a bedliner spatter gun to spray it on, and you need to do 3-4 coats to get good thickness. Or you can get an additive that turns it into "sludge" then you can trowel it on thicker. Either one cleans up easily with soap and water.

They have a ton of other products as well, but the firewall acts as a sound and heat barrier
For just sound you can use their Spectrum product.
The guys that run the place are very helpful, and the cost of the product is very fair IMO.
Also they have a great forum for more info:

Second Skin Forums - Powered by vBulletin

VS. the butyl stuff the spray on is wayyyyy lighter, wayyyyy easier to work with, and clean up. No bad smell, and far more effective at killing sound.
 I also found this review on rx7club:

QuietCoat Sound Dampening - RX7Club.com

the guy got a 13db reduction in noise when he did the whole car.

 I have applied it to the entire interior surfaces, and the underside of the transmission tunnel, as well as the firewall. Sludge for the wheelwells, and underside above the muffler. I recommend spraying 3-4 layers with a bedliner spatter gun. You can brush it on, but it does not go on as thick, or with as much of an "acoustical" surface. Also get some of the activator, and you can make the sludge, which allows you to trowel it on in the wheel wells. If you talk to the guys when you order they will mix it in a color that you prefer. (white-grey-black).

 IMO it does a much better job in quieting the surfaces, compared to my last car that was dyna-matted. Also weighs considerably less. It seems like a latex-paint in consistency, so cleanup is cake with water, etc.

I used the firewall. My car is nowhere near done, so I can't tell ya how effectively it deadens the noise. But when I compare the sound of the panels, and the ease of application, as well as the overall appearance and the weight, I prefer the spectrum product. If it reflects heat 1/2 as well as they advertise, then I will be thrilled.

I would prolly recommend 3-5 gallons to really coat an entire car, depending on how hardcore you want to be. You don't want to run out in the middle. You end up wasting quite a bit filling the spraybottle, and spraying, cleanup, etc.

I highly recommend doing inside the doors, but first use a bead of adhesive silicone between the door support bar and the door skin. Also I replaced the plastic between the door, and the door panel with raammat to seal the door Afterward you will have the best sounding FD door you have ever heard!
(yes I did just quote myself again, I recognize this is becoming a bit of a pattern, and for that I apologize)

Here are some pictures of the application of the spectrum firewall in my vehicle. 


Here is the only shot I have where you can see it?s application on the underside of the vehicle.  You will also note a great shot of the rare ?Brismo7? creature in it?s native habitat. 


I chose to use the spatter-gun application in visible areas like the firewall and hatch area.  For the cabin area under the carpet I painted it on up in the dash area, and spatter painted the rest of the area under the carpet.  I don?t recommend the brush application, as it does not seem to lay it on thick enough, and ends up being pretty time intensive.


   For the fenders, underside of the vehicle, and inside the doors I used the sludge and applied with either a rubber scraper or my hands in some rubber gloves. 


Heat Barrier:
The really neat thing about the Firewall product I used is that it also serves as a heat barrier.  Firewall is not quite as good a sound deadening agent for this reason.  Rather it has heat resistant ceramic spheres and glass beads in it?s structure to create a better barrier for heat.  Since I wanted noise and heat reduction, I went with this product applied in various states throughout my vehicle. It didn?t hurt that a guy on the classifieds of the pro-touring forum was unloading a 5 gallon bucket at ~30% cost! 

Then I decided to add a little bit of insurance to the effect of the firewall spray on application in terms of heat and sound abatement.  In addition I decided that the repetitive complaint about the heat put out by the trans tunnel by the t-56 and the exhaust was an all to common issue.  Since I had already been down the river with the second skin folks I grabbed a sheet of both the heatwave, and the heatwave pro.  So I added a layer of Heat wave pro to the transmission tunnel near the front, fading to a layer of regular heat wave in the rear of the tunnel. 

Each one looks like the jute material the FD has stuck under the rear panels, then sandwiched between one or two quilted layers of foil-type material.  The pro has two layers of the foil vs. the heatwave having only one.  I figured there is more heat nearest the engine, so use the pro up front.  Here is a pic:


As I ran out of the pro, I used up the standard heatwave primarily in the area of the rear bins. Funny thing about compound curves is that it takes a bit of effort to get things to lay nicely in them:


Foam: 
As you may have read in Goal #3 I used a bunch of closed cell foam in the frame of the structural members of my car.  This had an added benefit of dropping the noise, both by making the chassis more rigid, and by closing up empty space, thereby lowering resonance. 


Closed cell foam works great as an additional barrier without adding a lot of mass (ie: weight).  I considered getting some overkill or overkill pro, but found a similar product at my local Walmart:


I plan to apply this to my wheel wells on the inside, and the inside of my doors.  Now that I have removed the rear trim I will also use it in the hatch under the rear carpet.  Here is a pic of what we made up last weekend.  First we got the general form from shop towels and tape, then we transferred it to cardboard:


Then we cut out the foam, checked the fit.  And duplicated it onto the carpet.  Once that was done we cut the final carpet for the top, and glued them together with spray adhesive.


 Open cell foam also works well and costs a heck of a lot less when it comes to reducing noise.  So I put it in the carbon hatch, and some in the B-pillars since I was not concerned about water getting in there.


Driver Comfort:


Racing Seats

 I'm~6'3" and ~230
 The "deadleg" after a long drive was always an issue, I thought I just had a fat butt. That or the r-1 seats were too tight.  I wanted seats that would still allow easy ingress and egress from the vehicle, unlike many of the full racing seats.  In the past I had used Torino knockoffs with favorable results:
Sparco Torino knockoffs (DAD racing seats on eBay) fit in my FD with modifications to the stock rails, and I gained ~1.5 inches. I'm ~6'3" so the drop was appreciated, plus they have adjustable backs so that you can get the lean "just right." I mention my setup as it is by far the best budget method I could come up with and the seats recline and are comfortable and actually look good. I used these for a couple years in my rotary FD. You do need to modify your stock rails (mostly just detach the seatbelt pickup). But any custom that lowers your ride height would require that.  (I used DAD racing seats.) I know you said you didn't want to make brackets, but I made some out of some scraps of steel. Just had to spend a weekend measuring and drilling, no welding. You will need to mod your rails, or buy others, but they are much more comfortable for the butt and particularly the thigh region for the big guys.  IMO they are about the biggest seat that you can squeeze in there.  Now they are relegated to my minivan, and I have the Recaro RZ seats going in my FD so I can "save weight" and spend tons more $.
I?ll add some pics here later

 
Option 2 - is the Recaro RZ seats as much as I hate to say it since they are so incredibly pricey. They fit big guys really well, are very comfortable, with easy ingress/egress vs. the Recaro SPGs.
If you want to step up to another (IMO better) setup the spirit r recaro seats are real comfortable vs. stock, lower your ride position and crazy light. They also fit the FD like a glove as they are made to sit in the funky space required by the FD. But they are not reclineable, though the angle is just right and quite comfy.  If you can get the pricey factory rail they do allow a bit of tilt and adjustment as well.  But be warned they are Balla Dolla?s !$!$!$  This is one part of my build that I went way over any imaginable budget, and have a good amount of guilt associated with that fact.  Oh well?
I?ll post pix as I get these installed.
absolute power corrupts absolutely  :yay:
93 FD widebody - destroked
69 Suburban - positive manifold pressure
72 Blazer - 6.0, 6speed 4wd
65 Impala - 5.7
59 cad  - 5.3
53 spartan - crash pad status

Offline 65imp

Re: 65imp's TVR build
« Reply #11 on: May 14, 2010, 05:05:32 PM »
Quote from: RAPID;561577
Mirror, mirror on the wall
who has the lightest FD of all ?
Probably you. I was curious about this "Sneak attack" engine so I googled it.
HSPN News
Is this what your planning ? A high reving short stroke ? I'm looking forward to more updates on this great build.

I was wondering if anyone read through this thread close enough to recognize that comment.  Your sleuthing skills are up to snuff, and you are on the right track...

Quote from: bosscobra;561696
god there motors are expensive, although an 8k rpm rebored ls2 with ls7 top end would be nice, im gona save myself about 8-10k tho and stick with the 6800-7200rpm peak power i had initially planned for. oh and cant wait to see some more build pics. gota stay entertained and motivated somehow

Yeah, the cost was the main reason for me not going with katech.  But if you check Hyperion's thread you can see what kind of a product they deliver.  IMO it is worth the $ to get an engine from an outfit like them if you can stomach the cost.  Shoot, GM farms out their race engines to katech, that tells ya something.  I on the other hand had to do it my way to save some $.  I'll let you know how that went shortly.  :naughty:

In case i don't get to posting the details on the engine for a while I figured a teaser pic would tide us over:

absolute power corrupts absolutely  :yay:
93 FD widebody - destroked
69 Suburban - positive manifold pressure
72 Blazer - 6.0, 6speed 4wd
65 Impala - 5.7
59 cad  - 5.3
53 spartan - crash pad status

Offline 65imp

Re: 65imp's TVR build
« Reply #12 on: May 14, 2010, 05:06:22 PM »
Quote from: mykah89;561631
- Pulled heater core and associated ducting/levers. Replaced with Mazda accordion adapter also lost long rubber hoses -~12 lbs.


Where did you get the adapter from, and will that still allow you (or me) to run AC still if we wish, or does that pretty much nix it all.

Part number is FD01-61-150b, it's about $38. It's the duct that goes from the blower motor to the heater core. It is basically an accordian tube that connects the fan under the dash(far passenger side) to the ducting apparatus in the mid area under the dash.  It is used if you remove the evaporator (middle box unit under the dash) from the a/c system.  I also removed my heater core, as I won;t be using it either.  I did choose to retain the fan to blow of the windows, or blow air on myself and passengers.
absolute power corrupts absolutely  :yay:
93 FD widebody - destroked
69 Suburban - positive manifold pressure
72 Blazer - 6.0, 6speed 4wd
65 Impala - 5.7
59 cad  - 5.3
53 spartan - crash pad status

Offline 65imp

Re: 65imp's TVR build
« Reply #13 on: May 14, 2010, 05:07:16 PM »
Ok so my engine arrived eventually as you could ascertain in the teaser picture I posted.  Time to fill in the details.  Please bear with me as I write a fricken essay about the saga that has been this engine. 

Inspiration:

I read about the Katech Sneak attack engine which was a de-stroked, large bore build.  This type of build is often done to satisfy rule requirements for stock cubic inches, while improving the rev range on a race engine.  The Katech build uses the crankshaft out of a 5.3 engine and pairs it with the 4.125 head bore that the ls7 has.  This yields stock ls1 cubic inch numbers, but with a far more exotic top end that allows a 8k redline.  I know that more cubes equals more power under the curve, and I could likely go faster with less $ spent, but this sort of engine got me thinking. 

Later I read a post by gnx7 over on ls1tech about an engine build with lightweight internals/reciprocating mass revving incredibly smoothly and quickly.  This transformation was dramatic for some hardcore road racer.  I thought that sounded like a good match for the FD chassis. 

 Anyone who is familiar with the rx7 club member atihun knows about his last FD build.  For those who don?t, he is a good friend who had a very nice, meticulous single turbo FD (definitely the nicest I have ever seen). He had just got his setup dialed in, and it was very impressive.  He told me if he were to blow his engine he would really have to consider the LS7 as it was very impressive.  I agreed, especially considering the exotic nature of many of the materials and components in the LS7.  I realized I did not want to upgrade my engine again after I got my car together.  I wanted it to be right the first time. 

I wanted a motor that would fulfill those requirements, and be a little bit different.  But there was no way I could shell out the kind of $ Katech wanted.  Shoot I didn?t even have the kind of $ a LS7 would run.  So I decided to try and apply the same budget strategy I use to get parts for cheap.  I spent a ton of time looking for deals on the main components I would need on the used market.  If I saved enough on the big stuff, and I spread it out over a long enough time, then I could likely get an engine setup that would fulfill my budget and my requirements. 

Essentially my goal is a ls1 with as light a reciprocating mass as possible, for easy revving and an exotic feel.  Also I wanted to build it for as high a safe rpm as possible to maintain longevity per my budget. 

Acquisition:


After watching craigslist, ls1tech, and eBay for a while I found a guy who was parting out his ls build after building an engine too radical for his corvette.  He picked up a crate engine, and then could not find a buyer for his expensive, custom engine that he puled out.  He was selling a bunch of stuff, but I got my Darton MID-sleeved block from him, as well as the Callies Magnum crankshaft with stock ls1 stroke.  The price for both items was less than 1.5k, so I felt pretty good.  As is normal in situations like this he had extra stuff like the Arp main studs, cometic gaskets, speed pro bearings, and billet main caps that he threw in since he would not be using them.  With the 4.125 bore and the stock ls1 stroke I was looking at 388 cubes.  About the same as a ls2.  I wanted the extra strength and light weight of a quality aftermarket crank, and I knew it was a good deal.  I don?t think I could have found an aftermarket crank in the bore that the gm 5.3 crank has, and I was not going to be too much of a Nazi in following Katech?s recipe.  Also the darton block solved a couple issues that had not been resolved at the time of this build.  Things like Hyperion has cataloged in his ls7 swap thread.  In addition the Darton MID liners are the thickest, highest quality liners made for an ls application.  Since they were properly installed, it is about as bulletproof as I could get. 


After that I got ls7 titanium rods off eBay for ~400 bucks and some fully assembled stock ls7 heads/valve covers from Puerto Rico for about 1k off a wrecked corvette.  At the time I could not believe my luck as it was the first year the ls7 had been out. 


Then the stuff went off for some touch ups to various professionals who improve the stock stuff:

-Ls7 ti rods went to Katech for rebushing with a bronze insert.  They had a post about that being the only weak link they had found in their testing of ls7 rods.  I figured the insurance was worth it for my build.  Also I went with their rod bolts for the titanium rids, as no one else makes them, and for this build there was a great deal of concern over these important pieces of hardware.  Jason over there was kind enough to handle all this quickly and efficiently. 

-I sent the stock 1.8 roller rockers for the ls7 off to Harland sharp for re-building, and as an extra measure of insurance. 

-I got a rev-kit from ray-mac racing to extend the high rpm potential of my engine.  Effectively this supports the lifters with springs to lessen high rpm strain on the valvetrain.  In the end my engine builder chose to go in a different direction.  So I did not end up using this.   

-Heads with Ti intake valves and Sodium filled exhaust valves went to Tony Mamo for porting along with the ls7 intake I got from a guy brand new on ls1tech for a couple hundred bones.  He ported and flowed everything before sending it off to my engine builder.  Here are the flow values Tony sent me afterward:

Intake

.200.....171
.300.....252
.400.....320
.500.....359
.550.....375
.600.....381
.640.....384

Exhaust (w/ 1.875 pipe)

.200.....128
.300.....180
.400.....219
.500.....239
.600.....252
.700.....258
Quick not on flow bench numbers:
After reading and viewing a lot of flow numbers I have come to realize that they are a lot like dyno numbers.  Some shops post higher, some post lower.  Tony?s flow numbers are always on the more conservative side as he flows stuff without some of the flow bench ?tricks? that show gains artificially to improve sales.  A lot like dyno tricks that improve dno numbers, but show no gains at the track.  For this reason it is hard to compare numbers from location to location.  But if one shop has flowed a lot of stuff independently then you can compare numbers between items flowed at that same shop.

Also he sent me some pix after he finished, just before shipping:


Tony also assembled my heads with springs/retainers he recommended for my application that would be good to 8k. 

Also got some Used ARP head studs used for a great deal, and a set of the Cadillac racing lifters for the build.

Assembly:

This part took the most time.  I did not know an engine builder I trusted enough to make sure all this stuff worked well/ had good longevity/made good power/ I could afford.  After a great deal of research on ls1tech I decided HKE was the way to go.  Erik Koenig has a great reputation building engines on the LS platform.  His rep is the best engine work available by one of the most knowledgeable in the business at a very reasonable price.  In my experiences I found all of this to be very true.  Unfortunately the time side of things got stretched beyond what most would deem reasonable. 

Long story short.  My engine took 2 years to be assembled.  The first 9 months were a waste as I was not put on his engine waiting list due to a clerical error.  After that his shop was no longer doing work for individuals as they had a ton of race teams with more $ breathing down their neck to have work done.  Therefore my project was a low priority.  The remaining time was soaked up by various floods of their building in Texas, special part orders, and adjustments to my special parts.  All in all I think nothing but the best about their shop, but they could really use some clerical/organizational help.  But then the cost goes up?  You get the picture. 
Here are the parts Erik added to the mix, in addition to making all my parts work together:

Custom HKE Cam 240 / 252 115+3
Manton Custom Pushrods - 3/8ths Diameter .095 Wall
Melling LS1 oi... Melling LS1 oil pump HV # 10296
Wiseco Custom Pistons 4.135

Plus a ton of stock parts and ARP hardware. 

Erik got everything together and my engine arrived 1 month ago today August 11th, 2009.  And there was much celebration.   :yay:


Above is a picture after bolting up my ls6 valley cover, and waterpump.

In the end the engine ran me somewhere ~9k and I got to keep my stock tach redline.


absolute power corrupts absolutely  :yay:
93 FD widebody - destroked
69 Suburban - positive manifold pressure
72 Blazer - 6.0, 6speed 4wd
65 Impala - 5.7
59 cad  - 5.3
53 spartan - crash pad status

Offline 65imp

Re: 65imp's TVR build
« Reply #14 on: May 14, 2010, 05:08:10 PM »
Quote from: rx7what;566484
So do you have a time frame for when you want the car to be done, or at least done enough to drive?

Looks great are we going to be able to see this bad boy when we come down for seven stock? Just trailer it over like mark did last year.

My self imposed deadline is the birth of my second kid ~beginning of December.  I need the thing on the ground and mechanically done by then.  If I still need paint and tuning that is fine. 

I wanted to have most of the stuff that requires the car up in the air completed if I was going to trailer it to sevenstock.  We decided to get pretty crazy with the wiring harness and soaked up about a week, so no dice.  I will invite anyone who wants to take a look over between sevenstock and the steaks and beers event on Sat.  Some of the Nor-Cal guys are stoppin by for beers Fri. night, so I'll get their input then as well. 

I'll work on an update once I get some more info ready.
absolute power corrupts absolutely  :yay:
93 FD widebody - destroked
69 Suburban - positive manifold pressure
72 Blazer - 6.0, 6speed 4wd
65 Impala - 5.7
59 cad  - 5.3
53 spartan - crash pad status