May 21, 2024, 09:54:31 AM

Author Topic: FC3S Differential removal/installation process.  (Read 69847 times)

Offline bikedad

FC3S Differential removal/installation process.
« on: October 16, 2010, 10:00:34 PM »
I use 2 hydraulic floor jacks for this process. (Some people use 2 bottle jacks and a floor jack)

Edit: If your differential has never been out of the car you should do multiple applications of PB Blaster at all the bolting locations as well as the axle splines at the hub.
It will help in dis-assembly. (This was my third time swapping the diff in my car)

1)Loosen lug nuts and jack up rear of car at diff pumpkin.


2)Jack stands on frame rails just in front of diff cradle


3)Remove rear wheels


4)Disconnect exhaust if applicable (Do not need to remove)


5)Unbolt rear sway bar on both sides from top of link and rotate upwards out of the way


6)Unbolt axle shaft nuts at stub shafts on diff. This works well with an impact wrench otherwise you will have to possibly vise grip the rotor. I use a piece of rubber to protect from the jaws of the vise grip.


7)Remove rear brake caliper and tie up to springs.


8)Unbolt bottom shock mounts and move aside


9)You do not need to remove the axle shaft from hub. If removing axle shaft then use 32mm socket. Again, impact wrench is your friend or you might have to vise grip the rotor once again.


10)The axle shaft is spring loaded. Push cup toward hub to remove from stub shaft. The axle should slide out from hub at this point. If not then manual manipulation with hammer and 2x4 to release from hub spline. (Caution! This could separate your wheel bearing at this point depending on the severity of rust holding the axle in the spline)


11)You can see with this picture that the cup is removed from the stub shaft and the axle is just hanging.


12)Unbolt drive shaft at pinion flange. (Do not lose special shoulder bolts) Push Driveshaft forward and drop down or remove from transmission. (Trans fluid could leak out if you remove)


13)Unbolt Sublink bar from diff cradle


14)Center a floor jack under diff cradle just under pinion and jack up just enough to apply pressure and  keep in place when removing subframe brackets on left and right side of subframe.


15)Position the other floor jack directly under the pumpkin of the differential and jack up to apply pressure but not lift.


16)Remove the bolts for differential mount to body and slide the bottom bushings off.


17)At this point lower both jacks simultaneously to keep the cradle and differential level until the cradle/differential mount guide bolts coming from the body are almost completely through but not all the way out of the guide holes.


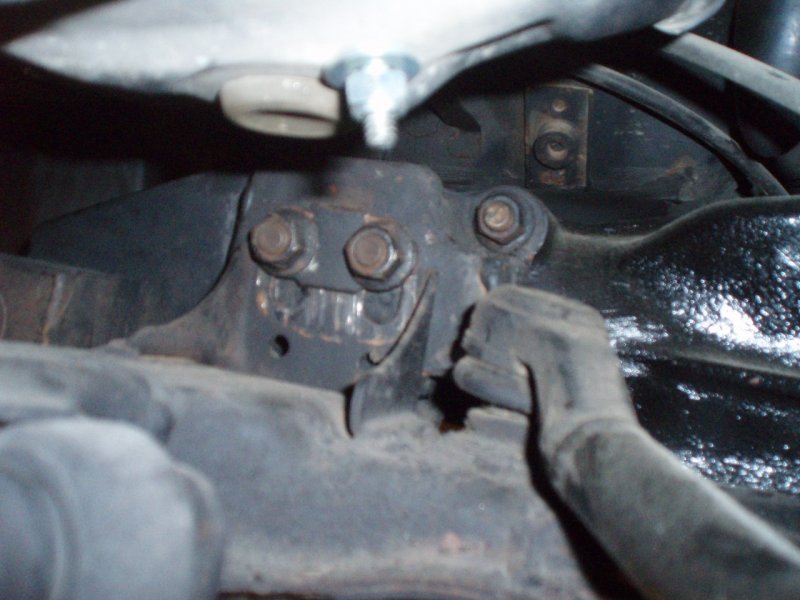
18)Unbolt the 2 pinion mounting bolts holding the differential pinion to the cradle and remove the 2 hole washer.


19)Lower both jacks some more but again keep level and don?t let the front cradle guide bolts completely come out of the guide hole in the bushings


20)Now just lower the differential to slide off the guide bolts coming from the body. Let it angle down to slide the pinion mount up and off the cradle mount. Just keep lowering until you can slide the differential out from underneath the car.


Installation is the reversal of the steps.
A note of caution, once the differential is slid back in place and the 2 pinion mount bolts slid up and over the cradle mount be sure to raise the cradle and differential simultaneously and level. If you don?t the assembly will get hung up on the cradle/diff guide bolts and you will have to employ the use of crow bars to realign.
This whole process can be done by one person but 2 are so much easier.
Approximate time of completion from jacking the car up to dropping off the jack stands is 3 hours for one person.

I took my beer break after the car was dropped off the stands.


« Last Edit: October 17, 2010, 10:41:32 AM by bikedad »
Don Teifke  :drive:
[smg id=8489]
"Life is tough.,, Life is even tougher if you're stupid."
-----John Wayne-----

Offline bikedad

Album: FC Diff Removal
« Reply #1 on: October 16, 2010, 10:21:37 PM »
 :cheers:
« Last Edit: October 16, 2010, 11:02:27 PM by bikedad »
Don Teifke  :drive:
[smg id=8489]
"Life is tough.,, Life is even tougher if you're stupid."
-----John Wayne-----

Offline digitalsolo

Re: FC3S Differential removal/installation process.
« Reply #2 on: October 17, 2010, 12:11:31 AM »
Very nice.  :)
Blake MF'ing McBride
1988 Mazda RX7 - Turbo LS1/T56/ProEFI/8.8/Not Slow...   sold.
1965 Mustang Coupe - TT Coyote, TR6060, modern brakes/suspension...
2007 Aston Martin V8 Vantage - Gen V LT4/TR6060, upper/lower pullies, headers, tune.
2021 Tesla Model 3 Performance - Stock...ish.

Offline mpcv2000

Re: FC3S Differential removal/installation process.
« Reply #3 on: October 17, 2010, 12:13:32 AM »
Good infos.
I'm swapping my S5 diff. for a S4 diff so this thread will become handy.
Martin !

Offline bikedad

Re: FC3S Differential removal/installation process.
« Reply #4 on: October 17, 2010, 09:27:29 AM »
Good infos.
I'm swapping my S5 diff. for a S4 diff so this thread will become handy.
If your diff has never been out one step to do the a couple days before is use PB Blaster on all the bolt locations. Do a couple of applications.

Is your current S5 diff a TII? if not then you'll need to get TII axles as well because the cups are larger for the S4 TII than the GXL NA diffs.
Also spray the axle splines at the hub if you're replacing the axles shafts.
If your current diff is an S5 TII then you're good to go. It's a direct swap.
« Last Edit: October 17, 2010, 10:42:00 AM by bikedad »
Don Teifke  :drive:
[smg id=8489]
"Life is tough.,, Life is even tougher if you're stupid."
-----John Wayne-----

3 fingered willy

  • Guest
Re: FC3S Differential removal/installation process.
« Reply #5 on: October 17, 2010, 08:12:09 PM »
 Approximate time of completion from jacking the car up to dropping off the jack stands is 3 hours for one person.

I took my beer break after the car was dropped off the stands.
[/quote]

3 HOURS????? :o

I can have my rear out in a half hour!!!! Same precedure. 8) Of course I have air tools lol. When I did my 8.8 swap I had it in and out 6 times in one day lol. :D

3 More the next day lol. Then I was done lol!

My favorite tool in my box is the Snapon IM31 3/8 drive impact gun, then would be the swivel impact sockets sets both standard and metric. Makes life MUCH easier! :D

Offline bikedad

Album: FC Diff Removal
« Reply #6 on: November 13, 2010, 07:13:48 PM »
See this new post for pinion brace installation....

http://www.norotors.com/index.php?topic=3659.new.html#new


« Last Edit: November 13, 2010, 08:29:10 PM by bikedad »
Don Teifke  :drive:
[smg id=8489]
"Life is tough.,, Life is even tougher if you're stupid."
-----John Wayne-----

Offline jim3

Re: FC3S Differential removal/installation process.
« Reply #7 on: November 13, 2010, 08:01:28 PM »
When I talked to Ray about noon and said you guys had been drinking beer all morning and were pretty well loaded, I think he wasn't kidding.
You can make a barn door fly with enough horsepower.

Retirement at last.  Wife's not happy, I bought a '66 Rustang instead of paying off my F150.

Offline Rayminator

Re: FC3S Differential removal/installation process.
« Reply #8 on: November 13, 2010, 08:22:02 PM »
When I talked to Ray about noon and said you guys had been drinking beer all morning and were pretty well loaded, I think he wasn't kidding.

Put that set-up on your car, and never think about the pinion mount breaking again. This is what I ran on my FC for 42,000 miles and 112, 1/4 mile passes. It allows up / down movement of a little over 1/16". The bolt is not tightened, ( a lock nut is used) but left somewhat loose, one hole is larger than the other, the difference in the hole sizes is 1/16" with the play at the top. Once driven, it is obvious that the pinion does in fact move up & down.........under up and down shifts.

During this installation, the crossmember bushing holes,  have been filled in to reduce excessive play. Try it you will like it.

Offline bikedad

Album: FC Diff Removal
« Reply #9 on: November 13, 2010, 08:34:00 PM »
Repost
Don Teifke  :drive:
[smg id=8489]
"Life is tough.,, Life is even tougher if you're stupid."
-----John Wayne-----

Offline bikedad

Re: FC3S Differential removal/installation process.
« Reply #10 on: November 13, 2010, 08:35:31 PM »
When I talked to Ray about noon and said you guys had been drinking beer all morning and were pretty well loaded, I think he wasn't kidding.

We were on our way back from home depot with some JB Weld metal epoxy to fill the front cradle bushings to help prevent forward and back movement.
This is a trial so we'll see what happens with the process. Stay tuned.


Don Teifke  :drive:
[smg id=8489]
"Life is tough.,, Life is even tougher if you're stupid."
-----John Wayne-----

Offline jim3

Re: FC3S Differential removal/installation process.
« Reply #11 on: November 14, 2010, 08:19:04 PM »
Okay, I see what Ray was talking about now.  With the brace in place I don't know if you will notice that.  Keep us informed.
You can make a barn door fly with enough horsepower.

Retirement at last.  Wife's not happy, I bought a '66 Rustang instead of paying off my F150.

Offline Rayminator

Re: FC3S Differential removal/installation process.
« Reply #12 on: November 14, 2010, 09:00:55 PM »
Okay, I see what Ray was talking about now.  With the brace in place I don't know if you will notice that.  Keep us informed.

It will minimize, front to rear movement. They actually make solid aluminum bushing for that location.

Offline Andrew R

  • Supporting Member
  • Launching!
  • Posts: 1270
  • Superunnatural
  • View Gallery
    • View Profile
Re: FC3S Differential removal/installation process.
« Reply #13 on: November 15, 2010, 07:41:06 AM »
I usually just drop the whole subframe.

Offline Digi7ech

Re: FC3S Differential removal/installation process.
« Reply #14 on: November 24, 2010, 02:17:50 PM »
Dropping the subframe is easier. You then get to sit down and unbolt everything instead of working around the chassis.

Also,
The JB/Rubber bushing won't last long.

Solids and rubber don't mix. The JB weld will probably flex the rubber and tear it or it will crack and fall out.

You either stay rubber or you go solid. Mixing the two won't work for long.
Drifting and Road Racing || 88 FC w/ 13bt || 87 FC TII Track project || 03 G35 VIP Sedan